
Breathing new life into old furniture is one of the most satisfying DIY projects you can tackle. The basic steps are always the same: clean, sand, prime, and paint. But getting that flawless, long-lasting finish that looks professionally done? That's all in the prep work and a few insider tricks.
Why Upcycling Furniture Is Worth the Effort
There’s something special about taking a tired, forgotten piece of furniture and turning it into a bespoke treasure for your home. It’s more than just a lick of paint; it’s about creating something with character, a story you can't just buy from a flat-pack box. You’re not just redecorating; you're giving something a second chance.
This isn’t just a niche hobby anymore, either. The whole world is catching on. In fact, the global furniture repair and restoration market is expected to be worth a massive $2.5 billion by 2025. People are actively choosing sustainability and the charm of upcycled pieces over buying new. When you decide to paint that old chest of drawers, you're part of a bigger, more mindful movement.
Choosing the Perfect Candidate for Paint
Your success story starts with picking the right piece. Solid wood furniture—think old pine or oak dressers, tables, and cabinets—is your best bet. These pieces are built to last and provide the perfect canvas. That dated, orange-pine dresser that’s been gathering dust in the spare room? It might look a bit grim now, but its solid bones make it the ideal candidate for a dramatic, colourful makeover.
Of course, not every piece is destined for a coat of paint. I'd steer clear of a few things:
- Valuable Antiques: Slapping paint on a genuine antique can completely tank its value. If you suspect you have something special, get it checked out first.
- Pieces with Major Veneer Damage: If the veneer is peeling and chipping all over, you're looking at a huge repair job that’s much more involved than a simple paint project.
- Furniture with Sentimental Finishes: If you love a piece because it was your grandmother's and you remember that exact wood grain, maybe don't paint it! There are other ways to refresh it without covering its history.
The trick is to pick a piece where paint will enhance its best features, not just hide its flaws or erase its value. A little bit of discernment goes a long way.
Choosing to upcycle is also one of the smartest budget-friendly home swaps that make a big impact, letting you totally transform a room without breaking the bank.
Gathering Your Essential Tools and Materials
A stunning painted finish is built on a foundation of having the right tools and materials ready to go. Trust me, having everything you need before you start not only saves you from those frustrating mid-project trips to the hardware shop but also sets you up for a much smoother process. Think of this as your complete shopping list for a professional-looking result.

Getting this prep phase right is more important than ever. While DIY projects are booming in the UK—the market is set to be valued at a huge £18.78 billion in 2025—things like inflation and supply chain niggles can mess with the cost and availability of good quality wood and paint. A bit of careful planning with your shopping list helps you sidestep these headaches.
Your Core Preparation Toolkit
Before a single drop of paint touches your furniture, you need to create the perfect canvas. Skimping on these prep materials is a classic mistake, and it almost always leads to a peeling, uneven finish that just won’t last.
Here are the absolute non-negotiables for your prep kit:
- Sugar Soap: This stuff is essential for cutting through years of grease, grime, and old furniture polish. A simple wipe-down won’t cut it; you need a powerful cleaner to make sure your primer and paint can actually stick to the surface.
- Wood Filler: Perfect for filling in any scratches, dents, or old hardware holes. A good quality, paintable wood filler is your secret weapon for creating that flawlessly smooth surface before you even think about sanding.
- Sandpaper (Assorted Grits): You'll definitely need a variety. A medium grit (around 120) is great for the initial scuffing, while a fine grit (220+) is perfect for getting things silky smooth between coats of primer and paint.
- Primer: This is the magic ingredient for both durability and a rich, even colour. For older wood, a stain-blocking primer is vital. It stops those pesky tannins from bleeding through and discolouring your beautiful new paint job.
Choosing the Right Paint for Your Project
The paint aisle can feel a bit overwhelming, but understanding the key differences will help you choose with confidence. The finish you pick has a huge impact on both the final look and how well the piece holds up to daily life.
A common mistake I see is people choosing a paint based only on the colour. Durability and finish are just as important, especially for high-traffic items like a dining table or a chest of drawers.
Let's break down your main options:
- Chalk Paint: Famous for its velvety matte finish and needing very little prep work, it’s brilliant for achieving a rustic or shabby-chic look. It sticks to almost anything but always needs a protective top coat of wax or varnish to make it last.
- Satinwood or Eggshell: These offer a lovely, low-sheen finish that’s far more durable and wipeable than chalk paint. They're fantastic all-rounders for most furniture pieces, giving a modern, elegant look that stands up to wear and tear.
- Gloss: This one delivers a high-shine, reflective finish. While it's extremely tough and easy to clean, it highlights every single tiny imperfection on the surface, so your prep work has to be absolutely perfect.
Choosing the right paint finish is a crucial step for achieving the look and longevity you're after. To make it easier, here’s a quick comparison of the most popular options you’ll find in the UK.
Paint Finish Comparison Guide
Ultimately, the best finish depends on the piece of furniture and how you plan to use it. Think about the style you want and the wear and tear it's likely to face.
Gathering the right supplies is a smart investment that really pays off in the final result, much like finding clever ways to make your home renovation budget go further.
Getting the All-Important Prep Work Right
If there’s one lesson every seasoned DIYer learns the hard way, it's this: a stunning paint job is 90% preparation and only about 10% painting. Seriously. Trying to cut corners here is the fastest route to a finish that peels, chips, and looks generally awful in a few months.
So, let's walk through the non-negotiable prep work that will turn that tired old piece of furniture into a perfect canvas.

First Things First: A Proper Clean
Before a single sheet of sandpaper touches that surface, you’ve got to give the piece a deep clean. Over the years, furniture collects a stubborn film of grease, dust, and old furniture polish. Paint simply won’t stick to that.
And no, a quick wipe-down won’t cut it. Your secret weapon here is sugar soap and warm water. Grab a sponge and give every inch of the piece a good scrub, paying special attention to corners and detailed carvings. Once you're done, wipe away any residue with a clean, damp cloth and let it dry completely.
Making Imperfections Disappear with Wood Filler
Take a close look at your piece. It's likely got a few battle scars – little dings, scratches, or holes from old hardware. This is where wood filler comes in, helping you create that flawlessly smooth surface everyone wants.
Using a small putty knife, press a good quality, paintable wood filler into any dents or holes. It's a good idea to overfill them just a tiny bit, as filler tends to shrink as it dries. Let it harden completely (always check the tin for timings), then you can sand it back so it's perfectly flush with the wood.
The Art of Sanding
This is where the real transformation begins. The goal of sanding isn't always to strip the furniture back to bare wood. More often, you're just creating a ‘key’ – a slightly abraded surface that gives the primer something to really grab onto. For anything with a glossy or varnished finish, this step is absolutely essential.
The sandpaper grit you choose really depends on the state of your furniture.
- For high-gloss or varnished finishes: You’ll need to put in a bit of elbow grease. Start with a medium-grit paper (around 120-grit) to break through that shiny top layer. An orbital sander can be a lifesaver for big flat surfaces here.
- For matte or satin finishes: A light scuff with a fine-grit paper (something like 180-grit) is usually all you need to create enough texture for the primer to bond well.
- Between your coats of paint: A very quick, gentle sand with a super-fine grit (220-grit or even higher) will knock down any tiny bumps, leaving you with a silky-smooth finish.
After every round of sanding, wipe everything down with a tack cloth or a slightly damp microfibre cloth. You want to get rid of every last particle of dust.
Never underestimate the power of a proper clean and sand. Taking your time here guarantees the professional, long-lasting finish you’re aiming for. It’s the difference between a project that looks great for years and one that starts chipping in months.
Why You Can't Afford to Skip Primer
Finally, let's talk about primer – the unsung hero of furniture painting. A good coat of primer is crucial because it ensures your paint sticks properly, it creates an even base for your colour, and, most importantly, it blocks stains.
Older woods, especially things like pine or mahogany, contain natural oils called tannins. Without a stain-blocking primer, these tannins can slowly bleed through your beautiful new paint, leaving ugly yellow or pinkish blotches.
This is why a shellac-based or dedicated stain-blocking primer is your best bet for older pieces. Using the right one is what really unlocks the power of paint and lets you truly transform furniture without any nasty surprises later on.
Applying Paint for a Professional Finish
After all that meticulous prep work, we’ve finally reached the most satisfying part of the journey: the actual painting. This is where the magic happens and your piece begins its transformation. The secret to a finish that looks like it came from a high-end workshop isn’t just slapping on a thick coat of paint; it’s all about patience and technique.
If there's one golden rule to follow, it’s this: apply multiple thin coats instead of one thick one. A single, heavy coat is a recipe for disaster—it takes forever to dry properly, is prone to ugly drips and runs, and often leaves a lumpy, uneven texture. In contrast, building up two or three light, even layers gives you a beautifully smooth, durable, and professional-looking surface.
Choosing Your Weapon: Brush or Roller?
The tools you pick can genuinely make or break your finish. Knowing when to grab a brush versus when to reach for a roller is a simple trick that dramatically improves your results. It really just depends on which part of the furniture you're tackling.
- For detailed areas: An angled paintbrush is essential for intricate spots like chair legs, carved details, or narrow edges. A quality brush gives you the precision you need to work the paint into every nook and cranny without overloading the surface.
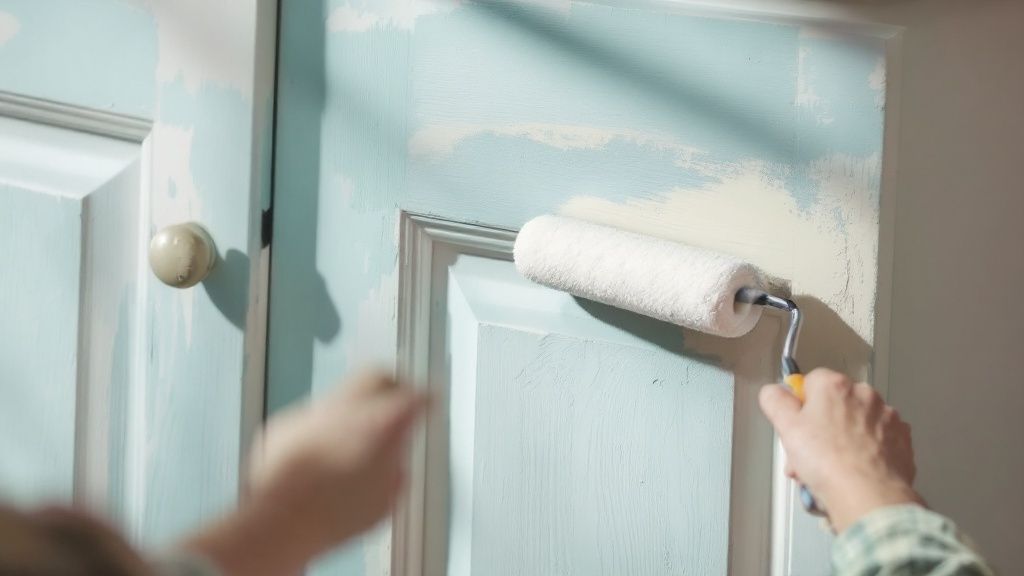
- For flat surfaces: A small, high-density foam roller is your best mate for large, flat areas like tabletops, drawer fronts, or cabinet sides. It lays down paint quickly and leaves a wonderfully smooth finish, free of the brush strokes that can be so tricky to avoid by hand.
A little tip I've learned over the years: always paint in the direction of the wood grain, even after you've primed. It’s a simple habit that works with the natural texture of the wood, creating a much more cohesive and polished look in the end.
The Art of a Flawless Application
To avoid those dreaded drips and runs, especially on vertical surfaces, be mindful of how much paint you load onto your tool. Less is definitely more here. Try dipping only the first third of your brush bristles into the paint, then gently tap off any excess against the inside of the tin rather than scraping it. This stops a big blob of paint from landing on your piece at the start of your stroke.
Patience with drying times is also crucial. Always check the manufacturer's instructions on the paint tin, as timings can vary quite a bit. If you get impatient and apply a second coat before the first is fully cured, you risk the paint dragging and creating a tacky, uneven mess. A good rule of thumb is to wait at least 4-6 hours between coats, but letting it dry overnight is even better for a harder, more resilient finish.
Looking for a little inspiration on how a new colour can completely revitalise a space? Have a look at these stunning paint colour ideas for your living room. It’s amazing what the right shade can do, both for your walls and your furniture projects
Protecting Your Work with the Right Top Coat
After all that hard work painting, the final step is what really counts for making it last. Applying a protective top coat isn't just a nice-to-have; it's the essential barrier that guards your beautiful finish against scratches, spills, and the general chaos of daily life.
Don't even think about skipping this stage on something that will see regular action, like a coffee table or your kid's dresser. If you do, you'll see scuffs and marks appear in no time. This final layer is what locks in the colour and gives your furniture the durability it needs to handle real life.
Choosing Your Sealant
The sealant you choose really comes down to the furniture's job. A high-traffic kitchen table needs a much tougher defence than a decorative bedside cabinet that just holds a lamp and a book.
Clear Finishing Wax: This is the classic partner for chalk paint. You apply it with a cloth, buff it to a lovely soft sheen, and it really brings out that velvety texture. The downside? It offers very little water resistance and needs re-doing every year or so, making it a no-go for hardworking surfaces.
Water-Based Varnish (Polycrylic): This stuff is a brilliant all-rounder. It's a clear coat that dries quickly, stays crystal clear without yellowing over time, and cleans up easily with water. It comes in different sheens (matte, satin, gloss) and is tough enough for most furniture projects.
Oil-Based Polyurethane: When you need maximum durability, polyurethane is your best bet. It creates a tough, plastic-like shield that's brilliant at resisting heat, water, and scratches. The trade-off is that it can give a slight amber tint, which might change the look of light paint colours, and the fumes are quite strong while you're applying it.
A great rule of thumb is to match your systems. If you used water-based paint, stick with a water-based top coat. You can put oil-based sealants over water-based paints, but it adds a layer of complexity and potential for things to go wrong.
Application for a Streak-Free Finish
Getting your top coat on properly is the secret to avoiding bubbles, streaks, or a cloudy look. Always go for a high-quality synthetic brush or a foam applicator when using water-based products.
The key is to apply thin, even coats. Use long, smooth strokes and move in one direction. Whatever you do, resist the urge to go back over an area that's already starting to dry—that's how you get streaks.
Let each coat dry completely, then give it a very light sand with 320-grit sandpaper. Wipe away all the dust, and then you're ready for the next coat. Two to three thin coats are usually all you need to create a robust, beautiful shield. For those looking to get the hang of different finishing touches, you can find other fantastic home improvement tips to elevate your space.
This kind of attention to detail is part of a much bigger trend. The UK's furniture repair industry, which includes upcycling projects like this, is set to generate around £284.7 million in 2024. It just goes to show how many of us are keen on giving old furniture a new lease of life.
Got Questions? Let’s Talk Furniture Painting
Even the most seasoned DIYer has questions mid-project. When you're transforming an old piece of wood furniture, it's totally normal to hit a roadblock or two. Here are the answers to some of the most common queries I get, designed to get you back on track and feeling confident.

Do I Really Have to Sand Before Painting?
Ah, the million-dollar question. I know it’s the step everyone is tempted to skip, but trust me, sanding is almost always worth the effort. Think of it less as a chore and more as creating the perfect 'key' for your primer and paint to really grab onto. This is what gives you a finish that lasts for years, not just a few months.
If the piece you're working on has any kind of glossy varnish or a slick, factory-smooth surface, then sanding is non-negotiable. If you don't, you’ll find your beautiful new paint job scratches or peels away with the slightest knock.
The only time you might get away with it is if you're using a specific 'no-prep' style chalk paint on a piece that's already raw or has a very matte finish. Even then, a quick scuff with some fine-grit sandpaper is what separates a good finish from a great one. You’re not trying to strip it back to bare wood—just knocking back the sheen is usually all it takes.
What Is the Best All-Round Paint for Furniture?
This is a bit like asking "what's the best car?" – it really depends on where you're going and what you want to do! There’s no single 'best' paint, because the right choice hangs entirely on the piece and the look you're aiming for.
For a modern, durable finish on items that will see a lot of action—like tables, chairs, or cabinets—a water-based satinwood or eggshell paint is a brilliant choice. They are tough, easy to wipe clean, and give a gorgeous, sophisticated low-sheen look.
On the other hand, if you're dreaming of a vintage, matte, or shabby-chic distressed vibe, chalk paint is your best friend. It’s incredibly forgiving and a joy to work with. But remember, if your project is destined for the garden, you absolutely must use a specialised exterior wood paint built to handle the unpredictable British weather.
A quick but crucial tip: whatever paint you land on, always pair it with a compatible primer. Using the right primer for your wood and paint type is the real secret to getting rich, even colour and a bond that genuinely lasts.
How Do I Avoid Leaving Brush Strokes?
Getting that coveted, super-smooth professional look is all about technique and tools. First things first, invest in a high-quality synthetic brush. Cheap brushes are a false economy; they’ll just end up shedding bristles all over your lovely new finish.
The real trick is to apply multiple thin, even coats of paint rather than trying to slap on one thick, gloopy layer. And for big flat surfaces like a tabletop or the sides of a dresser, a small foam roller will give you a flawless, stroke-free finish every time.
Here's another pro tip: try a paint conditioner (sometimes called an extender). Adding just a little bit to your paint slows down the drying time ever so slightly. This gives the paint a chance to level itself out, making those pesky brush marks magically disappear as it cures.
How Long Until I Can Actually Use My Painted Furniture?
Patience is key here, especially when we talk about 'curing' time. Your furniture might feel dry to the touch within a few hours, but it isn't fully cured. Curing is the chemical process where the paint hardens to its maximum strength and durability.
This process can take anywhere from 7 to 30 days, depending on the type of paint you used, plus the temperature and humidity in the room. A good rule of thumb is to be extra gentle with the piece for the first week. Most importantly, don't place any heavy objects or anything with a hard edge on the surface for at least three weeks. This will prevent dents, imprints, and scratches from ruining your beautiful new finish.


