
A disorganised craft space can stifle inspiration before it even begins. When your essential supplies are jumbled together in drawers or lost at the back of a cupboard, creative energy is wasted on searching rather than making. This guide offers ten transformative craft storage ideas designed to bring order, efficiency, and beauty to your dedicated workspace. We move beyond generic advice to provide specific, actionable solutions that you can implement immediately to reclaim your creative sanctuary.
We will explore a range of practical systems, from versatile pegboards and mobile rolling carts to clever repurposing of everyday household items. You'll learn how to tackle everything from tiny beads and delicate threads to bulky fabric rolls and tubes of paint, ensuring every tool has its place. Our focus is on creating a system that not only works for your current projects but also adapts as your collection of materials inevitably grows. Prepare to transform your craft corner from a source of stress into a streamlined haven where your next masterpiece is always within easy reach.
1. Pegboard Storage System
A pegboard system is one of the most versatile and visually appealing craft storage ideas for reclaiming precious worktop space. Originating from workshops and garages, this method uses a perforated hardboard panel mounted on a wall, which you can customise with an array of hooks, shelves, and containers. This modularity allows you to create a completely bespoke organisation system that keeps your most-used tools visible and within arm's reach.
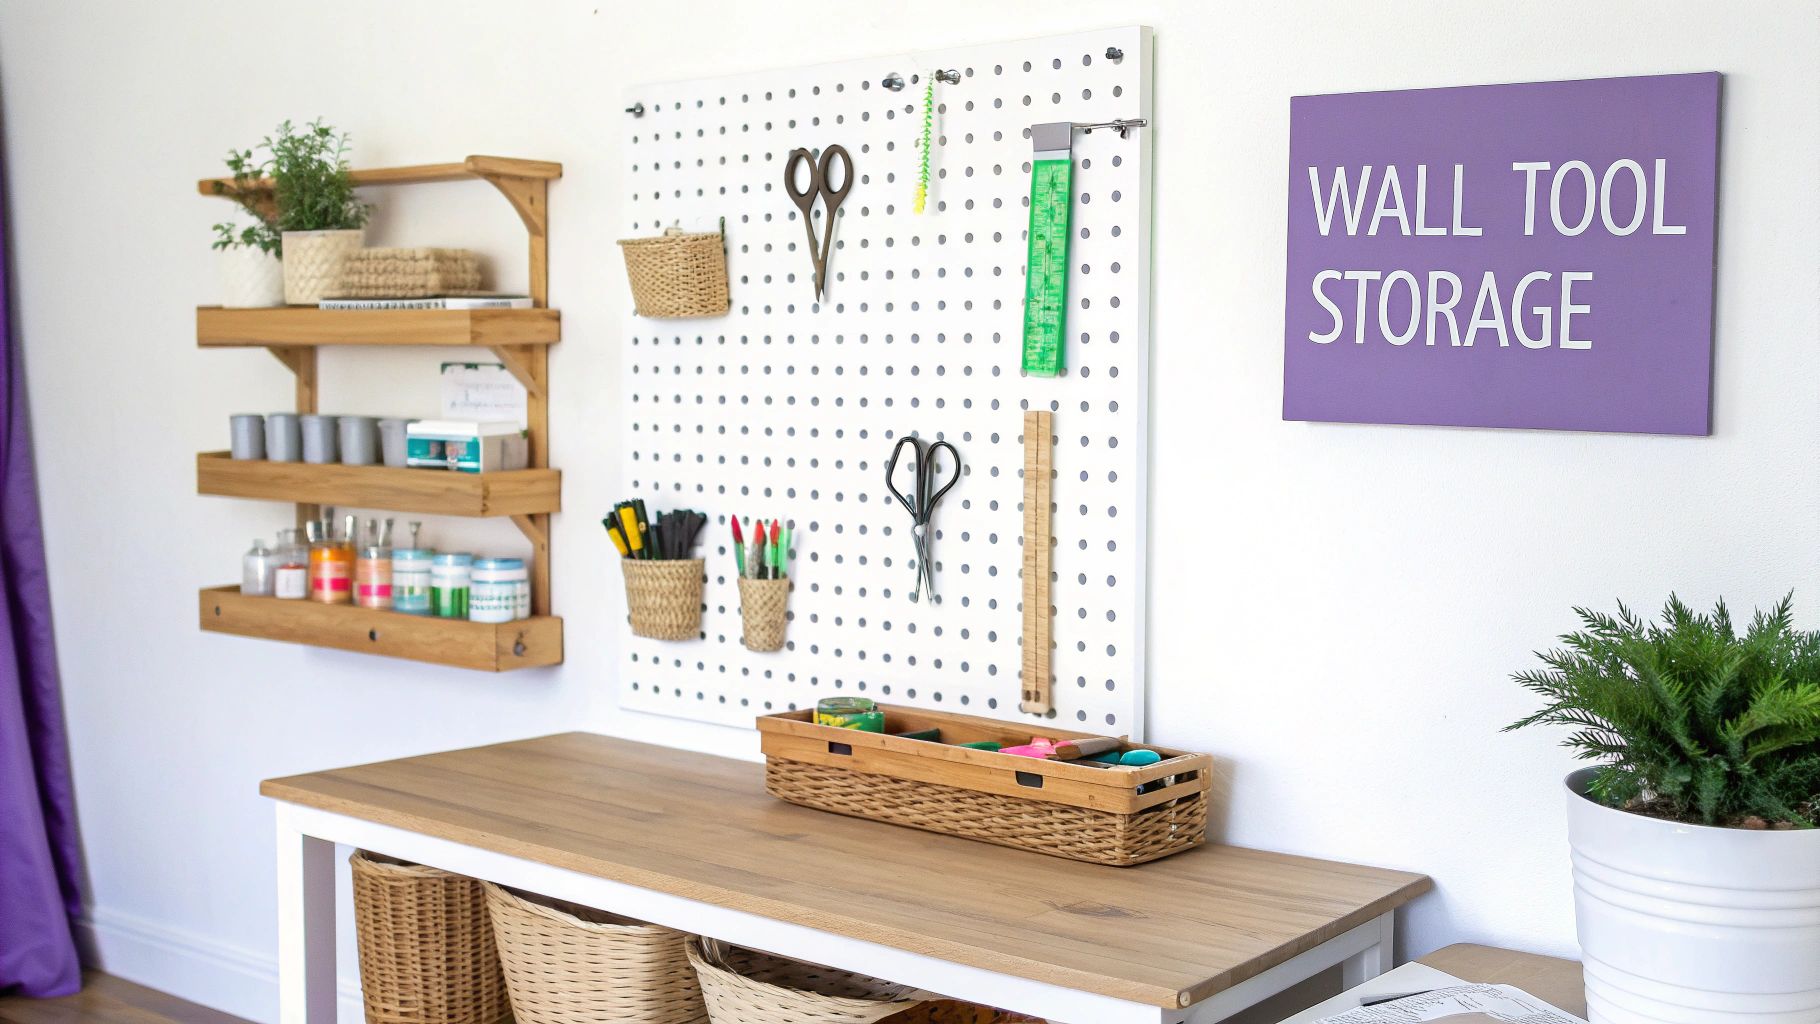
This solution is ideal for crafters who have a large collection of tools like scissors, pliers, and paintbrushes, or supplies like reels of ribbon and spools of thread. By going vertical, you free up your desk for active projects while ensuring everything has a designated home. Popular systems like IKEA's SKÅDIS series make it easy to start, but a simple sheet of pegboard from a hardware shop can be a brilliant DIY project.
Actionable Tips for Implementation
- Secure Installation: For heavier items, ensure you mount the pegboard directly into wall studs or use appropriate heavy-duty wall anchors. This prevents sagging and ensures safety.
- Create Zones: Group similar items together. Dedicate one area for cutting tools, another for adhesives, and a separate section for your yarn or threads. This makes locating what you need intuitive.
- Paint for Contrast: Consider painting your pegboard a bold colour that contrasts with your tools. A dark background can make metallic tools pop, improving visibility and adding a stylish design element to your craft room.
2. Clear Drawer Organisers
Tackling cluttered drawers is a common battle for any crafter, and clear drawer organisers offer a simple yet transformative solution. These transparent plastic trays and containers are designed to fit inside your existing furniture, creating tidy, designated compartments for all your supplies. By compartmentalising your materials, you can instantly see everything you own, turning a chaotic “junk drawer” into a functional, beautifully organised space.
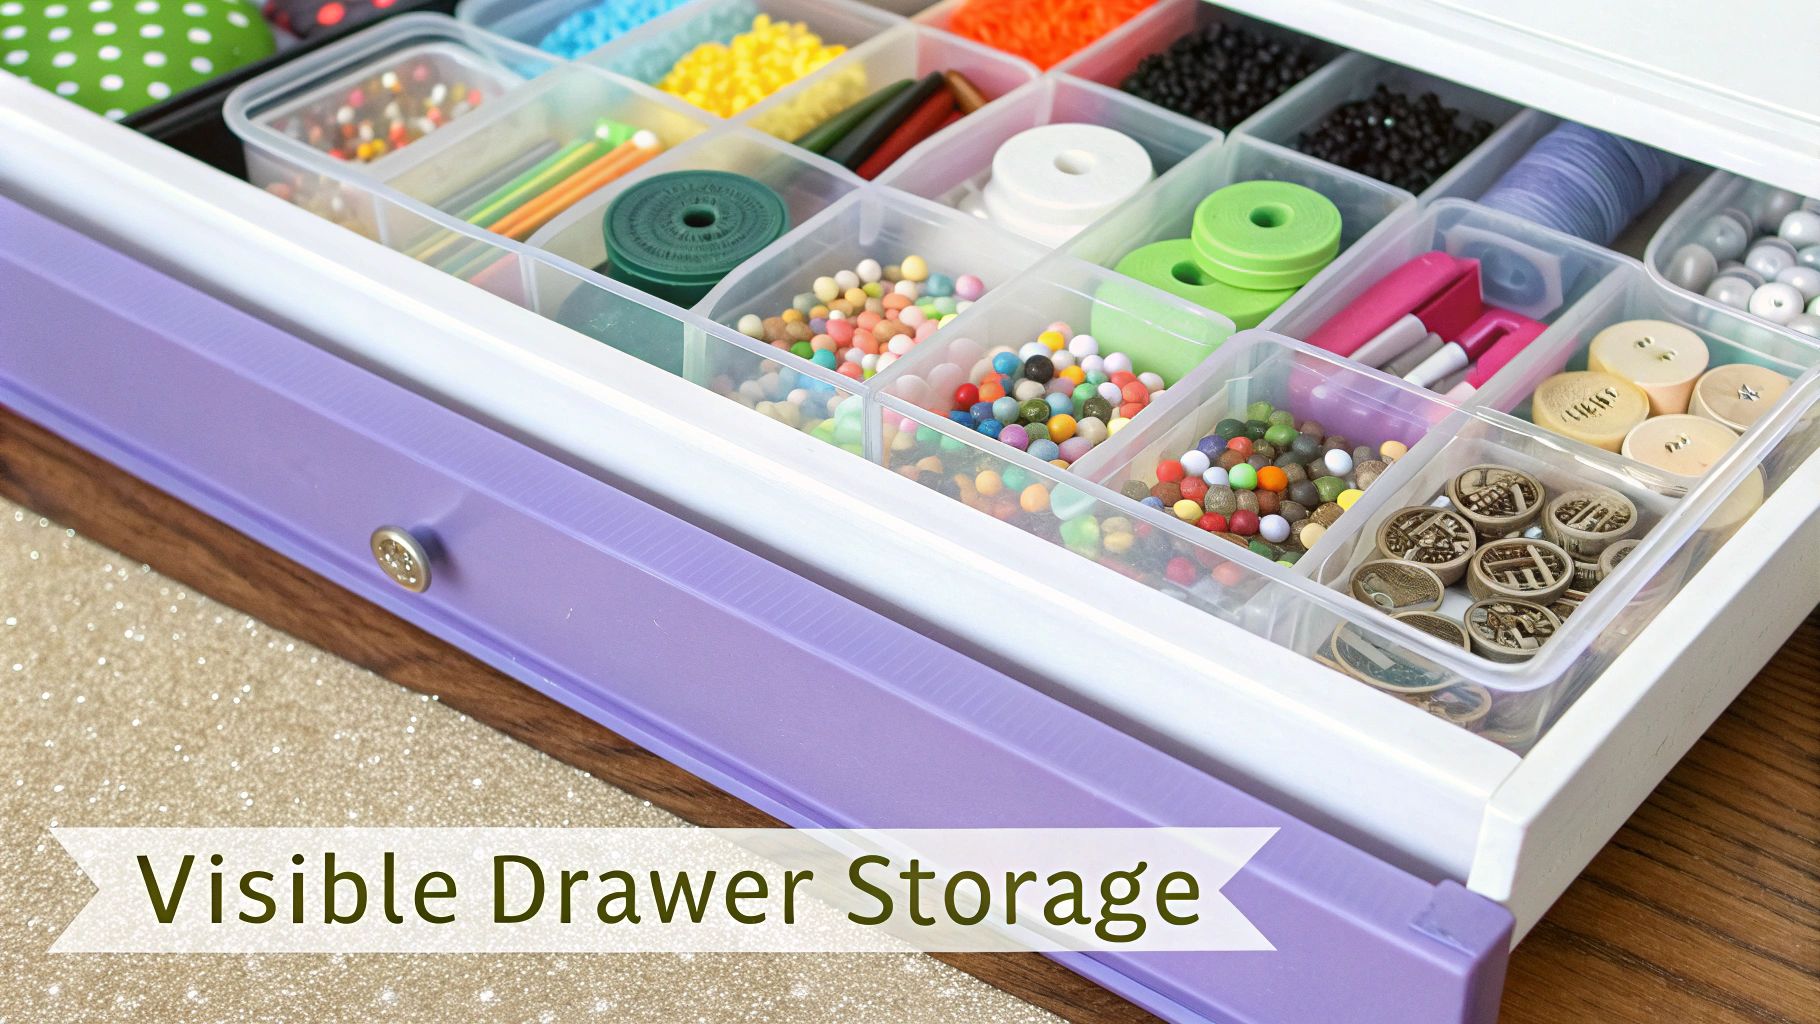
This method is one of the best craft storage ideas for managing small, easy-to-lose items like beads, buttons, sequins, and embroidery floss. Professional organisers and craft brands like ArtBin champion this approach because it maximises hidden storage space while keeping contents accessible. Systems from IKEA (GODMORGON) or The Container Store provide modular options, allowing you to mix and match sizes to perfectly fit your drawers and your collection. It’s an elegant way to maintain order behind closed doors.
Actionable Tips for Implementation
- Measure First: Before buying, carefully measure the internal dimensions of your drawers - length, width, and height. This ensures you purchase organisers that fit snugly without wasting space.
- Use Small Compartments: For tiny items like jewellery findings or beads, opt for organisers with multiple small sections. This prevents them from getting mixed up and makes them easier to grab.
- Consider Expandable Options: If your craft collection is growing, look for expandable drawer organisers. These can be adjusted to accommodate more supplies over time, offering a flexible, long-term solution.
3. Rolling Cart Storage
A rolling cart is the ultimate solution for flexible and mobile craft storage ideas, bringing your supplies directly to your workspace whenever inspiration strikes. These multi-tiered units offer a compact footprint while providing substantial storage that can be moved effortlessly between rooms. Popularised by home organisation bloggers and made famous by designs like IKEA’s RÅSKOG cart, this method allows you to keep your project essentials close at hand and then tuck the entire unit away to reclaim your space.
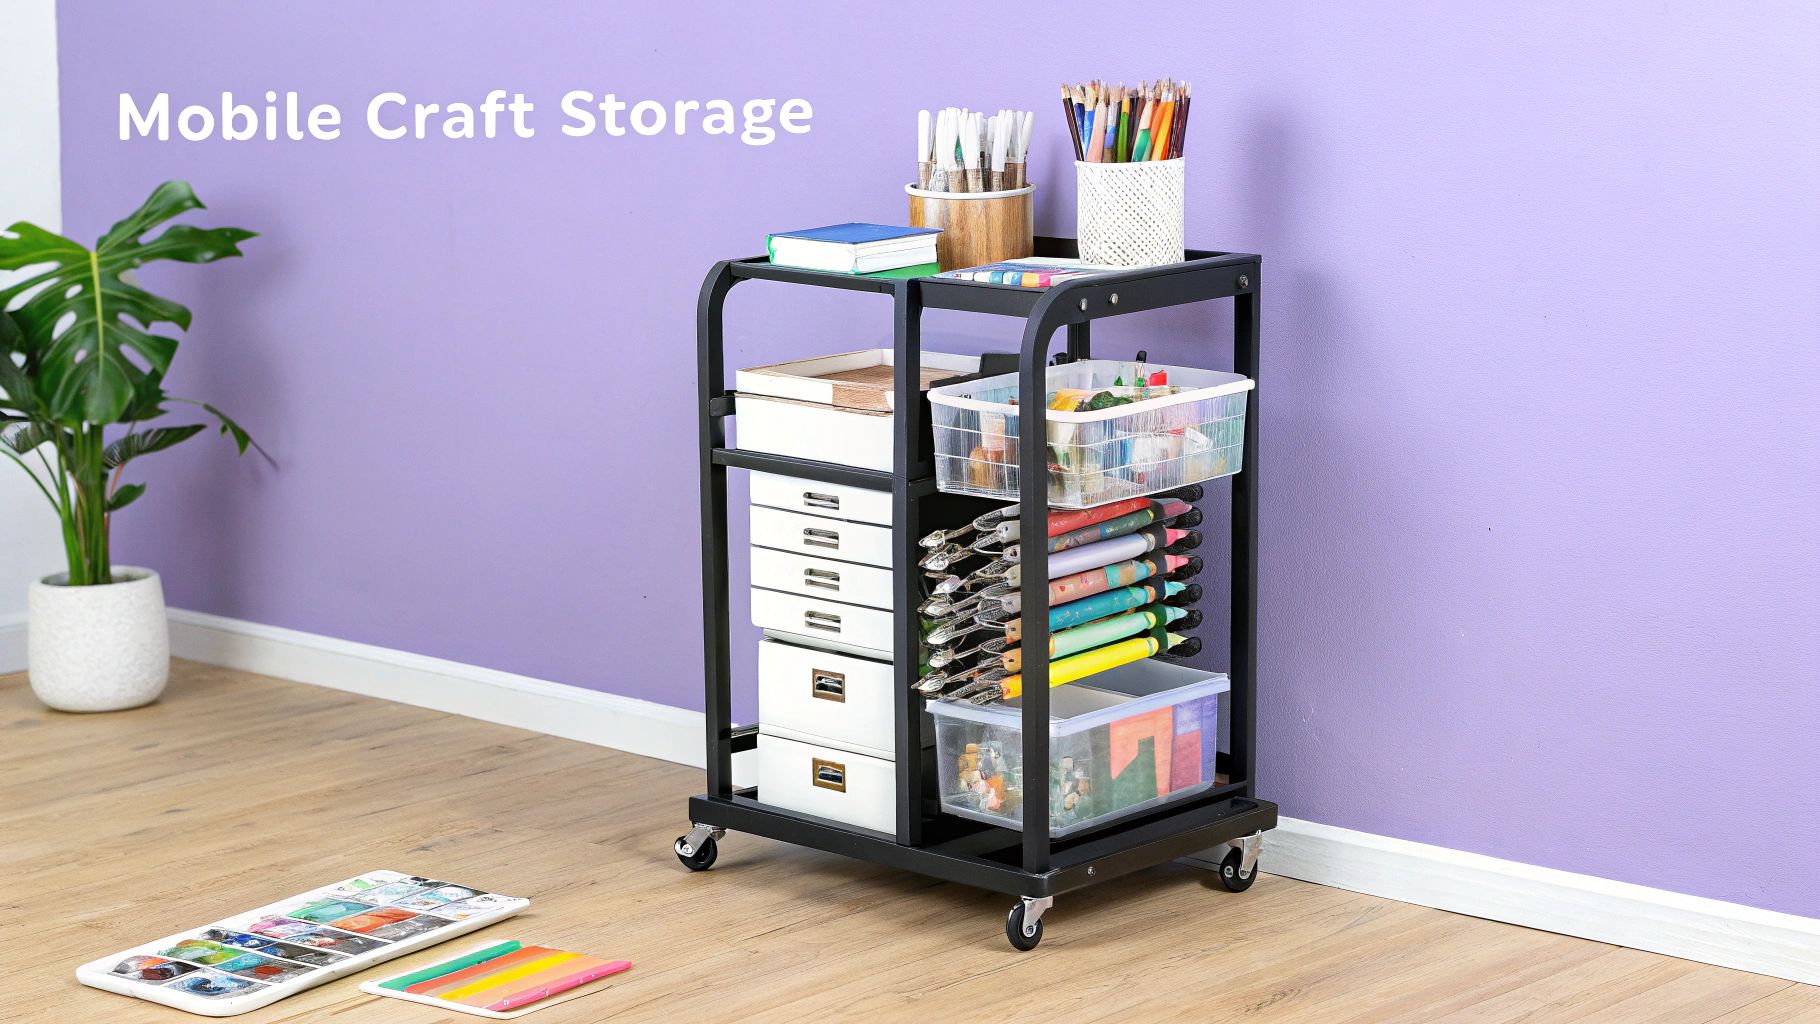
This idea is perfect for crafters who work in multi-purpose spaces, such as a dining room table or a living room sofa. A rolling cart can be organised to hold all the supplies for a specific craft, like knitting, painting, or jewellery making, creating a portable, dedicated station. When you're finished, the cart can be wheeled into a cupboard or corner, keeping your home tidy and your supplies neatly organised for the next session.
Actionable Tips for Implementation
- Balance the Load: Place heavier items like jars of paint or large yarn skeins on the bottom tier. This lowers the cart's centre of gravity, making it more stable and preventing it from tipping over as you move it.
- Contain and Categorise: Use small containers, jars, and drawer dividers within each tier to group similar items. This prevents smaller supplies like beads, buttons, and clips from sliding around and getting mixed up.
- Add Side Hooks: Maximise your storage potential by adding S-hooks or magnetic hooks to the sides of the cart. This is a brilliant way to hang tools like scissors, rulers, or washi tape for even quicker access.
4. Mason Jar Organisation
Mason jar organisation is a charming and highly practical craft storage idea, turning everyday glass jars into a beautiful display for your supplies. Popularised by rustic and farmhouse aesthetics, this method uses canning jars to store small items like buttons, beads, glitter, and twine. The clear glass provides instant visibility, so you can find exactly what you need without rummaging through opaque boxes, making your creative process much smoother.
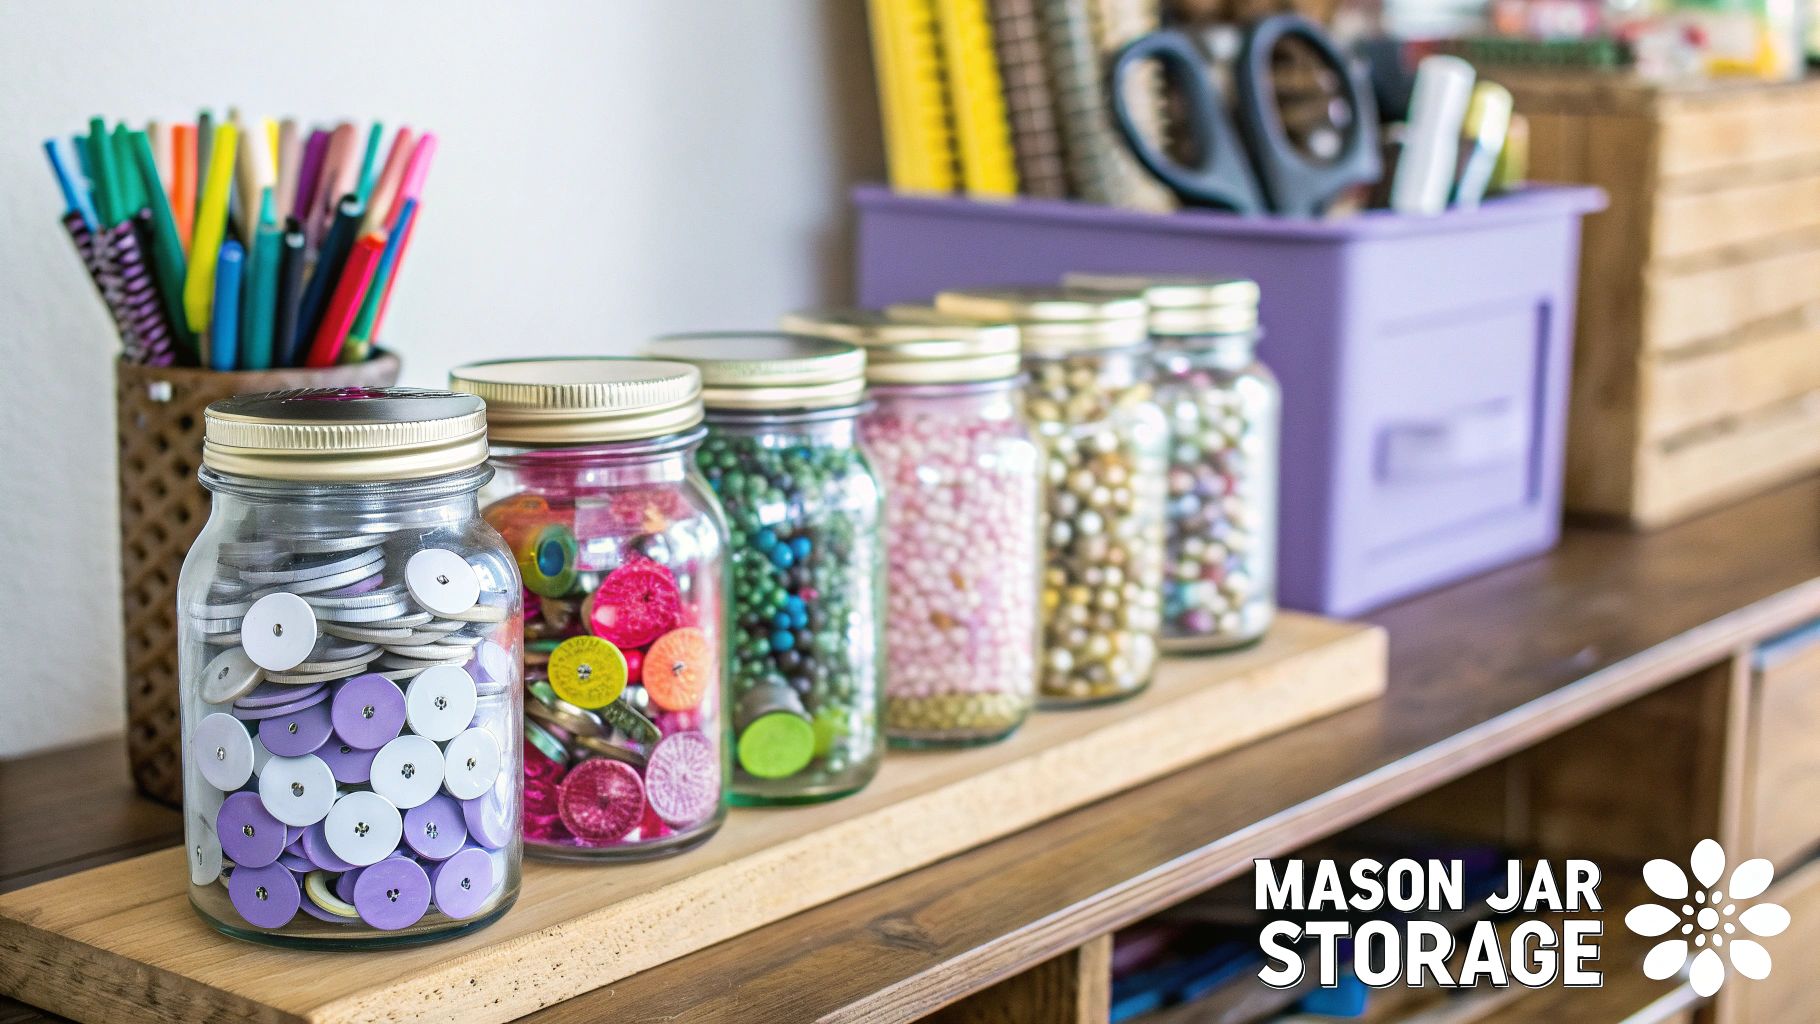
This eco-friendly solution is perfect for sewers, jewellers, and paper crafters who handle lots of tiny components. Jars can be neatly arranged on shelves, grouped by colour for a rainbow effect, or even mounted under a cabinet to save counter space. Beyond just storage, they add a touch of vintage, decorative flair to any craft room, proving that organisation can be both functional and stylish.
Actionable Tips for Implementation
- Mount Lids for Space-Saving: For a clever vertical storage solution, screw the jar lids to the underside of a shelf or cabinet. You can then twist the jar on and off, keeping your worktop clear while your supplies hang neatly overhead.
- Opt for Wide-Mouth Jars: Whenever possible, choose wide-mouth jars. They make it significantly easier to get your hands inside to grab items, especially bulkier supplies like pom-poms or washi tape rolls.
- Create Custom Labels: While the glass is transparent, labels are useful for distinguishing between similar-looking items like different types of glue or shades of glitter. Use a chalkboard pen or a stylish printed label to keep things perfectly organised.
5. Vertical File Storage
Adapting traditional office filing systems is a genius craft storage idea for managing flat materials like paper, vinyl sheets, and fabric remnants. Vertical file storage utilises filing cabinets, magazine holders, or dedicated file boxes to store these items upright, preventing creases, folds, and damage. This method makes it incredibly easy to flick through your collection and find the exact colour or pattern you need without rummaging through a disorganised stack.
This solution is a game-changer for scrapbookers with extensive 12x12 paper collections, quilters organising fat quarters, or Cricut users managing vinyl and heat transfer sheets. By keeping everything upright and categorised, you maintain the integrity of your materials and streamline your creative process. It transforms a potentially messy pile into a tidy, browsable library of supplies, making project prep much faster and more enjoyable.
Actionable Tips for Implementation
- Categorise with Folders: Use hanging file folders within a drawer or crate to separate materials by type, colour, or project. Add clear labels to the tabs for at-a-glance identification.
- Use Magazine Holders: For thicker items like cardstock packs or felt squares, sturdy magazine holders are perfect. You can line them up on a shelf to create a neat, uniform look.
- Prioritise Access: Store the materials you use most frequently at eye level or in the most accessible drawer. Seasonal or less-used items can be stored in lower drawers or higher shelves.
6. Magnetic Storage Solutions
Magnetic storage is a sleek and highly effective craft storage idea for organising any metal tools and supplies. Borrowing from professional kitchens and workshops, this method uses magnetic strips, boards, and containers to keep essential items off your desk but instantly accessible. This approach prevents small metal objects from getting lost in deep drawers and keeps sharp tools safely stored yet visible.
This solution is perfect for crafters with numerous metal implements, such as jewellery makers with pliers, seamstresses with scissors and pins, or artists with palette knives. By mounting magnetic knife strips on the wall, you can elegantly display and grab your tools as needed. Magnetic pin bowls are a staple in quilting studios, and small magnetic pots are brilliant for holding tiny items like paper clips, brads, or metal findings, ensuring your workspace remains tidy and efficient.
Actionable Tips for Implementation
- Test Magnet Strength: Before installation, test the magnet's strength with your heaviest tools to ensure it can hold them securely. Use stronger magnets for heavier items like fabric shears.
- Position Thoughtfully: Mount magnetic strips at a comfortable height, easily within arm's reach of your main workspace but away from areas of high traffic to avoid knocking items off.
- Protect Electronics: Be mindful to keep strong magnets away from sensitive electronic devices like cutting machines, computers, or mobile phones to prevent any potential damage.
7. Cube Storage Systems
Cube storage is a cornerstone of modern home organisation and one of the most adaptable craft storage ideas available. These modular shelving units, composed of symmetrical square compartments, can be configured to fit almost any space. Their genius lies in their flexibility; you can use the cubes as open shelves for displaying yarn or paper stacks, or fill them with stylish fabric bins or baskets for concealed, categorised storage.
This system is perfect for crafters whose supply collections are constantly evolving. As your hobby grows, you can easily add more units or reconfigure your setup. Popularised by IKEA's iconic KALLAX series, cube organisers offer a clean, uniform look that can tame the visual chaos of a multi-craft hobby. They work exceptionally well for storing bulky items like fabric bolts and vinyl rolls, or for corralling smaller notions within designated bins.
Actionable Tips for Implementation
- Anchor for Safety: If you stack units or use a tall configuration, always anchor the system securely to the wall to prevent it from tipping over, especially in households with children or pets.
- Mix and Match Storage: Create visual interest by leaving some cubes open for decorative items or frequently used supplies, while using fabric or wicker bins in others. This blend of open and closed storage is both functional and aesthetically pleasing.
- Label Everything: To avoid pulling out multiple bins to find one item, use clear labels. Stylish options include chalkboard tags, metal label holders, or simple adhesive labels that match your room’s decor.
8. Ceiling-Mounted Storage
When floor and wall space are fully utilised, the only way to go is up. Ceiling-mounted storage is a clever craft storage idea that transforms the often-overlooked overhead area into a highly functional storage zone. Adapted from garage and workshop organisation, this method uses suspended racks, tracks, and organisers to store bulky or less-frequently used supplies, freeing up valuable room below for creative work.
This solution is perfect for storing large bolts of fabric, seasonal decorations, or tubs of yarn that would otherwise occupy prime cupboard space. Professional art studios often use ceiling tracks for hanging large paper rolls, a technique easily adapted for a home craft room. By taking advantage of this vertical real estate, you can significantly increase your room's storage capacity without adding to the clutter on the ground.
Actionable Tips for Implementation
- Prioritise Safety: Always install ceiling storage directly into ceiling joists for maximum support. Check the weight capacity of both the storage system and your ceiling structure to prevent accidents.
- Consider a Pulley System: For heavier containers or items you need to access more regularly, a pulley system can be a lifesaver. This allows you to lower and raise storage bins without needing a ladder every time.
- Use Clear Containers: When storing items overhead, visibility is key. Use clear, well-labelled containers so you can easily identify the contents from below without having to take everything down.
9. Repurposed Household Items
One of the most economical and eco-friendly craft storage ideas involves repurposing common household items. This resourceful approach turns potential waste into functional, bespoke storage, perfect for crafters on a budget or those aiming for a more sustainable lifestyle. It encourages you to see the organisational potential in everyday objects, from the kitchen pantry to the nursery.
This method is brilliant for sorting the tiny, easy-to-lose components of crafting. Think of using clean baby food jars for glitter and beads, egg cartons for buttons and sequins, or coffee cans for holding paintbrushes and knitting needles. An over-the-door shoe organiser can become a vertical powerhouse for yarn skeins, fabric fat quarters, or vinyl rolls. This approach not only saves money but also adds a unique, personal touch to your craft space.
Actionable Tips for Implementation
- Clean and Prepare: Thoroughly wash and dry any item before use, especially food containers, to prevent residue from damaging your supplies.
- Create a Cohesive Look: For a more unified and polished aesthetic, consider spray painting mismatched items like jars, tins, and boxes in a single colour or a coordinated palette.
- Prioritise Visibility: Whenever possible, use clear containers like glass jars or plastic tubs. This allows you to see the contents at a glance, saving you time from having to open every single container to find what you need.
10. Stackable Drawer Units
Stackable drawer units are a cornerstone of practical and customisable craft storage ideas, offering a simple way to contain clutter while keeping supplies accessible. These modular systems, typically made from durable plastic, allow you to build a storage tower perfectly suited to your space and collection. You can stack units of various drawer sizes to create a bespoke solution for everything from bulky yarn skeins to tiny beads and embellishments.
This method is particularly effective for crafters with a diverse and growing range of materials. Unlike fixed furniture, you can add new units as your collection expands. Systems from brands like Sterilite and IRIS USA are popular choices, often seen in well-organised craft rooms and art classrooms. Choosing clear drawers allows you to see the contents at a glance, saving you time from rummaging through multiple containers to find what you need.
Actionable Tips for Implementation
- Prioritise Stability: To prevent tipping, always place heavier items like clay blocks or bottles of paint in the bottom drawers. Avoid stacking units too high, especially in households with children or pets.
- Divide and Conquer: Use small drawer dividers or inserts to further organise tiny items like buttons, sequins, and jewellery findings. This stops them from becoming a jumbled mess inside a larger drawer.
- Label Everything: Attach clear, easy-to-read labels to the front of each drawer. This simple step transforms your storage from a guessing game into a highly efficient system, making retrieval effortless.
Top 10 Craft Storage Solutions Comparison
Creating Your Perfectly Organised Crafting Haven
Embarking on a journey to organise your creative space is more than just a tidying exercise; it is an act of reclaiming your time, focus, and artistic energy. Throughout this guide, we've explored a diverse range of craft storage ideas, from the versatile command centre of a pegboard system to the mobile efficiency of a rolling cart and the clever repurposing of everyday household items. We’ve seen how vertical space can be unlocked with file holders and magnetic strips, and how modular cube units and stackable drawers offer scalable solutions that grow with your collection.
The ultimate goal is to move beyond temporary fixes and establish a sustainable system that works for you, not against you. An organised space minimises the time spent searching for that specific shade of thread or the right-sized paintbrush, freeing up precious moments for what truly matters: the act of creation itself. When your tools are visible, accessible, and logically arranged, you eliminate the friction that so often stalls a creative impulse.
Your Action Plan for a Clutter-Free Creative Zone
Feeling inspired but not sure where to begin? The key is to start small and build momentum. Don't feel pressured to overhaul your entire craft room in a single weekend. Instead, focus on creating a tangible and immediate impact with these actionable next steps:
- Assess and Categorise: Before buying a single container, take stock of what you own. Group similar items together: all your paints, all your yarns, all your paper supplies. This critical first step will inform every decision you make, ensuring you choose storage that fits your specific inventory.
- Select One High-Impact Area: Choose the most cluttered or frustrating corner of your space. Is it your desk? A pile of fabric in the corner? A drawer overflowing with miscellaneous tools? Focus your initial efforts there. A quick win will provide the motivation to continue.
- Implement One New Idea: From the solutions we’ve discussed, pick one that resonates with your needs and your space. Perhaps it’s a simple set of magnetic tins for your metal dies or a few clear drawer organisers to finally conquer your stationery collection.
- Schedule a Regular 'Reset': Dedicate just 15 minutes each week to putting things back in their designated homes. This small habit prevents clutter from creeping back in and keeps your organised system functioning beautifully.
By thoughtfully implementing these craft storage ideas, you are not just tidying up; you are designing an environment that nurtures your passion. You are building a personal haven where inspiration can strike and flow without interruption. The result is a space that feels less like a storage closet and more like a true artist’s studio, a place where your best ideas have the room they need to come to life.


