
To get that perfect, invisible finish when you fill holes in a wall, it all comes down to choosing the right tool for the job. A tiny nail hole from a picture frame needs a completely different approach than a bigger dent left behind by an over-enthusiastic door opening. Get this bit right, and the rest is easy.
Gathering Your Essential Wall Repair Toolkit
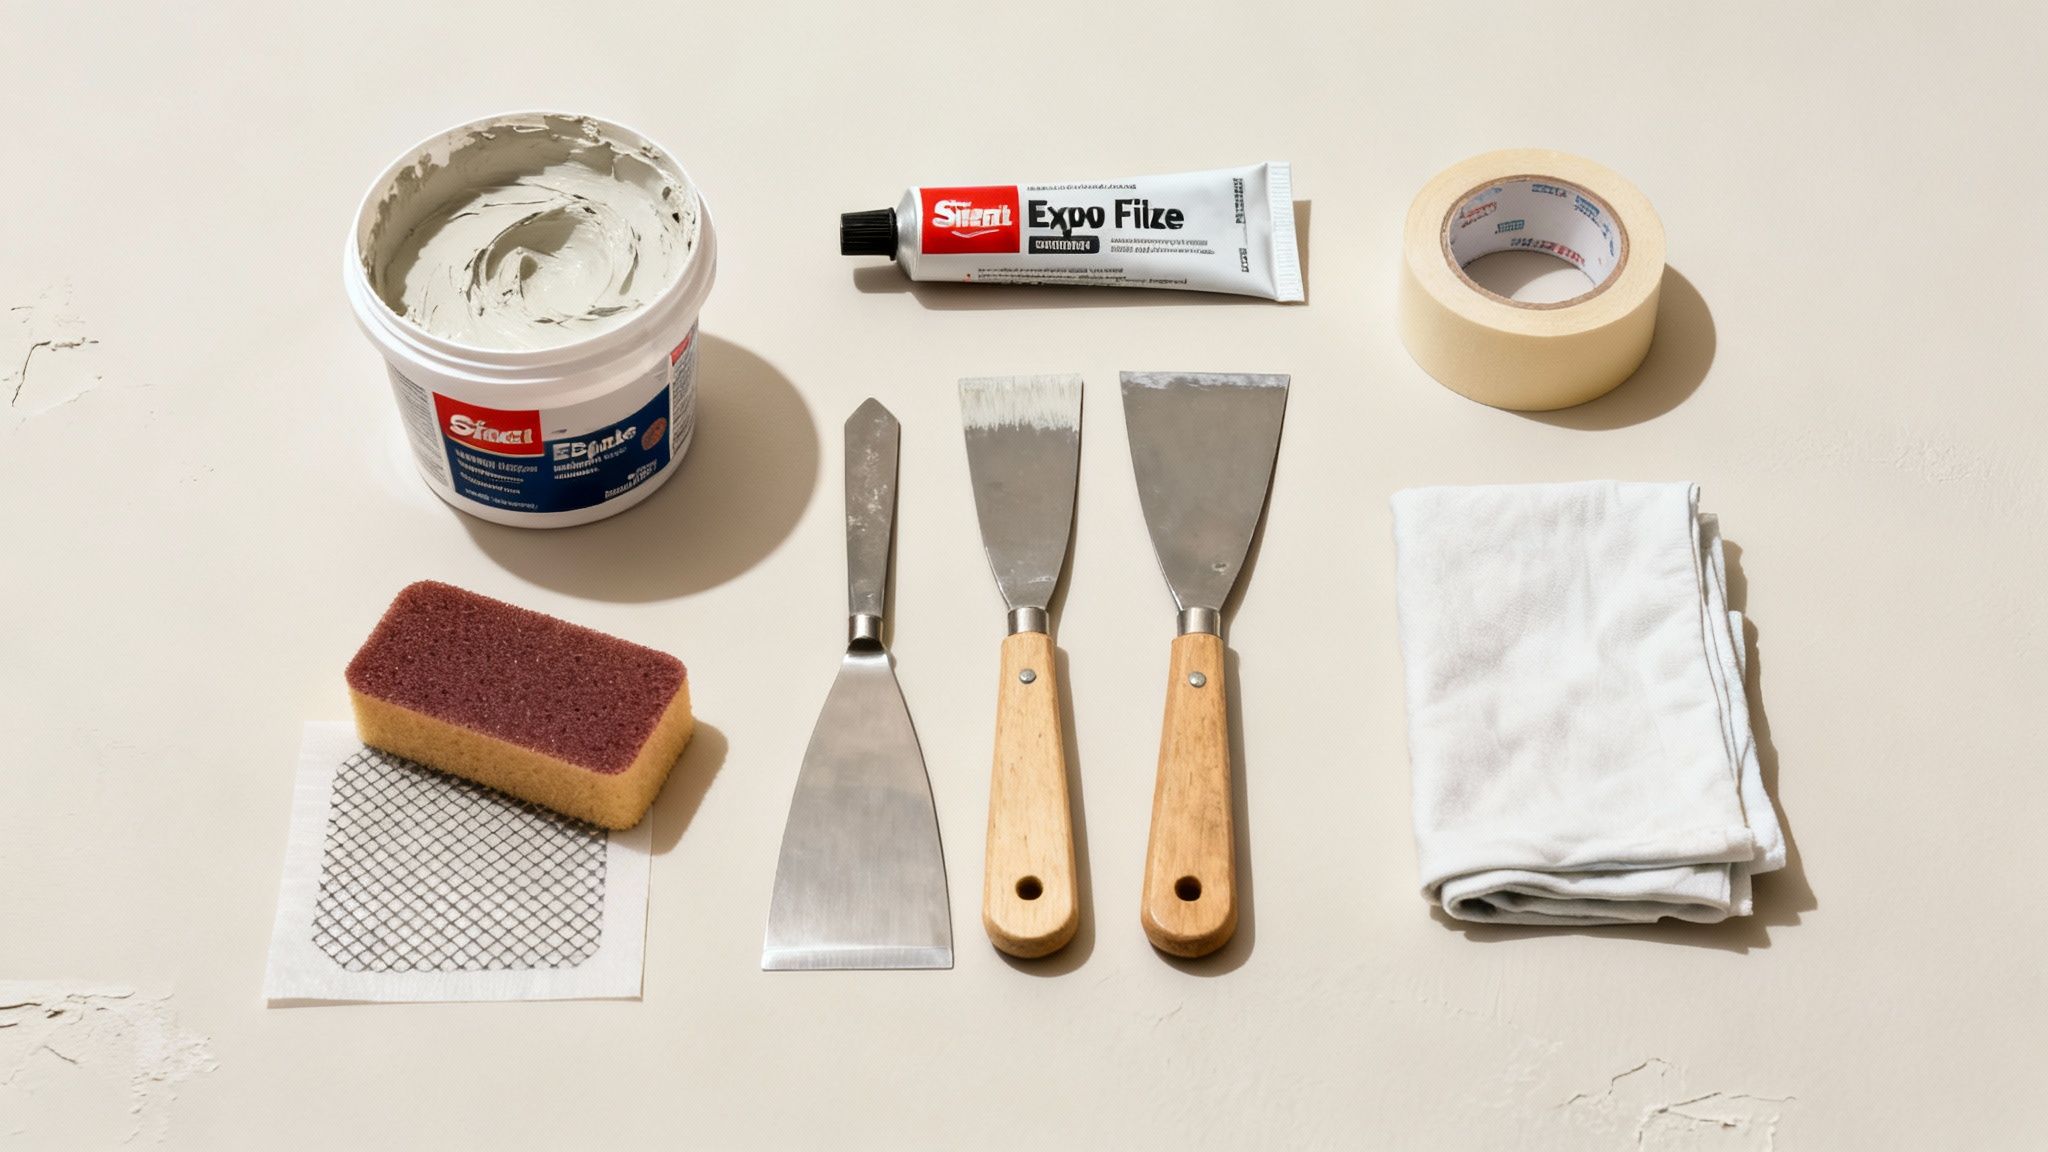
Before you even think about patching, let's talk about preparation. Getting your toolkit sorted first is the secret to a professional-looking finish and saves you from turning a quick fix into a weekend-long headache.
Think of it like cooking a recipe you love—you wouldn’t swap out key ingredients and expect the same delicious result. The same goes for wall repair; having the right bits and bobs on hand is non-negotiable for a flawless mend.
Choosing the Right Filler for Your Wall Repair
Picking the right filler is probably the most critical decision you'll make. It’s not a one-size-fits-all situation. To make it a bit clearer, here’s a quick rundown of the most common options you’ll find at the DIY shop.
For those tiny pinholes left behind by gallery walls or stray darts, a lightweight, ready-mixed spackle is your best friend. It’s designed to dry quickly without shrinking, making it perfect for little touch-ups.
But for something more substantial, like a dent from a doorknob or a hole left by old rawl plugs, you need something tougher. A vinyl-based spackle or an all-purpose joint compound provides much better strength and adhesion, making sure your hard work doesn’t crack a few months down the line.
A classic mistake is trying to fill a deep hole with lightweight spackle. It almost always shrinks as it dries, leaving a tell-tale divot that needs a second or even third coat to fix.
Essential Application and Finishing Tools
Your application tools are just as important as the filler itself. A flexible putty knife is your go-to for a smooth, clean application. Look for one that's about 1.5 to 3 inches wide – this size gives you brilliant control for feathering the edges of the patch so it blends seamlessly with the wall.
And for a truly invisible repair, you can't skip the sanding. A fine-grit sanding sponge (around 120-150 grit) is so much better than a flat sheet of sandpaper here. Its soft, flexible design lets you gently smooth the repaired area without accidentally scuffing up the surrounding paintwork.
Finally, don't forget the essentials that protect your home and make clean-up a breeze:
- Dust Sheets: An absolute must for protecting your floors and furniture from dust and stray filler.
- Painter’s Tape: Use it to mask off skirting boards, door frames, or adjacent walls for super clean lines.
- A Damp Cloth: Keep one handy for wiping away any excess filler before it has a chance to dry.
Handling Pinholes and Small Nail Pops
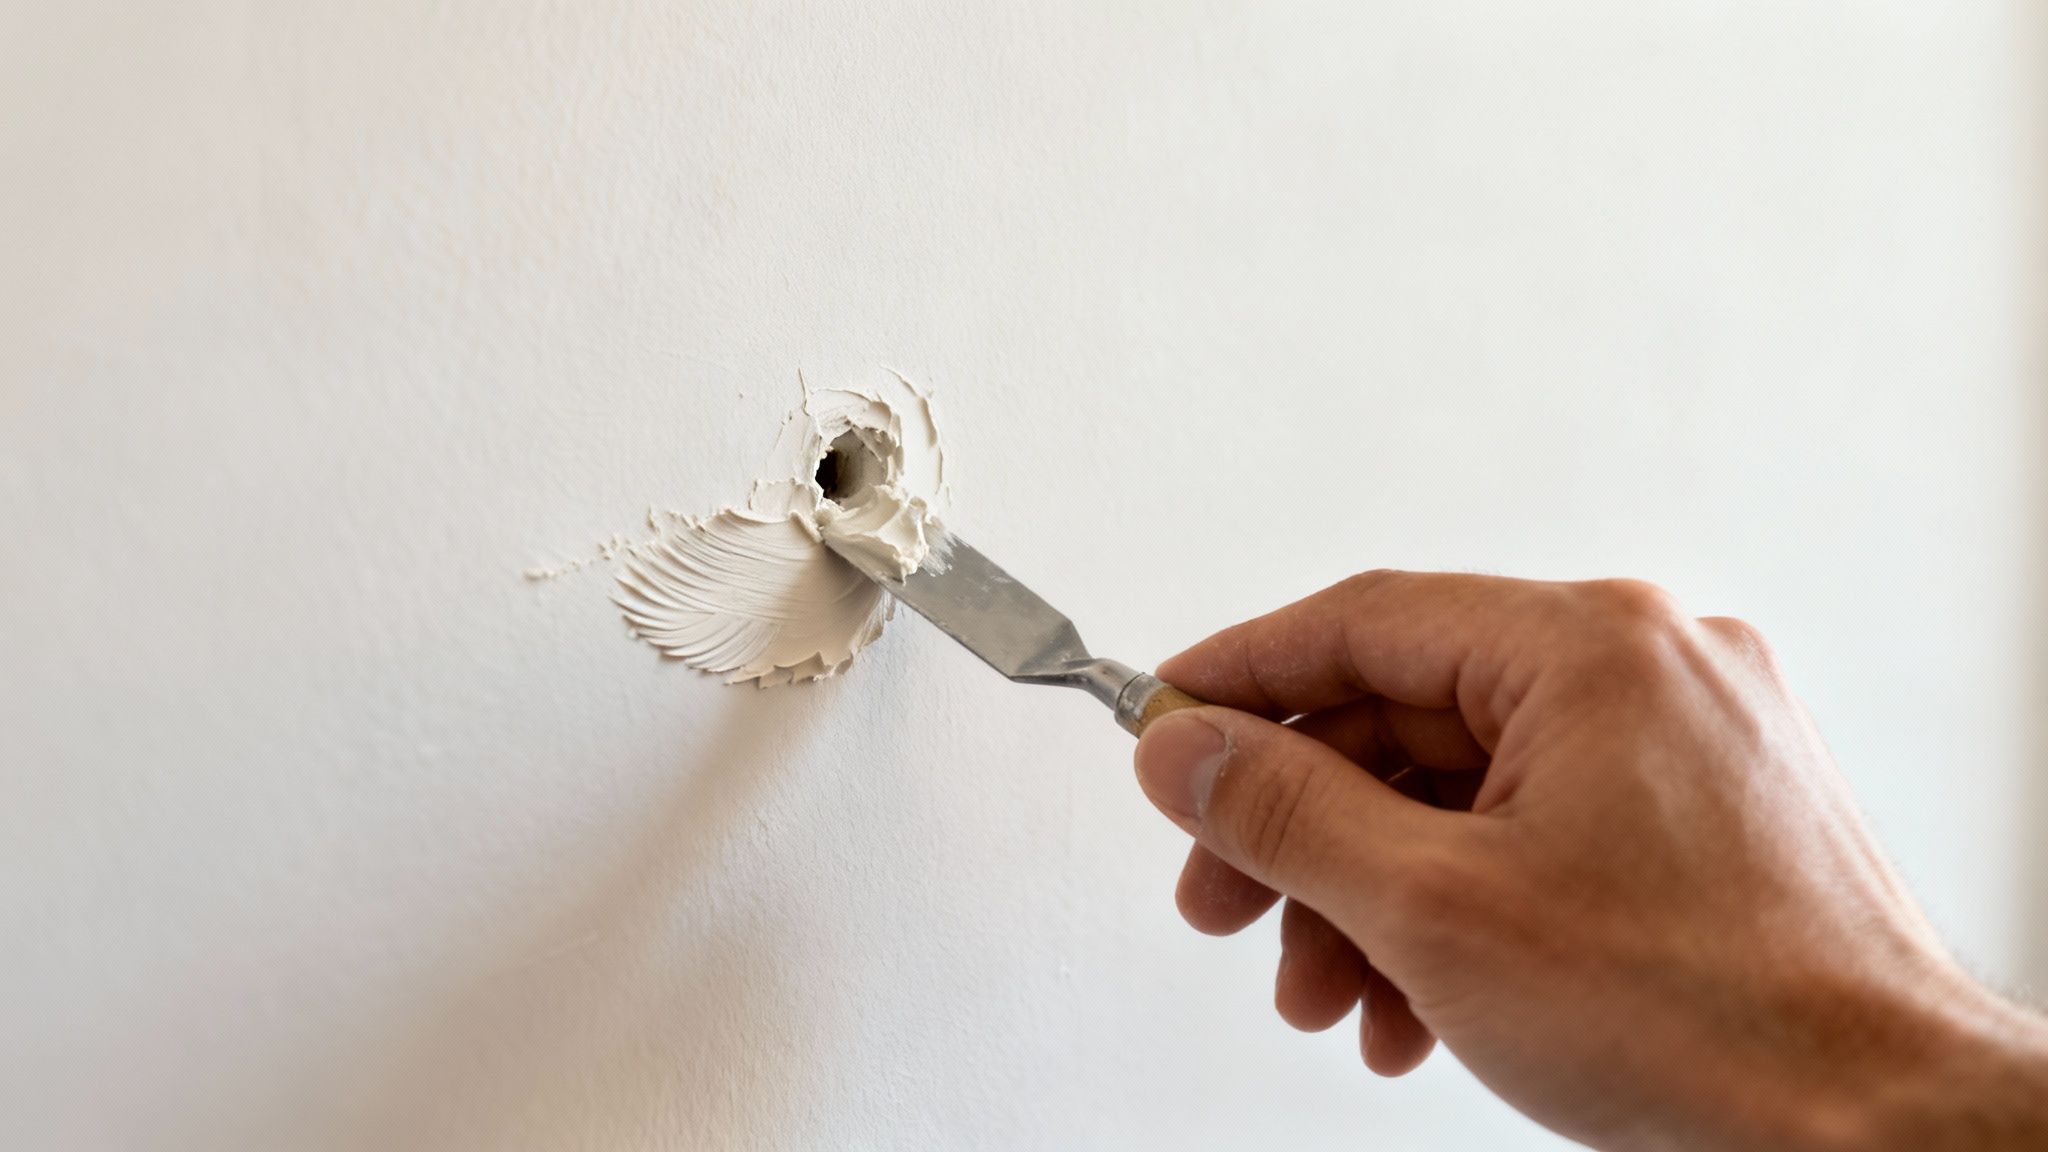
We’ve all been there. You take down a piece of art or a mirror, and your once-perfect wall is dotted with tiny but persistent marks left by picture hooks and nails. While they might seem minor, tackling them properly is what separates a truly invisible mend from a patch job you can spot from across the room.
And it seems we’re all getting more hands-on with our homes. The UK's home improvement market, which covers all the little jobs that come with a redecoration, hit £11.3 billion in 2024 and is expected to climb to £16.67 billion by 2033. Data from MyJobQuote.co.uk shows households in Wales are particularly keen, spending an average of £44.00 a month. It just goes to show that knowing how to professionally fill holes in a wall is a skill every home décor lover needs.
The Secret to a Seamless Fill
Here’s a little trade secret that feels wrong but works every time: you need to slightly overfill the hole.
Just apply a small dab of lightweight spackle right over the pinhole, making sure the filler sits just proud of the wall. This tiny mound is your best friend. Why? Because spackle tends to shrink a little as it dries. Overfilling prevents that dreaded sunken divot from appearing after you’ve sanded it down, saving you from having to apply a second or third coat.
A professional finish always comes down to ‘feathering the edges’. It’s just a fancy way of saying you need to blend the filler smoothly into the surrounding wall so there are no hard lines. Hold your putty knife at a low, 45-degree angle and pull it across the spackle in one clean, firm stroke.
Mastering the Application and Finish
Once your filler is on, the rest is about refinement. This is where a bit of patience really pays off. If you try to sand the filler before it’s fully dry, you’ll just pull it right back out of the hole.
Your Finishing Checklist
- Drying Time: Most lightweight spackles feel dry to the touch in under an hour, but always go by the instructions on the tub. A good rule of thumb? If it still feels cool, it needs more time.
- Sanding Smooth: Grab a fine-grit sanding sponge – 120-grit or higher is perfect. Use very light pressure and a gentle circular motion to smooth the raised filler until it’s perfectly flush with the wall.
- Priming is a Must: Whatever you do, don't skip the primer! It seals the filler (which is very porous) and ensures your final coat of paint goes on evenly. Without it, you’ll end up with a dull or shiny spot known as ‘flashing’, which makes the repair obvious.
One of the trickiest parts can be matching an existing wall texture. If your walls have a slight stipple or an "orange peel" finish, you can mimic it by dabbing the wet filler lightly with a balled-up cloth or a coarse sponge just before it sets.
And if you’re planning on hanging new artwork after the repair, our guide on perfect picture frame hanging has some brilliant tips to get it right the first time, ensuring your wall looks flawless from every angle.
Repairing Mid-Sized Damage with Confidence
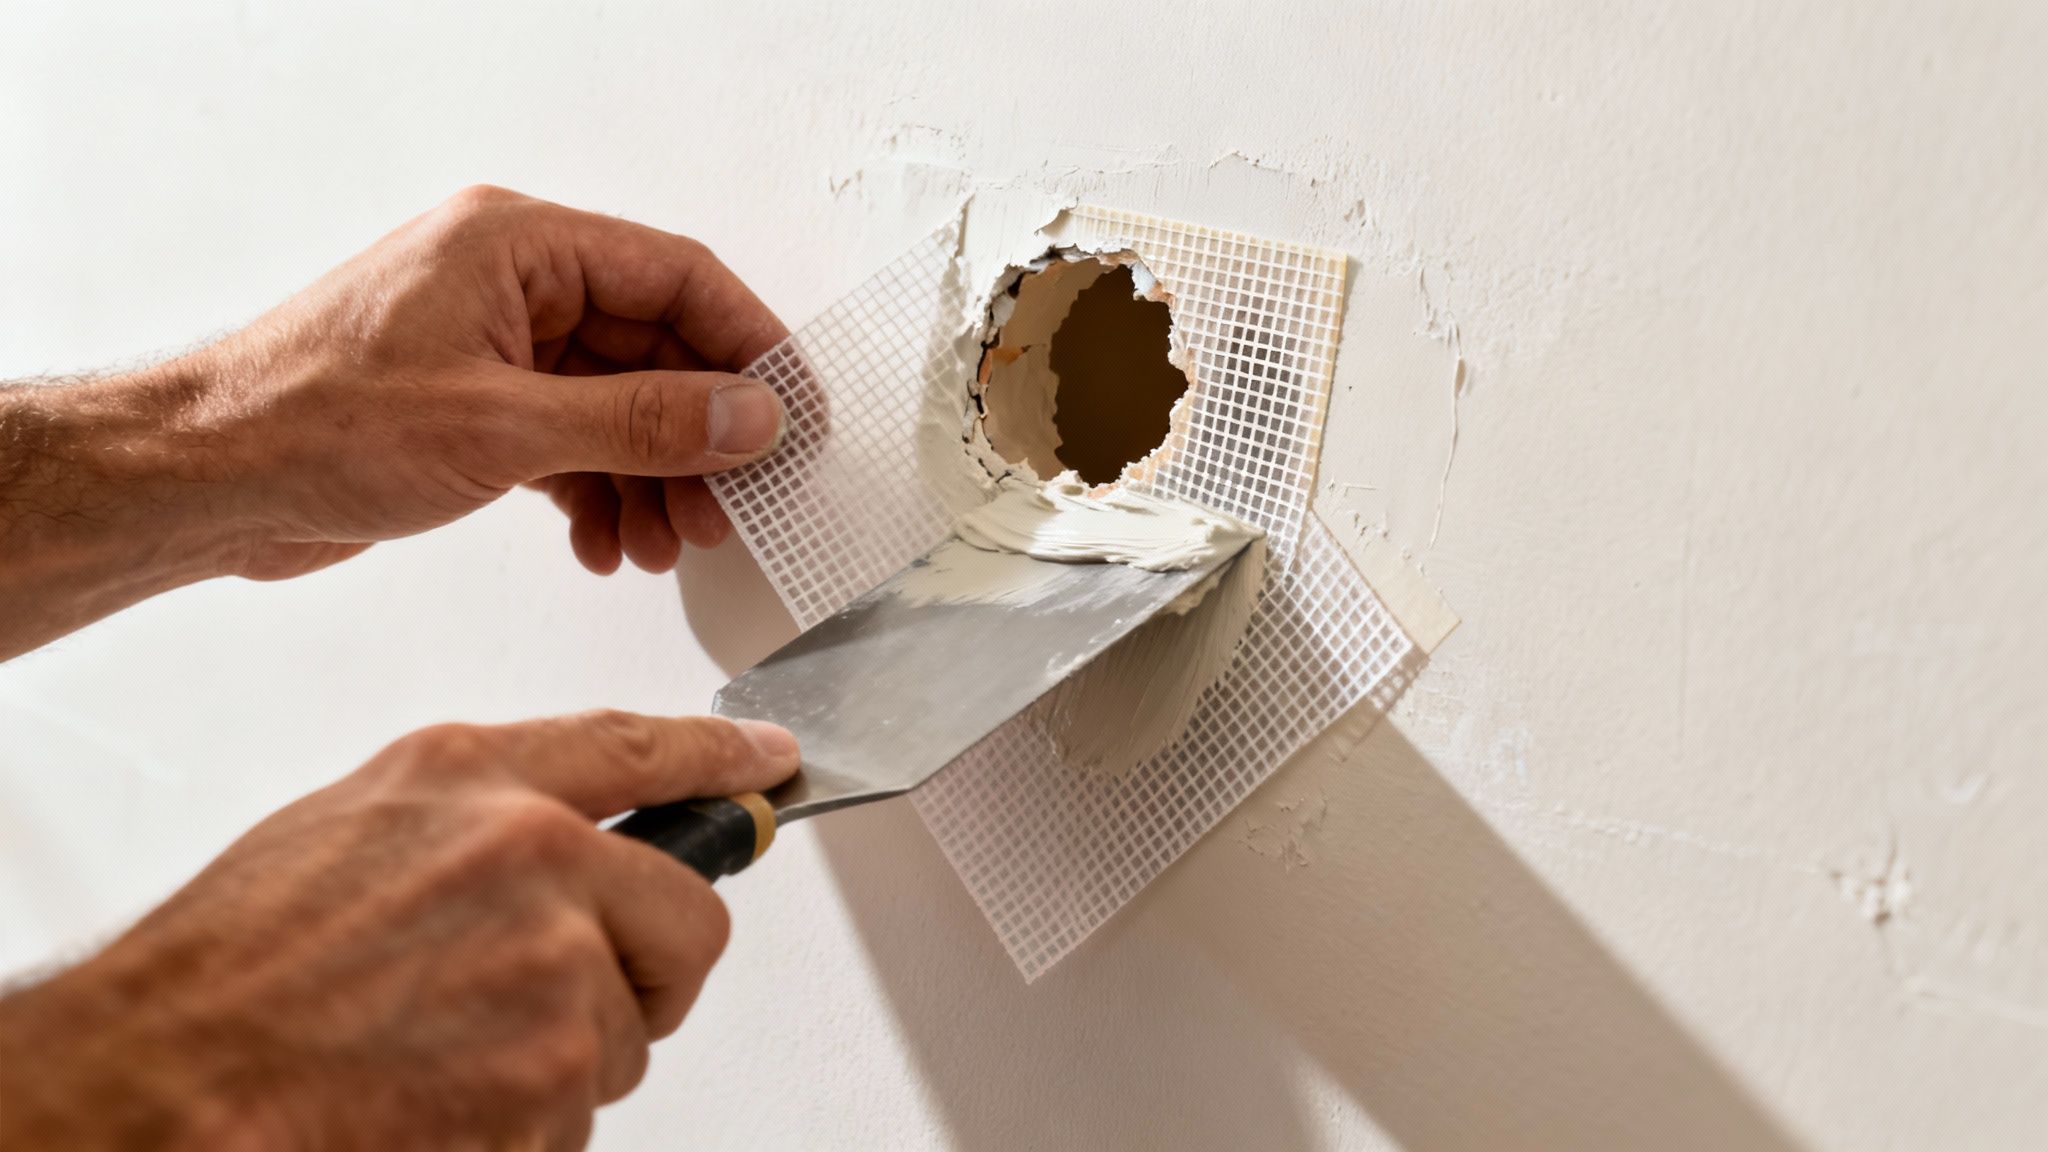
When the damage is more serious than a simple nail pop, your repair strategy needs to level up. Think of those tell-tale circular dents from doorknobs slamming into the wall, or the messy gaps left behind after taking down old shelves or light fixtures. These mid-sized holes, usually between half an inch and three inches wide, need a bit more attention than a quick dab of filler.
For this kind of job, you need to add structure back into the wall. This is where a self-adhesive mesh patch becomes an absolute game-changer for anyone looking to fill holes in a wall. It provides a solid foundation over the gap, stopping the filler from just falling into the wall cavity and, crucially, preventing cracks from showing up later on.
The Layering Method for a Durable Repair
The real secret to a rock-solid, professional-looking repair is patience. You have to resist the temptation to trowel on a thick glob of joint compound and call it a day. Trust me, that approach almost always leads to shrinkage, cracking, and a sunken patch that’s impossible to hide.
Instead, think like a plasterer and apply multiple thin, even coats. This slow-and-steady approach is the key to a lasting mend that won't fail you.
- First Coat: Start by applying a thin layer of joint compound directly over the mesh patch. Begin at the centre and work your way outwards, using your putty knife to feather the edges so they blend smoothly into the surrounding wall.
- Drying Time is Crucial: Now, walk away. Let this first layer dry completely, which can take up to 24 hours, depending on the compound and the humidity in your room. Don’t rush this bit.
- Subsequent Coats: Once it’s bone dry, give the area a light sand and apply another thin coat, extending it slightly further than the first. Keep repeating this process until the mesh is fully hidden and the surface is perfectly flush with the wall.
The goal is to build up the repair gradually. Each thin layer strengthens the one beneath it, creating a robust patch that integrates seamlessly with the existing drywall. It’s the difference between a quick fix and a permanent solution.
Embedding the Mesh Patch Seamlessly
Getting the mesh patch properly embedded is the first step towards an invisible repair. Before you stick it on, make sure the area around the hole is clean, dry, and free of any loose debris or peeling paint. A quick wipe-down with a damp cloth is all it takes.
Cut the patch so it overlaps the hole by at least one inch on all sides. This gives the adhesive plenty of surface area to grip onto. Press it firmly onto the wall, smoothing out any air bubbles from the centre outwards. The mesh should lie completely flat, creating a stable base for your joint compound.
Knowing these foundational skills is more useful than ever. Innovations in wall coverings are booming—the UK wall panels market, for example, is projected to reach £238 million in 2024. As plastering and drywall services continue to grow, understanding the basics empowers homeowners. You can learn more about these future UK wall panels on barbour-abi.com.
Once your final layer of compound is dry and sanded smooth, the wall is almost ready for its new look. If you're planning a complete refresh, you might find our guide on how to remove wallpaper from walls particularly helpful before you start painting.
Advanced Fixes for Large Holes in Drywall
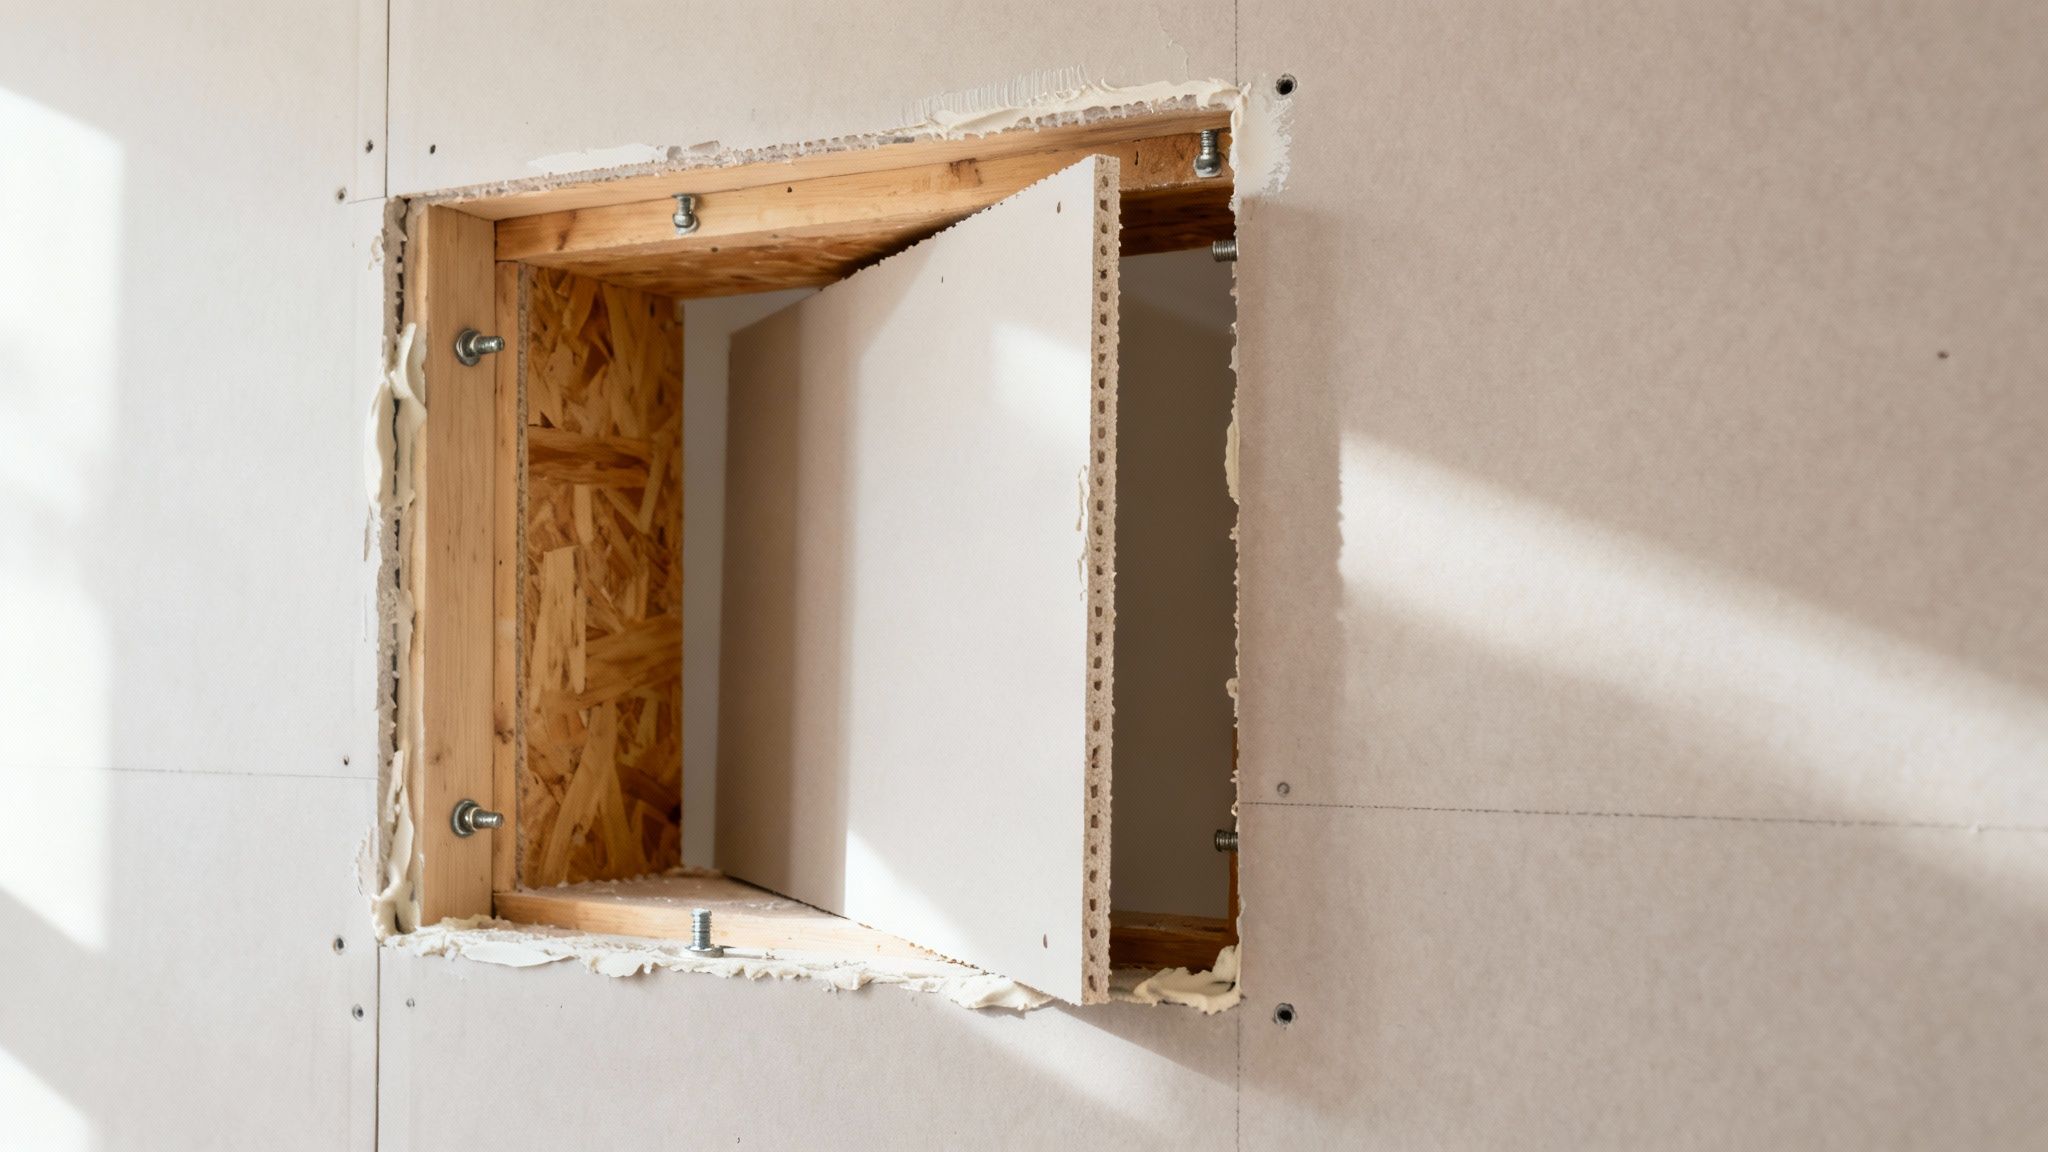
We’ve all been there. You’ve had a plumbing disaster, or maybe a piece of furniture has had a rather unfortunate argument with the wall, and now you’re left with a hole that’s way beyond what a simple mesh patch can handle. At this point, it’s time to take a deep breath and go for a proper, professional-grade solution.
While it sounds a bit intimidating, cutting out the damaged section and fitting a new piece of plasterboard is the only way to get a repair that’s truly strong and completely invisible. This isn’t just patching over a problem; it's more like a wall transplant. It restores the structural integrity and leaves you with a finish that’s as good as new.
The trick is creating a solid foundation for the new piece, which is where a lot of DIY repairs go wrong. By slotting in a couple of simple wooden backing boards, you give the new plasterboard something to grip onto, preventing any flexing or annoying cracks appearing down the line.
Creating a Clean and Stable Repair Area
First things first, you need to turn that jagged, messy hole into a neat square or rectangle. Grab a straightedge and a pencil and draw a clean shape around the entire damaged area. Then, carefully cut along your lines with a plasterboard saw or a sharp utility knife – the cleaner your cuts, the easier the next steps will be.
Once you’ve removed the damaged bit, you’ll need to add some support inside the wall cavity. This is where those backing boards come into play.
- Measure and Cut: Cut one or two pieces of scrap wood (a 1x2 or 1x3 batten is perfect) so they’re a few inches longer than the height of your opening.
- Secure the Backing: Slide each piece of wood into the hole and position it behind the existing plasterboard. Pull it up tight against the back of the wall, then drive plasterboard screws through the existing wall and into the wood to clamp it firmly in place.
These battens create a solid frame to attach your patch to, making the whole repair incredibly sturdy. Trying to fill holes in a wall this big without proper backing is one of the most common renovation mistakes, and it almost always leads to a weak, noticeable finish. You can find more tips in our guide on how to avoid common renovation mistakes.
Taping and Finishing for an Invisible Seam
With your backing firmly in place, cut a new piece of plasterboard to fit snugly into the opening. It should sit flush with the surrounding wall. Secure it to your wooden backing boards with more plasterboard screws.
Now for the magic part – making the repair completely disappear. The art of taping the seams properly is what separates an amateur job from something that looks like it was done by a pro.
The secret to a flawless seam is using multiple thin coats of joint compound, rather than one thick layer. This methodical approach minimises shrinkage and builds up a strong, smooth surface that blends perfectly with the existing wall.
Apply a thin layer of joint compound over the seams and embed paper or fibreglass joint tape into it, pressing it in firmly with a putty knife. Let it dry completely. Then, apply at least two more thin coats, feathering the edges a little further out each time. This gradual blending is the key to a seamless transition.
It’s this kind of skilled work that contributes to a booming industry; in the UK, plastering services generated £3.3 billion in 2025, largely thanks to residential repairs and refurbishments. After a final, light sanding, your wall is ready for priming and painting, and the damage will be nothing but a distant memory.
Achieving a Perfect Finish with Paint and Texture
Let’s be honest, a wall repair is only as good as its final coat of paint. This is the moment where all your hard work pays off and the patch either disappears completely or sticks out like a sore thumb. Rushing this last bit is the number one reason a perfectly filled hole still looks obvious once everything’s dry.
The secret to making a mend truly invisible? Don’t skip the priming. It’s a non-negotiable step. Fresh filler and joint compound are far more porous than the rest of your wall, meaning they soak up paint like a sponge. If you just slap your paint straight on, the repaired patch will dry to a dull, flat finish that screams “I’ve been filled!”
This patchy difference in sheen has a name: ‘flashing’. Priming is the magic step that seals the porous filler, creating a uniform base. This ensures your topcoat of paint dries evenly, giving you a flawless, consistent colour and finish across the entire wall.
Matching Your Existing Wall Texture
Not all walls are perfectly flat. In fact, many modern homes have a subtle texture, like a gentle 'orange peel' stipple from being spray-painted. A super-smooth, sanded patch on a textured wall will stand out just as much as a bad repair. Luckily, faking these common textures is easier than you might think.
For that light, speckled look, an aerosol texture spray is your best friend. These clever cans let you apply a fine mist of texture that mimics professional finishes beautifully. For the best result, just follow these tips:
- Always Test First: Before you aim at your wall, grab a piece of cardboard and do a test spray. This helps you get a feel for the spray pattern and the best distance to hold the can.
- Go Lightly: Hold the can about 18-24 inches from the wall. Apply the texture in short, sweeping bursts. It’s always better to build it up in thin layers than to go too heavy and have to sand it all off again.
- Blend the Edges: Gently feather the spray around the very edges of your repair. This will help the new texture blend seamlessly into the existing wall.
If your wall has a more unique or random texture, a slightly damp sea sponge can work wonders. Simply dab it gently onto the final, thin layer of wet joint compound to create a subtle, uneven pattern that matches the surrounding area.
Applying the Final Coats of Paint
With your patch primed and perfectly textured, it’s time for the final flourish: the paint.
Using a small roller or brush, apply your wall colour over the repaired spot. The trick is to extend the paint a few inches beyond the patch on all sides. This helps to feather the edges and blend the repair into the rest of the wall, making it undetectable.
You will almost certainly need two coats of paint for a perfect colour match, so don’t be tempted to stop after one. Let the first coat dry completely before you even think about applying the second. The finish of your paint is just as important; understanding the subtle differences between eggshell and satin can be the final detail that makes or breaks the look.
With a little patience here, your wall will look brand new, with absolutely no evidence of the damage left behind.
Your Wall Repair Questions, Answered
Even the most straightforward DIY project can throw a curveball. When you're midway through filling holes in a wall, a quick, clear answer can be the difference between a flawless finish and a frustrating do-over. We’ve all been there.
So, think of this as your on-the-spot troubleshooting guide. We're tackling the common questions that pop up, from drying times to why that perfect patch suddenly cracked.
How Long Should Filler Dry Before I Can Sand It?
This is the big one, and the honest answer is: it depends. The type of filler you're using, how deep the hole is, and even the humidity in the room all play a part. It’s less about watching the clock and more about knowing what to look for.
A lightweight spackle for tiny nail holes might be ready to sand in under an hour. But for anything more substantial, like a patch made with joint compound, you need to give each thin layer at least 24 hours to cure properly. Rushing this is the number one mistake people make, and it almost always leads to a sunken patch or fine cracks appearing later on.
Here’s a tried-and-true trick: if the filled area still feels cool to the touch, it isn't fully dry. Patience is your best tool here – it guarantees a solid repair that you won’t have to fix again in six months.
Can I Use the Same Filler for Plaster and Plasterboard?
While lots of modern fillers are labelled "all-purpose," you'll always get a better, longer-lasting result by matching the product to your wall type. They’re just different materials, and the right filler will bond better and flex with the wall as it should.
If you’re in an older home with traditional plaster walls, grabbing a dedicated plaster repair compound is the smart move. It forms a much stronger bond and shares similar properties with the wall itself, which massively reduces the risk of cracks reappearing around the patch. For standard plasterboard, a good quality spackle or joint compound is perfect. If in doubt, read the small print and find one that explicitly says it's suitable for both surfaces.
Why Did My Perfect Wall Patch Suddenly Crack?
It’s a truly disheartening moment: you’ve smoothed it perfectly, let it dry, and come back to find a web of tiny cracks. Don’t worry, this is a really common (and easily fixed) problem. It nearly always comes down to one of two things: you've either applied the filler way too thickly in one go, or you didn’t let the layers dry properly in between.
For any repair deeper than about half a centimetre, you have to build it up in thin layers. It feels slow, but this patient approach prevents the filler from shrinking too much as it dries – and that shrinkage is what causes the cracking. Layer it up gradually, and you’ll get a solid, seamless finish.
Once your repair is perfect, the final touch is the paint. Our guide on how to choose paint colours is just the thing to help you pick the perfect shade for your newly flawless wall.


