
The kitchen island is no longer just a functional workspace; it has evolved into the central hub of modern home life. It’s where meals are prepped, homework is finished, and friends gather over a cup of tea. Finding the right design is therefore crucial to creating a kitchen that is both beautiful and perfectly suited to your lifestyle. A well-chosen island can define your space, improve workflow, and become the true heart of your home.
This guide moves beyond generic advice to provide a curated roundup of ten distinct kitchen island design ideas. We will explore a diverse range of styles, materials, and innovative functionalities to spark your imagination. You will discover practical implementation details for each concept, from the dramatic elegance of a waterfall edge to the smart utility of a multi-level layout.
Whether you're planning a full renovation or simply looking for an impactful update, these examples are designed to offer actionable insights. We will cover specific approaches to integrating seating, maximising storage, and making bold colour statements. Let's explore the possibilities and find the perfect island to elevate your kitchen's form and function.
1. The Waterfall Edge Island: A Statement in Seamless Style
A waterfall edge is one of the most impactful kitchen island design ideas for creating a sleek, high-end aesthetic. This design features the countertop material extending vertically down the sides of the island to meet the floor, creating a continuous and seamless flow. The result is a bold, sculptural piece that acts as a powerful focal point, especially popular in contemporary and minimalist kitchens.
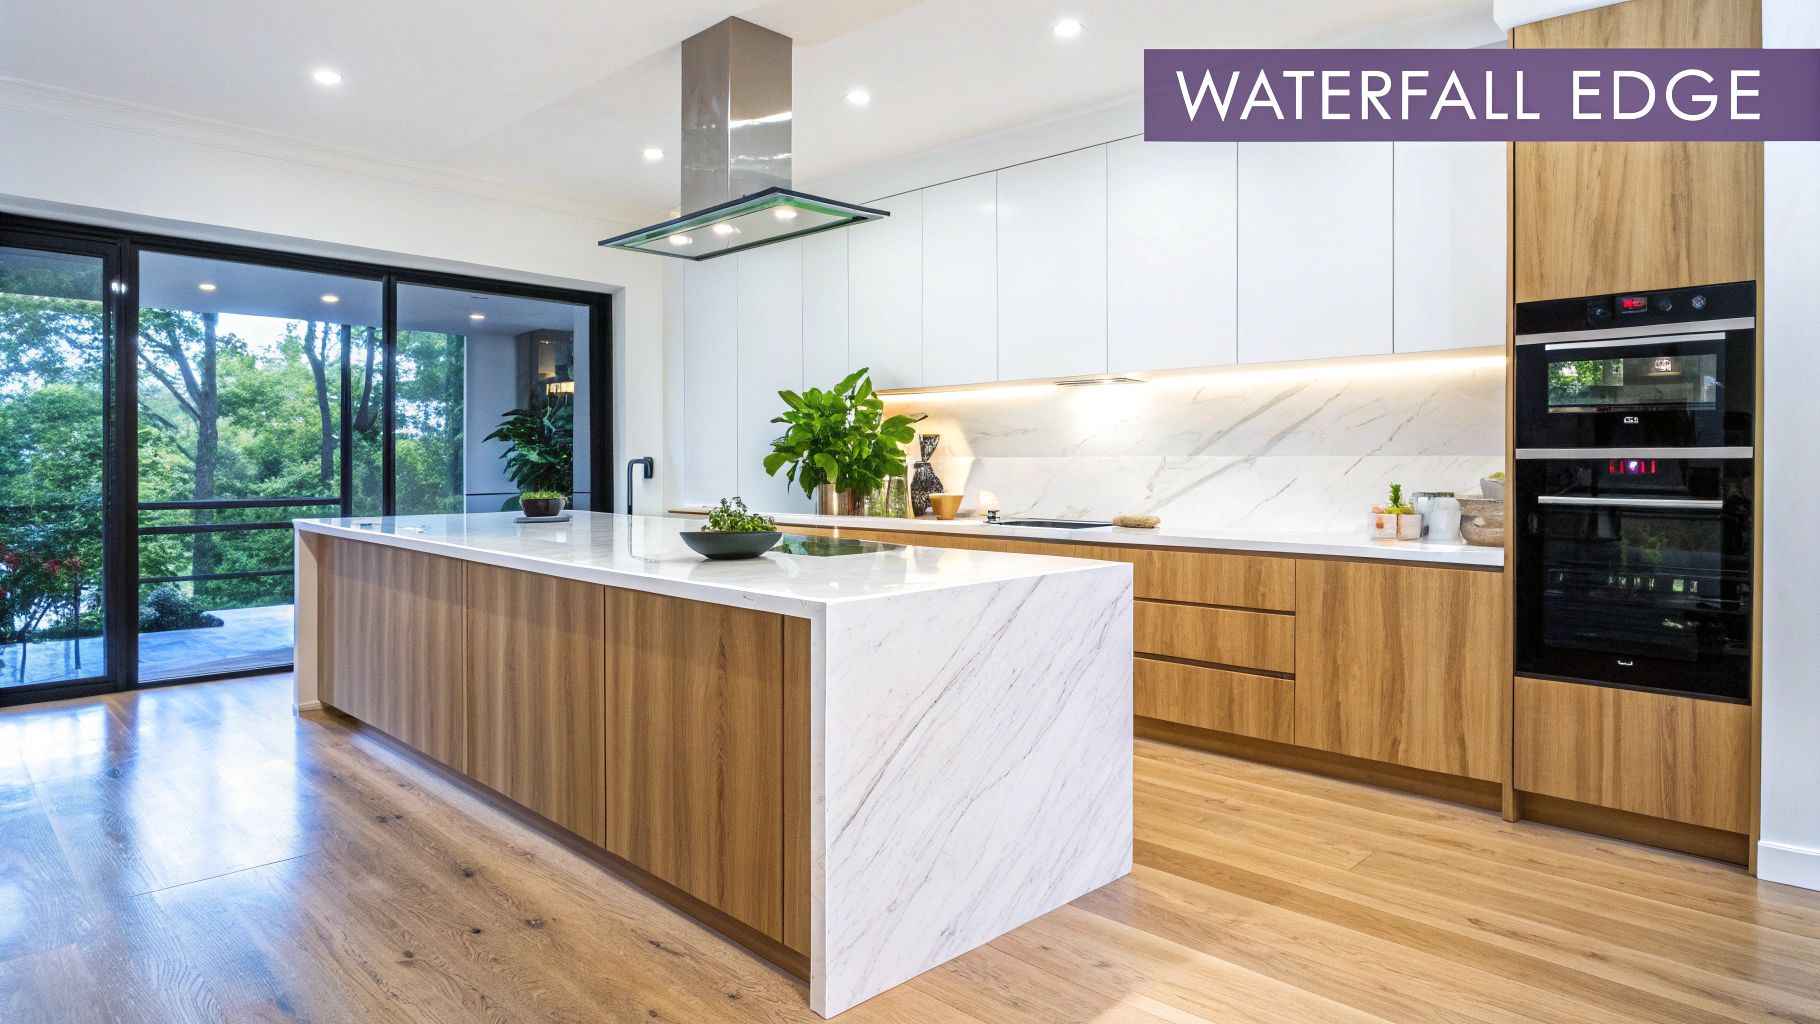
Its monolithic form elevates the entire room, lending it an air of bespoke luxury. This style is frequently seen in high-end projects, from the polished Calacatta marble islands in new-build London flats to the crisp white quartz finishes in modern farmhouse kitchens showcased in publications like Architectural Digest.
Key Implementation Tips
To achieve a flawless waterfall island, meticulous planning and skilled execution are paramount.
- Book-Matching: For natural stone like marble or granite, ask your fabricator to book-match the slabs. This technique aligns the veining at the seam where the top meets the side, creating a stunning, symmetrical, mirror-image pattern.
- Finishing Touches: While polished surfaces are striking, consider a honed or matte finish. These are less reflective and far better at concealing fingerprints and smudges, a practical choice for a high-traffic family kitchen.
- Structural Support: The weight of the vertical slab puts significant stress on the island's structure. Ensure your joiner or contractor builds a robust internal frame to adequately support the material and prevent cracking over time.
- Budget Accordingly: The extra material and specialised labour required mean a waterfall edge can cost 20-30% more than a standard island countertop installation. Factor this into your budget from the outset.
2. The Multi-Level Island: Designing for Function and Flow
The multi-level island is one of the most practical kitchen island design ideas for homeowners looking to maximise functionality. This design incorporates different height surfaces within a single structure, typically combining a standard counter height (around 91cm) for prep work with a raised bar height (around 106cm) for casual dining or socialising. The result is a highly efficient, zoned space that clearly delineates tasks.
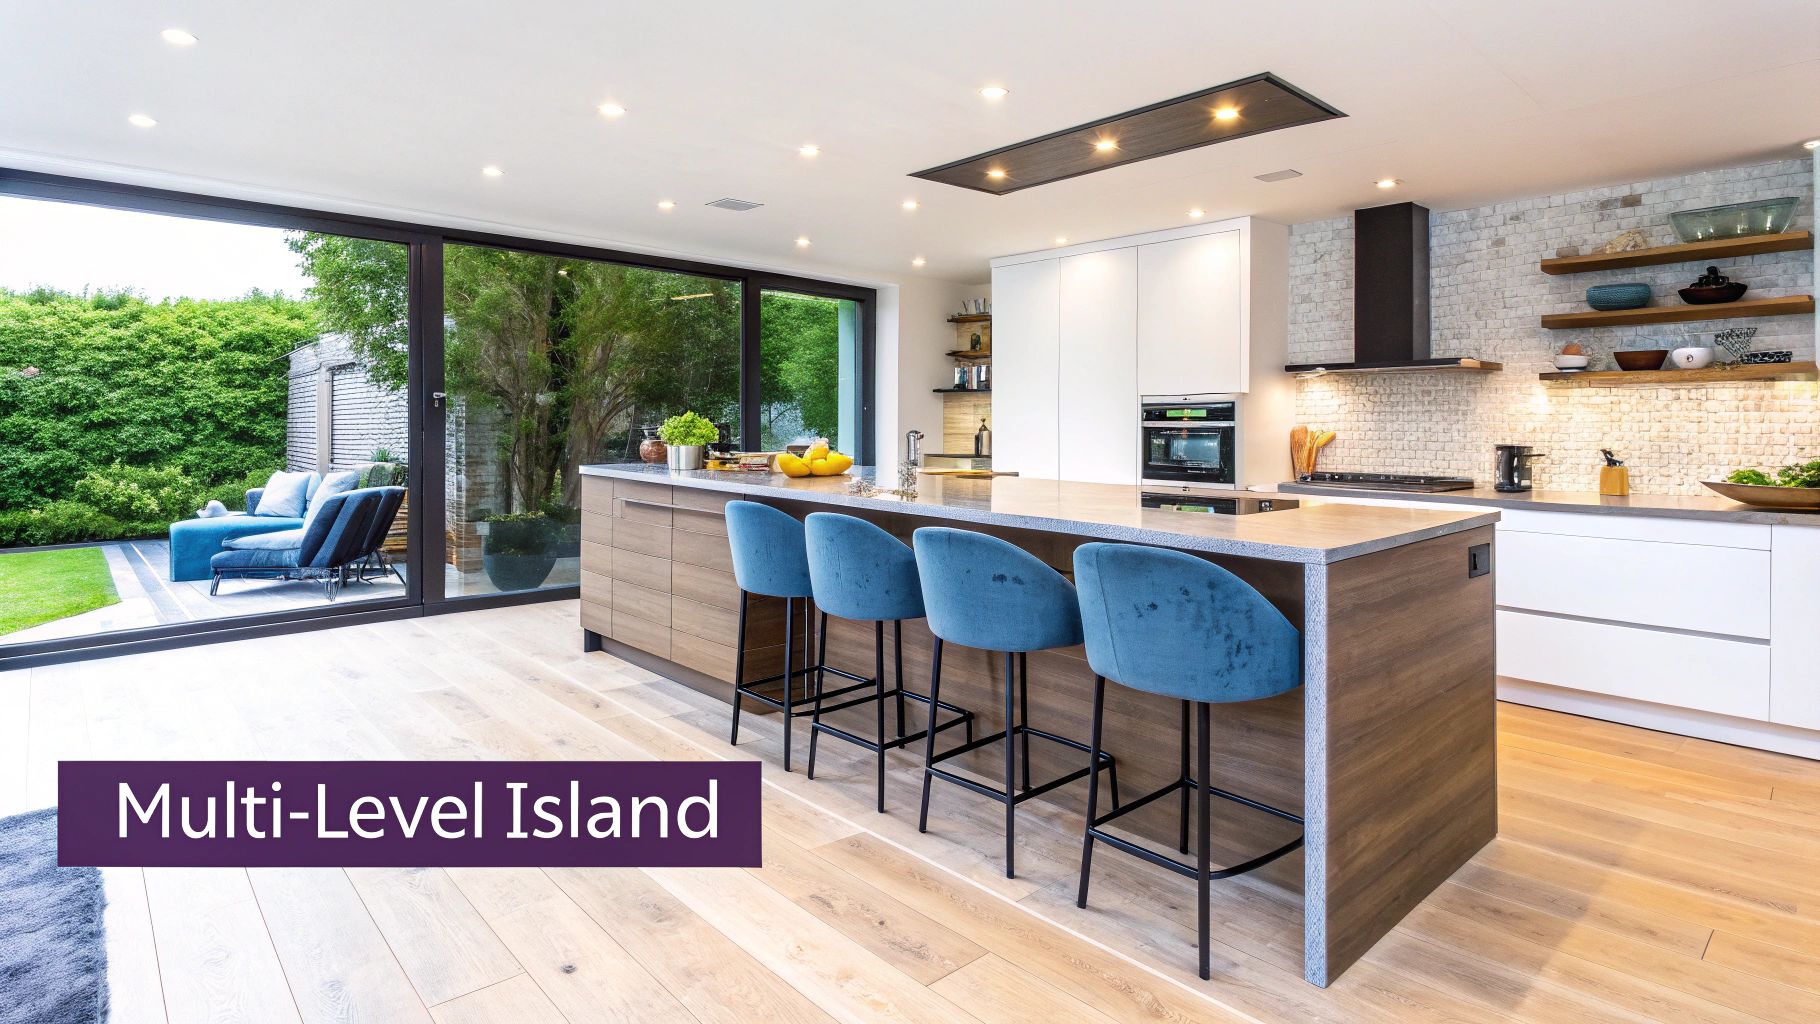
This tiered approach creates a natural hub, perfect for open-plan living where the kitchen flows into dining or living areas. It neatly hides countertop clutter from the view of guests seated at the higher level, a clever trick often seen in show homes by builders like Toll Brothers and popularised by designers like Joanna Gaines. It offers a restaurant-style dynamic, separating the "work" zone from the "service" area.
Key Implementation Tips
A successful multi-level island balances aesthetics with ergonomic precision.
- Ergonomic Spacing: Ensure there is a vertical difference of at least 15cm between the two levels. This provides adequate clearance for comfortable use, whether you're chopping on the lower tier or sitting at the upper one.
- Material Contrast: Use contrasting materials to visually separate the zones. For example, pair a durable quartz worktop on the prep level with a warm, solid oak slab for the bar area to add depth and character.
- Workflow Planning: Consider your daily routine. The lower, primary work surface should be closest to your main kitchen triangle (sink, hob, fridge). The higher seating area should face outwards, encouraging social interaction without interrupting the cook.
- Adequate Knee Space: For the bar-height seating section, plan for an overhang of at least 25-30cm. This provides sufficient knee room for people to sit comfortably without feeling cramped against the island base.
3. The Butcher Block Island: A Touch of Rustic Warmth
A butcher block island introduces natural warmth and a touch of professional culinary character into the heart of the home. This classic kitchen island design idea features a thick, solid wood countertop crafted from strips of hardwood laminated together. It provides a functional, forgiving surface ideal for food preparation and brings an organic texture that contrasts beautifully with sleeker, harder materials in the kitchen.
Its enduring appeal is showcased in everything from the rustic farmhouse kitchens featured in Country Living to the sophisticated, Scandinavian-inspired designs seen in modern homes. Brands like John Boos & Co. have long been championed by professional chefs, while lifestyle influencers such as Magnolia Home have popularised their use in residential settings, celebrating their timeless, practical charm.
Key Implementation Tips
To ensure your butcher block island remains beautiful and functional for years, proper care and selection are crucial.
- Regular Oiling: Treat the surface monthly with a food-safe mineral oil or a specialised wood conditioner. This prevents the wood from drying out, warping, or cracking and keeps it looking rich and lustrous.
- Choose Your Grain: For the most durable surface that can withstand direct chopping, opt for an end-grain construction. It is more forgiving on knife edges and better at self-healing minor cuts. Edge-grain is a more common and affordable alternative, still offering excellent durability.
- Protect from Damage: Always use trivets for hot pans to prevent scorch marks. While butcher block is meant for cutting, using a separate chopping board for messy tasks or heavy cleaving can preserve the island’s primary finish.
- Plan for Maintenance: One of the greatest benefits of wood is that it's repairable. Deep scratches or stubborn stains can be sanded out and the area can be re-oiled, restoring the surface to its original beauty.
4. The Storage-Focused Island: A Powerhouse of Practicality
Beyond aesthetics, a kitchen island must be a functional workhorse, and the storage-focused island is one of the most practical kitchen island design ideas for achieving an organised, clutter-free space. This design prioritises maximum storage capacity, incorporating clever solutions that go far beyond standard cupboards. It transforms the island into the central hub for kitchen organisation.
This approach is heavily influenced by the decluttering movement popularised by figures like Marie Kondo and is a hallmark of brands specialising in organisation, such as Rev-A-Shelf and The Container Store. From deep pan drawers to integrated spice racks and pull-out bins, every centimetre is optimised to keep worktops clear and essentials within easy reach, making it ideal for busy family kitchens and smaller spaces where storage is at a premium.
Key Implementation Tips
A highly functional, storage-centric island requires careful planning around your specific lifestyle and cooking habits.
- Assess Your Needs: Before finalising a design, conduct a kitchen inventory. Do you need deep drawers for pots and pans, vertical slots for baking trays, or specialised compartments for small appliances? Tailor the storage to what you own.
- Mix It Up: A combination of deep drawers for bulky items and shallow cupboards or shelves for smaller goods creates a more versatile and efficient system. Don't limit yourself to just one type of storage.
- Incorporate Smart Accessories: Look into pull-out corner units, integrated knife blocks, and hidden charging stations for devices. These clever additions from specialists like Rev-A-Shelf can dramatically increase the island's utility.
- Prioritise Accessibility: Place your most-used items in the most accessible spots. Consider soft-close hinges and drawer slides, which not only add a touch of luxury but also improve durability and prevent slamming.
5. The Portable/Rolling Island: Flexible Function on Wheels
For homeowners who prioritise adaptability, the portable or rolling island is one of the most practical kitchen island design ideas. These mobile units, mounted on high-quality casters, offer the extra workspace and storage of a fixed island but with the crucial advantage of flexibility. This makes them ideal for smaller kitchens, open-plan living areas that serve multiple functions, or for those who simply love to reconfigure their space.
This design’s genius lies in its versatility. It can be moved to the centre of the room for meal prep, pushed against a wall to serve as a buffet during a party, or rolled out of the way entirely to create more floor space. Its popularity has been boosted by brands like IKEA, whose FÖRHÖJA kitchen cart is a staple in compact urban flats, and by Food Network chefs who utilise mobile workstations for dynamic cooking demonstrations.
Key Implementation Tips
To ensure your rolling island is a help rather than a hindrance, consider these key details.
- Prioritise Stability: Choose an island with high-quality, heavy-duty locking casters. This is non-negotiable for safety, preventing the unit from shifting while you are chopping or using small appliances.
- Match the Height: For comfortable use, the island's height should ideally align with your existing countertops. If you plan to use it for dining with bar stools, ensure it is the appropriate height for your seating.
- Consider Your Flooring: Check that the wheels are suitable for your floor type. Softer rubber or polyurethane wheels are better for protecting hardwood or vinyl floors from scratches, while harder nylon wheels work well on carpeted areas.
- Measure Everything: Before purchasing, measure not just the kitchen space but also all doorways and tight corners it will need to pass through. An island that can’t be moved easily defeats its primary purpose.
6. The Seating-Integrated Island: A Hub for Dining and Socialising
Integrating seating directly into your island transforms it from a purely functional workspace into a warm, social hub. This kitchen island design idea incorporates features like banquette seating, built-in benches, or extended breakfast bars, creating a cohesive and space-efficient dining area. It's a design that fosters connection, making the kitchen the true heart of the home.
This approach is championed in the cosy, aspirational kitchens seen in Nancy Meyers films and is a staple in designs by brands like Restoration Hardware. From banquettes in sprawling Napa Valley kitchens to intimate breakfast nooks featured in Traditional Home magazine, integrating seating creates a custom, built-in feel that is both practical and inviting.
Key Implementation Tips
A successful seating-integrated island prioritises comfort and flow, making the space work for everyday life.
- Space Allocation: Plan for 24-26 inches (60-65 cm) of width per person to ensure comfortable seating. The countertop overhang or knee space should have a depth of at least 12-15 inches (30-38 cm) to allow people to sit without feeling cramped.
- Comfort is Key: For banquettes or bench seating, incorporate comfortable cushioning and back support, especially if it will be used for extended periods. Upholster with durable, easy-to-clean fabrics.
- Maximise Storage: A major advantage of built-in bench or banquette seating is the potential for hidden storage. Design the base with lift-up tops or pull-out drawers to cleverly store kitchen linens, seasonal items, or children’s craft supplies.
- Lighting and Access: Ensure the seating area is well-lit with dedicated pendant lights or downlights. Plan clear pathways around the seating so it doesn't create a bottleneck in the kitchen's workflow.
7. The Appliance-Integrated Island: The Ultimate Culinary Hub
An appliance-integrated island transforms a simple surface into a high-performance culinary workstation. This powerful kitchen island design idea involves embedding major appliances like cooktops, ovens, dishwashers, or specialised units such as wine coolers directly into the island's structure. This approach centralises the main cooking and cleaning functions, creating a highly efficient layout often favoured in professional kitchens.
This design is the hallmark of a serious cook's kitchen, championed by luxury appliance brands like Sub-Zero and Wolf and seen in the high-spec homes of celebrity chefs. It turns the island into the undisputed centre of activity, allowing the host to cook, entertain, and interact with guests simultaneously in an open-plan space.
Key Implementation Tips
Integrating appliances requires significant forethought and technical planning to ensure both safety and functionality.
- Plan Services Early: All necessary electrical wiring, gas lines, and plumbing must be planned and installed during the initial construction or renovation phase. This is not something that can be easily retrofitted, so plan the exact appliance locations from day one.
- Prioritise Ventilation: If installing a hob, powerful extraction is non-negotiable. An overhead extractor hood or a downdraft system needs an adequate CFM (cubic feet per minute) rating to effectively remove steam, grease, and odours from the room.
- Safety and Spacing: Ensure there is sufficient clearance around cooking appliances. A minimum of 30 cm of clear countertop on either side of a hob is recommended, and safe distances must be maintained between hot surfaces and any seating areas.
- Appliance Selection: Choose appliances specifically designed for island installation. Also, consider the noise levels, especially for dishwashers or extractors, as they will be in the centre of your open living area. It's wise to invest in quieter models.
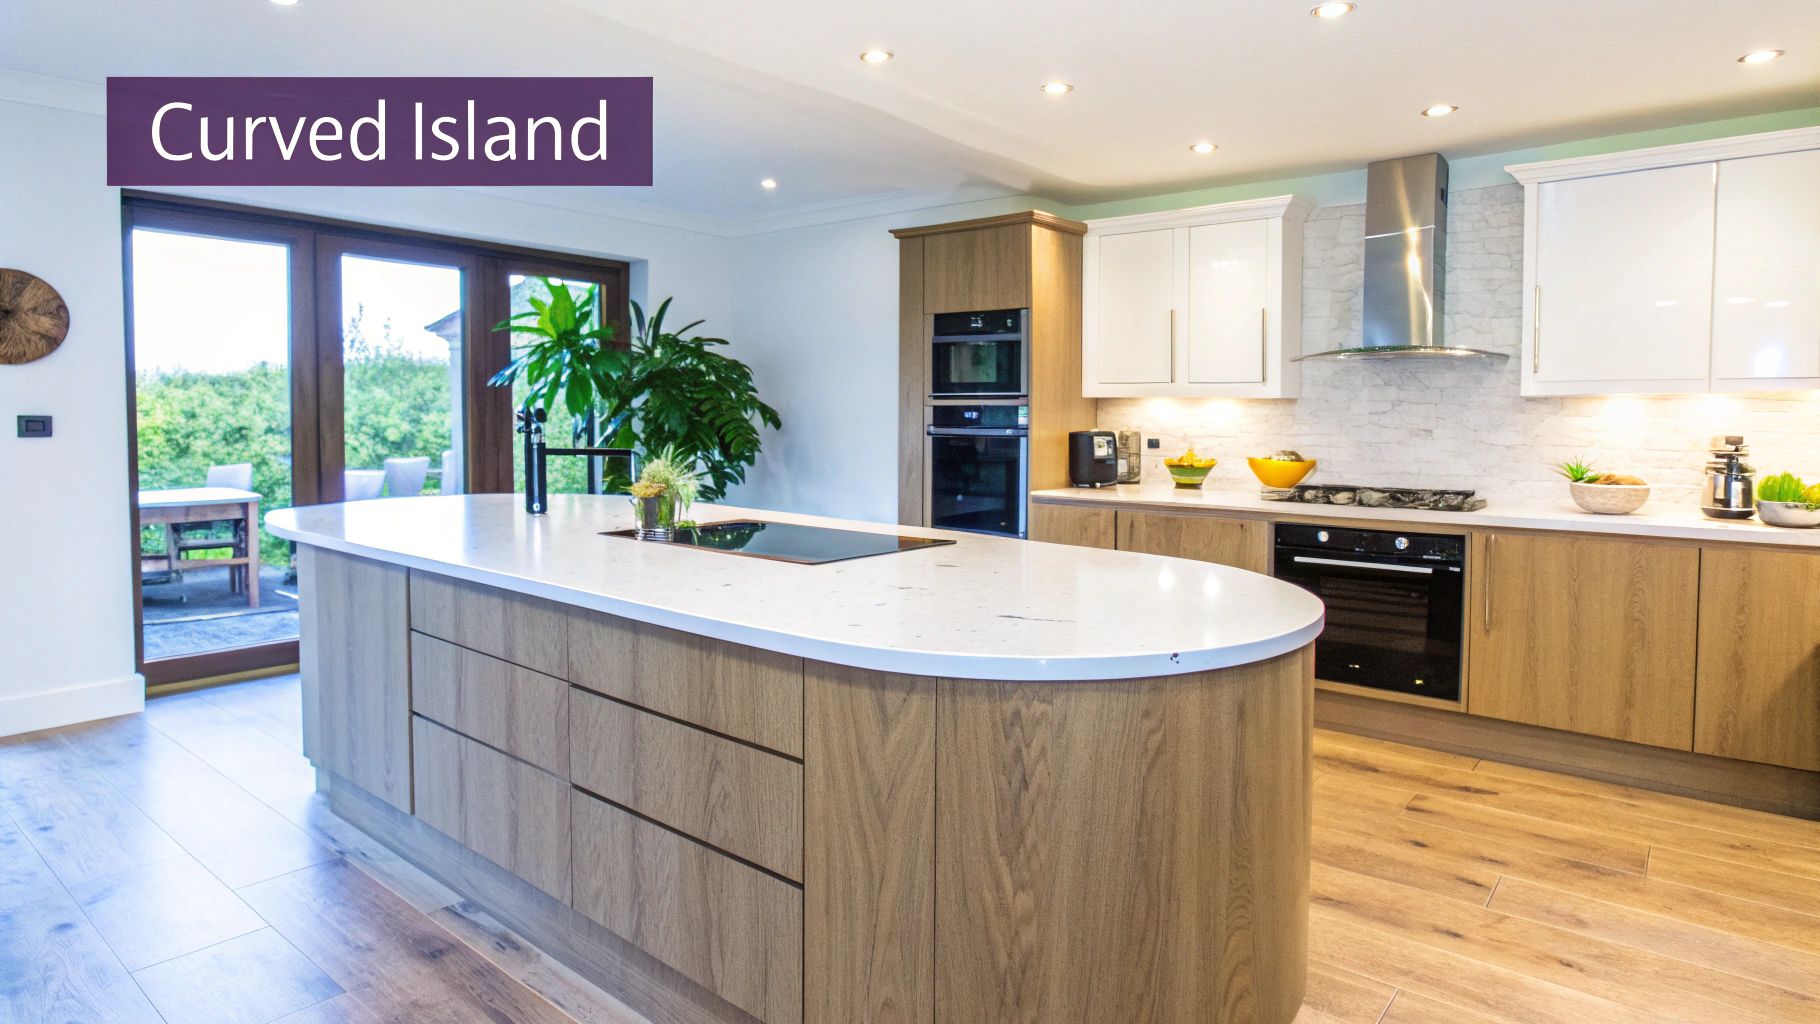
8. The Curved Island: Sculptural Flow and Function
Breaking away from rigid, linear forms, a curved or rounded island introduces an organic, sculptural element into the heart of the home. This kitchen island design idea uses soft, flowing lines to create a more fluid layout, easing traffic flow and adding a sophisticated, gentle aesthetic. It’s a design that feels both inviting and dynamic, turning the island into a piece of functional art.
These graceful shapes are often the centrepiece of high-end European kitchens from brands like Boffi, or feature in the avant-garde projects of designers such as the late Zaha Hadid. The result is a kitchen that feels less utilitarian and more bespoke, with a welcoming contour that encourages conversation and gathering.
Key Implementation Tips
Achieving a perfect curve requires specialist skills and careful material selection.
- Fabricator Expertise: Not all fabricators are skilled in creating seamless curves. Seek out a specialist with a strong portfolio of curved work, especially when using materials like stone or solid surfaces like Corian.
- Material Choice: Certain materials lend themselves better to curves. Solid surface composites, engineered stone, and even certain woods can be expertly shaped. Natural stone is possible but requires immense skill and often a larger slab to avoid weak points.
- Plan Utilities Early: The placement of electrical outlets, plumbing for a sink, and appliance integration must be meticulously planned to follow the island's unique contour. This is not a detail to leave for later.
- Cabinetry and Clearances: Ensure custom-curved cabinet doors or drawers have adequate clearance to open fully without clashing. Standard rectangular cabinetry can be used internally, but the end panels and doors must be bespoke.
- Budget for Craftsmanship: The custom fabrication, specialised labour, and potential for material wastage mean a curved island is a significant investment. Budget for a 30-50% higher cost compared to a standard rectangular island.
9. The Colour Statement Island: Injecting Personality with Paint
Creating a colour statement island is one of the most effective kitchen island design ideas for injecting personality and creating a powerful focal point. This approach uses a bold or contrasting colour on the island cabinetry that stands apart from the surrounding units. The result is a striking visual anchor that can define the entire mood of the kitchen, from vibrant and energetic to sophisticated and moody.
This design technique has been popularised by interior designers like Studio McGee and Joanna Gaines, who frequently use rich navy, deep green, or charcoal grey islands to ground their designs. It offers a way to introduce a beloved colour without committing to it across all the kitchen cabinetry, making it a versatile and impactful choice.
Key Implementation Tips
A successful colour statement island relies on thoughtful selection and execution to ensure it enhances, rather than overwhelms, the space.
- Test Extensively: Never commit to a colour based on a small swatch. Paint large sample boards and observe them in the room at different times of day to see how natural and artificial light affects the shade.
- Balance with Neutrals: For the most cohesive look, let the island be the star. Surround it with more neutral tones on the main cabinets, worktops, and splashbacks to create a balanced, intentional design.
- Choose Durable Paint: The kitchen island is a high-traffic, high-use area. Opt for a high-quality, durable paint finish specifically formulated for kitchens, such as an acrylic eggshell or a satin finish, which will withstand knocks, spills, and frequent cleaning.
- Consider Longevity: While trendy colours are tempting, consider a semi-timeless shade like a deep navy (e.g., Benjamin Moore's Hale Navy) or a classic sage green. These colours have staying power and are less likely to date your kitchen quickly.
10. The Minimalist Floating Island: A Lesson in Levity
For the ultimate in clean, uncluttered aesthetics, the minimalist floating island is one of the most sophisticated kitchen island design ideas. This design creates an illusion of weightlessness, where the island appears to levitate above the floor. This is achieved through clever structural engineering, such as cantilevered supports anchored to the wall or a recessed plinth base that is hidden from most sightlines. The effect is pure, architectural, and powerfully modern.
This style, championed by minimalist architects like John Pawson and seen in high-end German kitchen showrooms from brands like Bulthaup, prioritises form and material over ornamentation. It is perfect for open-plan spaces where maintaining a sense of airiness and light is crucial. The result is a kitchen that feels less like a utility room and more like a carefully curated gallery space.
Key Implementation Tips
Achieving this seemingly simple look requires meticulous planning and flawless execution.
- Structural Integrity is Key: A floating island requires robust, hidden support. This often involves a concealed steel frame bolted to the floor or a reinforced wall structure. Always engage a structural engineer to ensure safety and stability.
- Embrace Integrated Features: To preserve the clean lines, opt for handle-less, push-to-open cabinetry. Integrated appliances and sinks that sit flush with the worktop are also essential to maintaining the seamless, monolithic appearance.
- Enhance with Lighting: Installing a strip of LED lighting underneath the island is a popular technique. This enhances the floating effect, especially in the evening, by casting a soft glow onto the floor below and highlighting the negative space.
- Material Cohesion: Stick to a limited and consistent material palette. Using the same high-quality material for the worktop, sides, and cabinetry creates a unified, sculptural object that reinforces the minimalist ethos.
Kitchen Island Design Ideas Comparison
Choosing Your Centrepiece: Making the Right Island a Reality
We have explored a stunning array of kitchen island design ideas, each offering a unique blend of form and function. From the sleek, continuous lines of a waterfall edge island to the charming, rustic appeal of a butcher block top, the possibilities for transforming your kitchen's core are truly inspiring. The journey from initial idea to a stunning, functional reality hinges on a thoughtful synthesis of your personal style and practical daily needs.
Your kitchen island is not merely a piece of furniture; it is the command centre of your culinary space. It's where meals are prepared, conversations are started, and memories are made. As we've seen, whether your priority is the clever utility of a storage-focused island or the social hub created by integrated seating, the most successful designs are those that feel like a natural extension of your lifestyle.
Translating Inspiration into Action
To move forward with confidence, it is essential to ground these exciting design concepts in the reality of your own home. Before committing to a final plan, take a moment to systematically evaluate your requirements. This crucial step ensures your new centrepiece will serve you beautifully for years to come.
Consider the following actionable steps:
- Map Your Workflow: Use masking tape on your floor to outline the potential footprint of your new island. Walk around it, pretending to cook, clean, and entertain. Does it feel spacious or cramped? This practical exercise helps you visualise traffic flow and guarantees you maintain the essential "kitchen work triangle" between your sink, cooker, and refrigerator.
- Audit Your Storage Needs: Take a full inventory of your kitchenware. What currently clutters your worktops? What is awkwardly stored in hard-to-reach cupboards? An island with dedicated drawers for utensils, deep cabinets for small appliances, or open shelving for cookbooks could be the perfect solution. This audit will clarify whether a minimalist design or a storage-heavy model is more appropriate.
- Evaluate Your Social Habits: How do you use your kitchen socially? If you host large gatherings, an island with multi-level surfaces or ample bar seating might be ideal. For smaller, more intimate family meals, a simple overhang for a couple of stools could be sufficient. Be honest about how you live, not just how you aspire to live.
Your Kitchen's True Potential
Ultimately, the best kitchen island design ideas are the ones that resonate with your home's unique character and your family's rhythm. By carefully considering the insights from the curved, minimalist, and appliance-integrated islands we've showcased, you can create a feature that is both a breathtaking design statement and a hardworking hub. This investment in thoughtful design will pay dividends daily, enhancing not just your property's value but your overall enjoyment of your home. The perfect island isn't just out there; it's waiting for you to design it.


