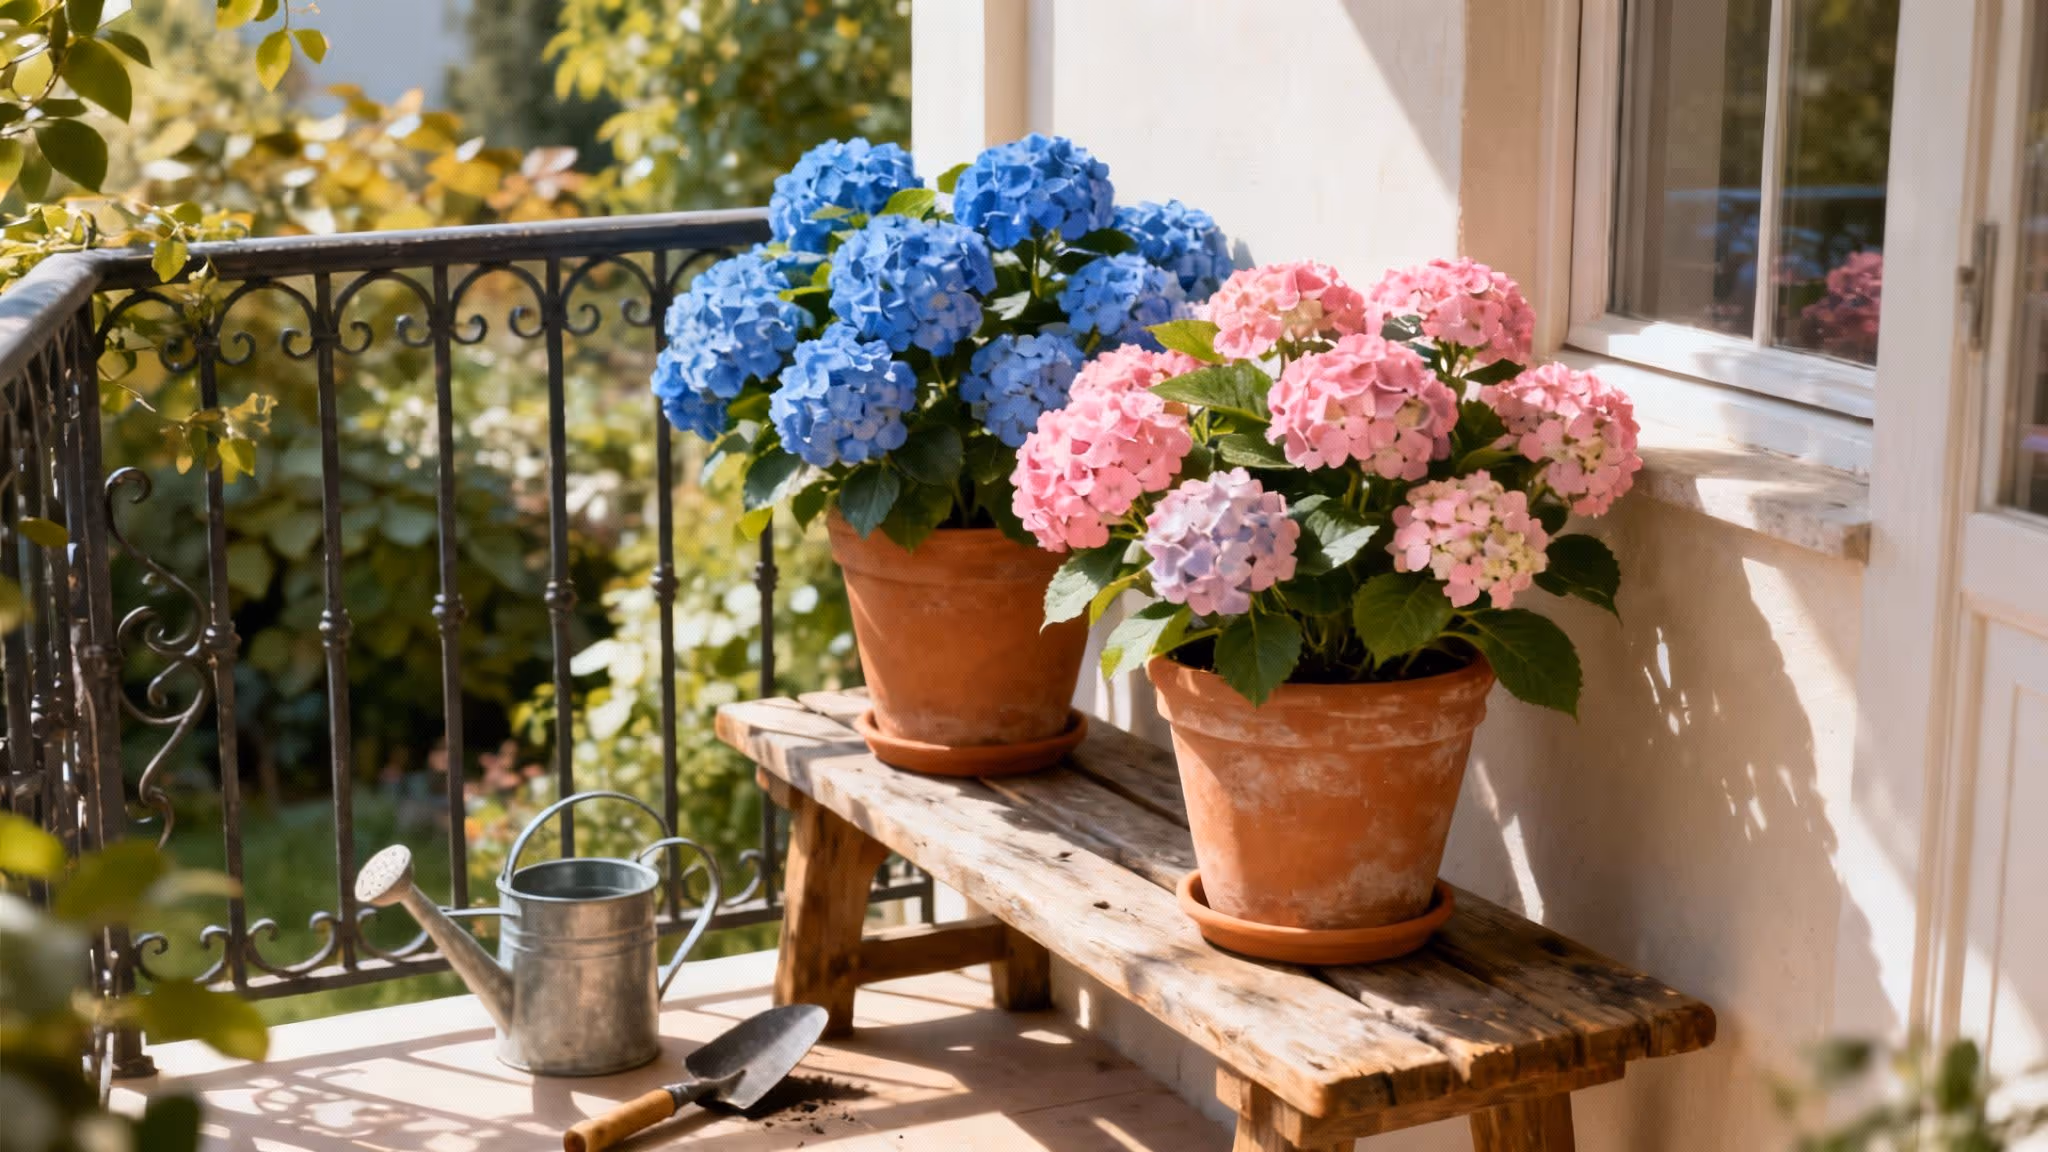
If you think hydrangeas are just for sprawling country gardens, think again. Growing these magnificent shrubs in pots is one of the best ways to bring instant, show-stopping colour to a patio, balcony, or even a front step. And honestly? It's often easier.
When you grow hydrangeas in containers, you're in the driver's seat. You get a level of control over their environment that's simply not possible when they're planted in the ground, making it a brilliant solution for urban gardeners or anyone short on space.
Why Your Patio Needs a Potted Hydrangea
The real magic of growing hydrangeas in pots is the freedom it gives you. Suddenly, you can create the perfect conditions for the blooms you really want.
- Perfect the Soil: Dreaming of those incredible, true-blue flowers? In a pot, you can easily create the ideal acidic soil mix they need to thrive.
- Control the Light: Hydrangeas love morning sun but can get scorched by harsh afternoon rays. A pot lets you move them around to find that perfect sweet spot.
- Simplify Winter Care: Protecting your plant from harsh UK frosts becomes a simple matter of moving it to a sheltered spot, rather than a massive garden rescue operation.
- Style on the Fly: You can rearrange your patio display whenever you fancy a change. A potted hydrangea can be the star of the show one week and a beautiful supporting act the next. Check out these fantastic patio plants ideas for more inspiration.
A Growing Trend in UK Gardens
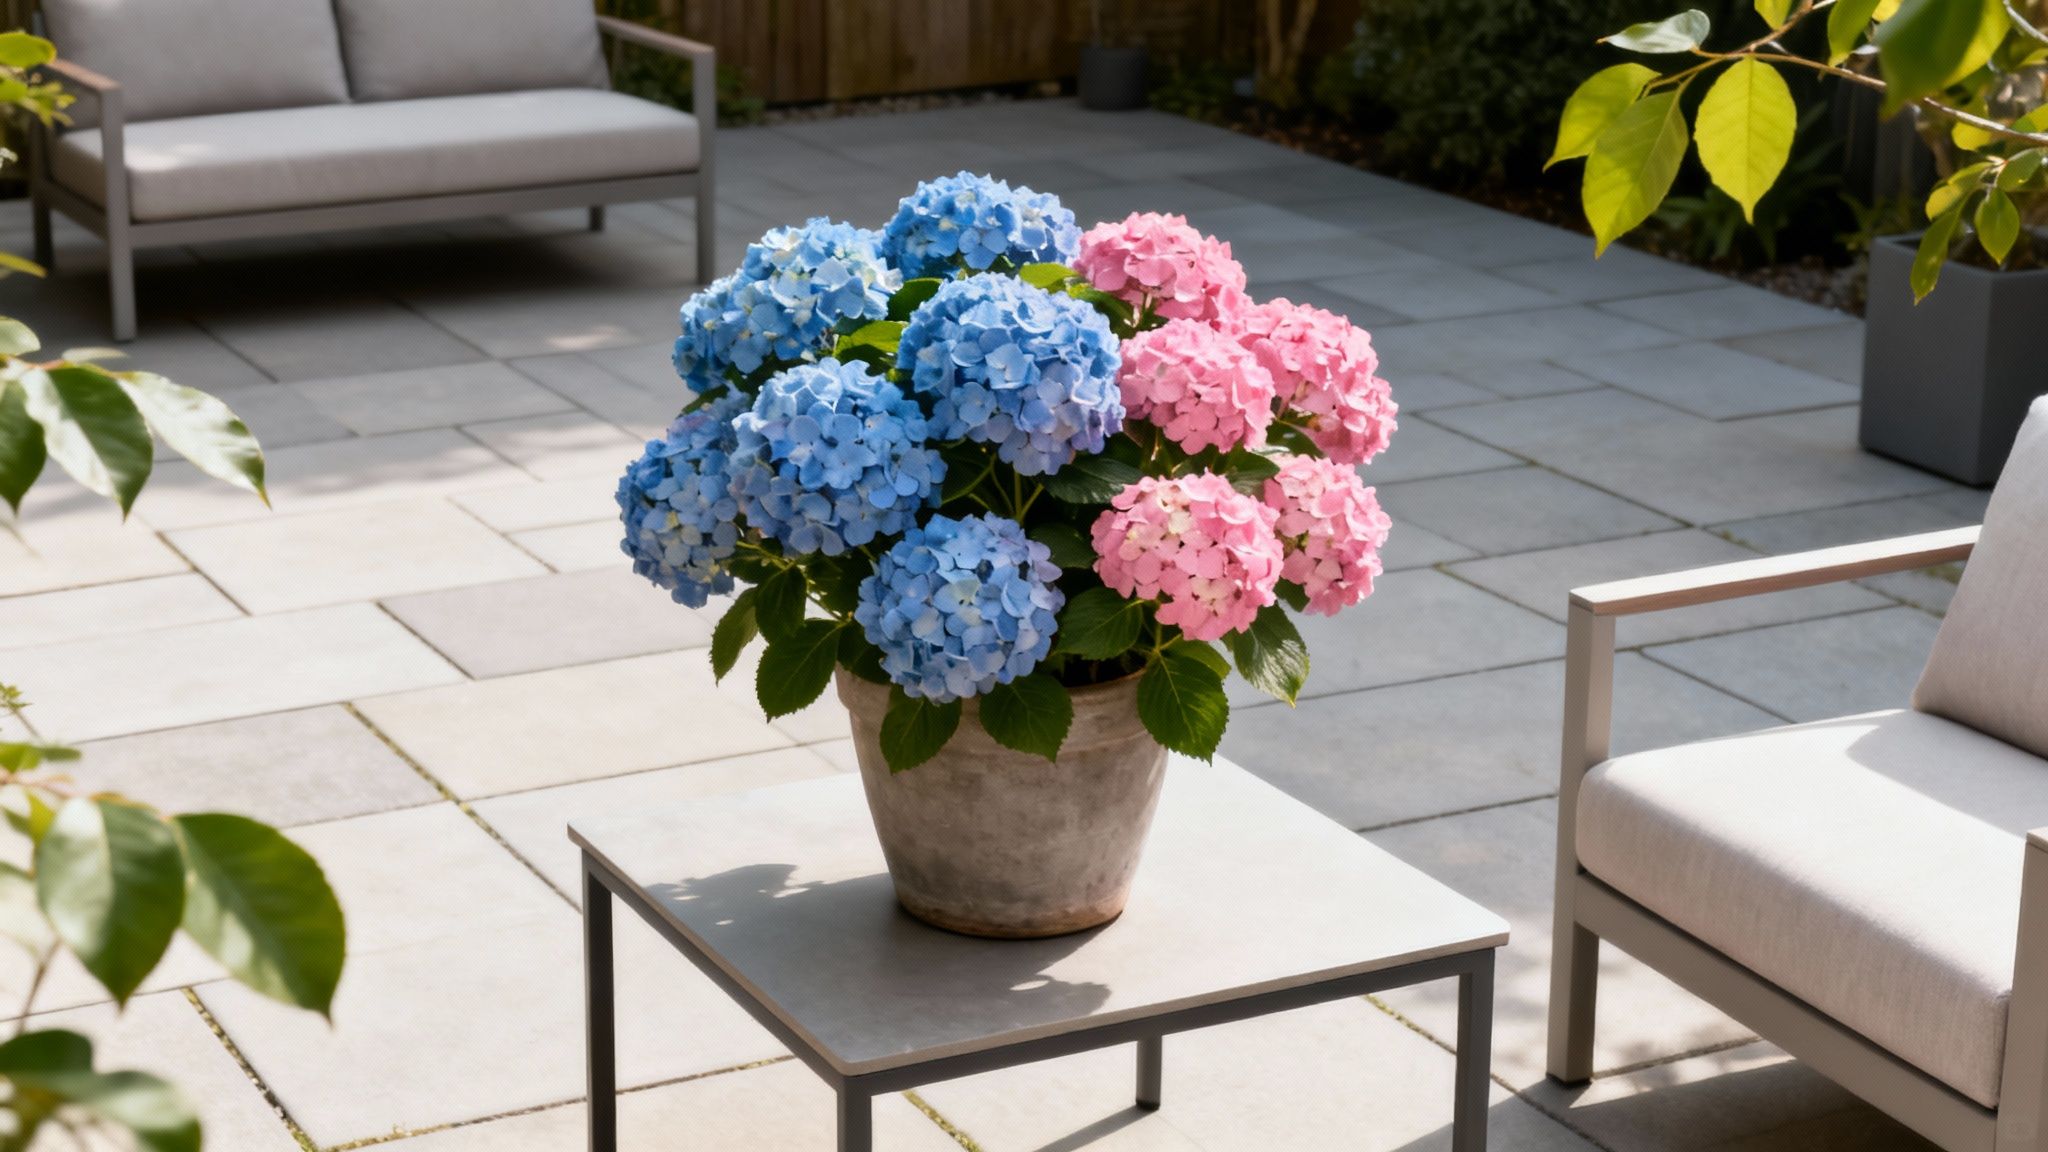
This isn't just a niche trick; it's a full-blown trend. The Royal Horticultural Society consistently lists hydrangeas among the most popular shrubs for UK patios, where container growing is the obvious choice.
Walk into any garden centre, and you'll see they now recommend pots with a diameter of at least 30–50 cm (12–20 inches) specifically for hydrangeas. It’s a clear sign that growing these beauties in containers has gone from a clever hack to mainstream gardening wisdom, especially for those of us with smaller outdoor spaces.
Before you dash off to the garden centre, here’s a quick rundown of the essentials you'll need to get right from the start.
Essential Checklist for Potted Hydrangea Success
Getting these basics sorted from day one is your ticket to healthier plants and bigger, more reliable blooms season after season.
Choosing the Right Hydrangea for Container Life
Let's be honest, not all hydrangeas are cut out for life in a pot. It’s easy to get seduced by a giant, glorious shrub at the garden centre, but choosing the right variety is the single most important decision you’ll make for successful hydrangeas in pots. The goal isn’t just survival; it’s about finding a plant that will genuinely flourish in a container.
The secret? Look for dwarf or compact cultivars. They’ve been bred specifically to stay a manageable size without skimping on the blooms. Trying to wrestle a hydrangea that wants to grow two metres tall into a 50cm pot is a battle you’ll never win. Plant labels with words like ‘Little,’ ‘Mini,’ or ‘Tiny’ are a good clue you’re on the right track.
Understanding the Main Hydrangea Types
To pick the perfect plant, it helps to know the main players. For UK container gardens, three types really shine, each with its own personality.
- Hydrangea paniculata (Panicle Hydrangea): These are probably the most forgiving hydrangeas for pot life. With their distinctive cone-shaped flower heads, they're incredibly hardy and can handle more sun than other types. A real trooper.
- Hydrangea macrophylla (Bigleaf Hydrangea): Think of the classic hydrangea and this is it – big, rounded 'mophead' or delicate 'lacecap' flowers. They're famous for their chameleon-like ability to turn from pink to blue depending on your soil's acidity.
- Hydrangea arborescens (Smooth Hydrangea): Known for their enormous, perfectly spherical white or pink flower heads, some of the newer compact varieties are brilliant for pots, offering a seriously dramatic display.
Choosing between them really comes down to your garden's conditions. That sun-trap balcony is the perfect stage for a panicle hydrangea, while a patio that gets gentle morning sun and afternoon shade is where a bigleaf variety will feel right at home.
Top Hydrangea Varieties for UK Pots
Ready to get specific? Here are a few tried-and-tested varieties that perform brilliantly in containers. It’s not an exhaustive list, but it’s a fantastic place to start.
A great rule of thumb, especially for UK gardeners in colder regions, is to choose a variety that is rated for at least one zone colder than yours. Roots in pots are more exposed to frost than those in the ground, so this extra hardiness provides a valuable insurance policy.
For Sunnier Spots (Panicle Varieties):
- 'Little Lime': A dwarf version of the famous 'Limelight', this one produces gorgeous lime-green cones that slowly fade to pink and cream. It’s tough, reliable, and a real crowd-pleaser.
- 'Little Quick Fire': One of the first paniculatas to get going in summer. Its white flowers quickly deepen to a rich pinkish-red, giving you colour from early summer right through to autumn.
For Classic Colour and Shadier Patios (Bigleaf Varieties):
- 'Miss Saori': A Chelsea Flower Show winner, and you can see why. The double-petalled white flowers are delicately edged in rosy pink. It’s a complete showstopper that stays naturally compact.
- Endless Summer 'The Original': A hugely popular choice because it blooms on both old and new wood, which means a much longer flowering season for you. It’s also easy to get those coveted rich blue flowers by using ericaceous compost in the pot.
For Simple Elegance (Smooth Varieties):
- 'Invincibelle Wee White': A true dwarf smooth hydrangea that gives you masses of pure white, ball-shaped flowers on sturdy stems that don't flop. A brilliant, low-maintenance choice.
Making a thoughtful choice now prevents so many headaches later. Match the plant’s natural habits to your space, and you’ll set the stage for a breathtaking display of hydrangeas in pots for years to come.
The Perfect Pot and Soil Mix for Healthy Roots
When you're growing hydrangeas in pots, the container and the soil you fill it with are everything. This isn’t just a pot; it's your plant’s entire world—its source of food, water, and stability. Getting this foundation right from day one is the single best thing you can do to guarantee strong roots and, eventually, a glorious show of flowers.
Think of it as choosing the perfect home. Of course, you want it to look good, but function is king. Your pot needs to nail that tricky balance of holding onto moisture without becoming waterlogged, all while insulating the roots from the UK's famously unpredictable weather.
Choosing the Right Container
First things first: drainage holes are non-negotiable. Hydrangeas are thirsty plants, but they absolutely hate having 'wet feet' in soggy soil, which is a fast track to root rot. If you’ve found the perfect pot but it only has one measly hole, don't be shy—get the drill out and add a few more.
Beyond that, the material of the pot makes a real difference. Each one has its pros and cons.
- Terracotta/Clay: These have a classic, timeless look. Their porous nature lets air and water move through the sides, which is great for root health. The downside? They dry out in a flash during a summer heatwave and can easily crack in a hard frost.
- Glazed Ceramic: Available in every colour under the sun, glazed pots are brilliant at retaining moisture. Just be warned, a large ceramic pot filled with damp compost is seriously heavy to shift.
- Plastic/Resin: A practical and affordable choice. Modern plastic pots are lightweight, great at holding moisture, and much easier to move into a sheltered spot for the winter.
- Fibreglass/Composite: These often give you the best of both worlds. They look convincingly like stone or ceramic but are lightweight, durable, and frost-resistant—a superb long-term investment.
Pro Tip: Whatever you choose, think big. Hydrangeas have surprisingly sprawling root systems. A young, compact variety needs a pot at least 45 cm (18 inches) wide and deep, while a more established plant will want something closer to 60 cm (24 inches) to give it room to grow.
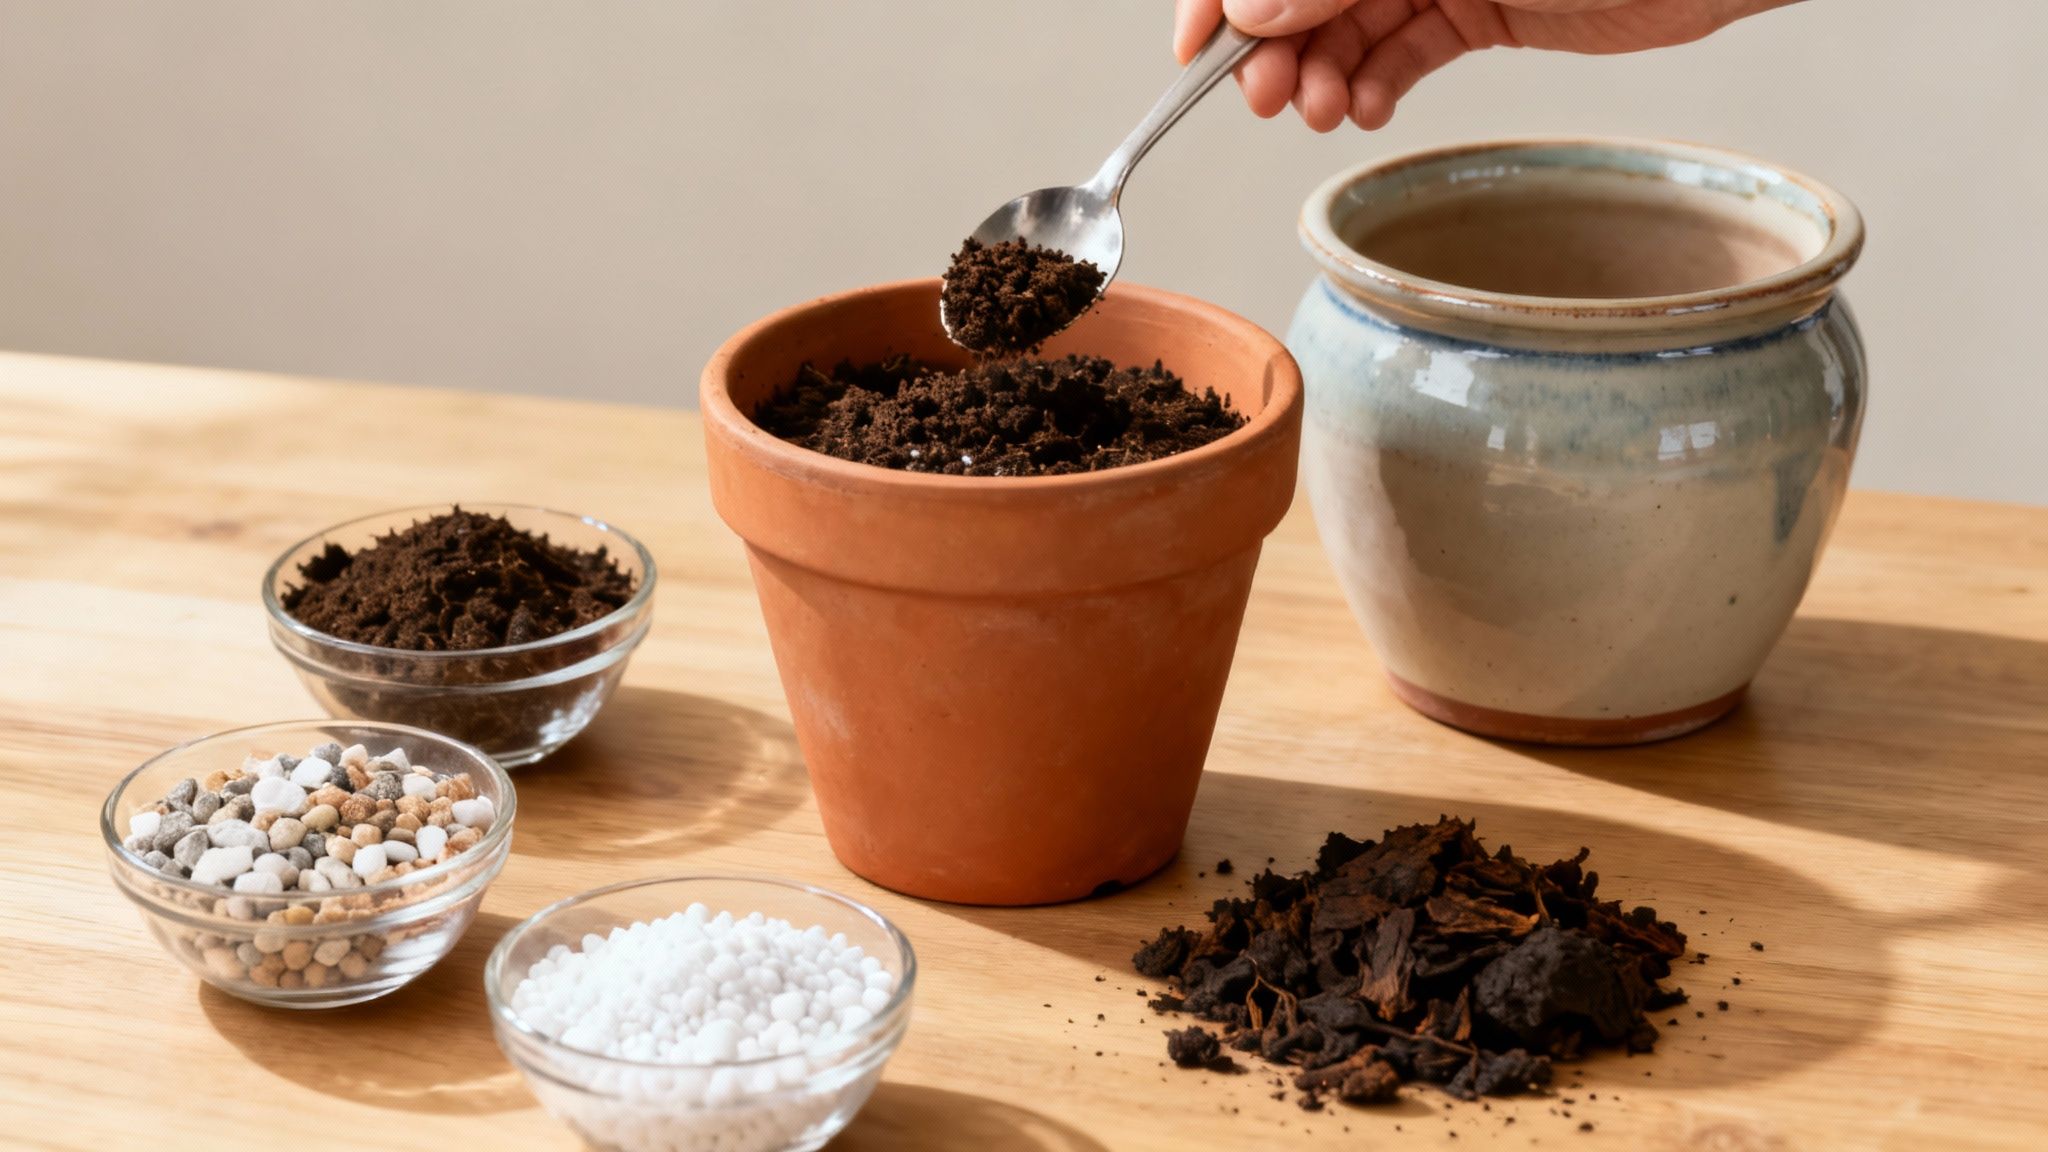
Crafting the Ideal Soil Blend
This is where so many good intentions go wrong. Scooping soil straight from your garden border into a pot is a recipe for disaster. Garden soil is far too heavy; it compacts down, squeezing out air and drainage, and will slowly suffocate the roots.
Instead, you need a proper potting mix. A good quality, soil-based compost like a John Innes No. 3 is a fantastic starting point, as it provides both structure and slow-release nutrients.
For the ultimate custom blend that will keep your hydrangeas in pots thriving, here’s my go-to recipe:
- The Base (60%): Start with a high-quality, peat-free multi-purpose or soil-based compost. This forms the bulk of your mix.
- The Drainage (20%): Mix in a generous amount of perlite or horticultural grit. This creates tiny air pockets, stopping the soil from becoming a solid brick and letting excess water escape freely.
- The Good Stuff (20%): Add some well-rotted manure or rich garden compost. This acts as a natural slow-release fertiliser and helps the mix hold onto moisture without becoming waterlogged.
If you’re chasing those incredible, deep blue flowers on a Hydrangea macrophylla, just swap half of the multi-purpose compost for an ericaceous (acidic) version. This lowers the soil's pH, which is crucial for the plant to absorb the aluminium that creates the blue pigment.
For more general pointers on getting your container setup just right, our guide on container gardening for beginners is packed with useful tips. A little thought now sets the stage for a healthy, happy plant for years to come.
How to Pot Your Hydrangea for Lasting Success
With the perfect pot and soil mix at the ready, it’s time for the exciting bit: the planting. This is where you give your hydrangea the best possible start, and getting it right now means a healthier, happier plant for years to come. It’s more than just plonking it in a new container; it’s about setting the stage for strong roots and glorious blooms.
Timing is everything, especially with the UK's unpredictable weather. The sweet spots for potting up are either in spring, just as you see the first signs of new growth, or in autumn, once the flowers have faded but before the first proper frosts bite. Planting during these milder windows lets the roots settle in without the stress of summer heatwaves or freezing winter soil.
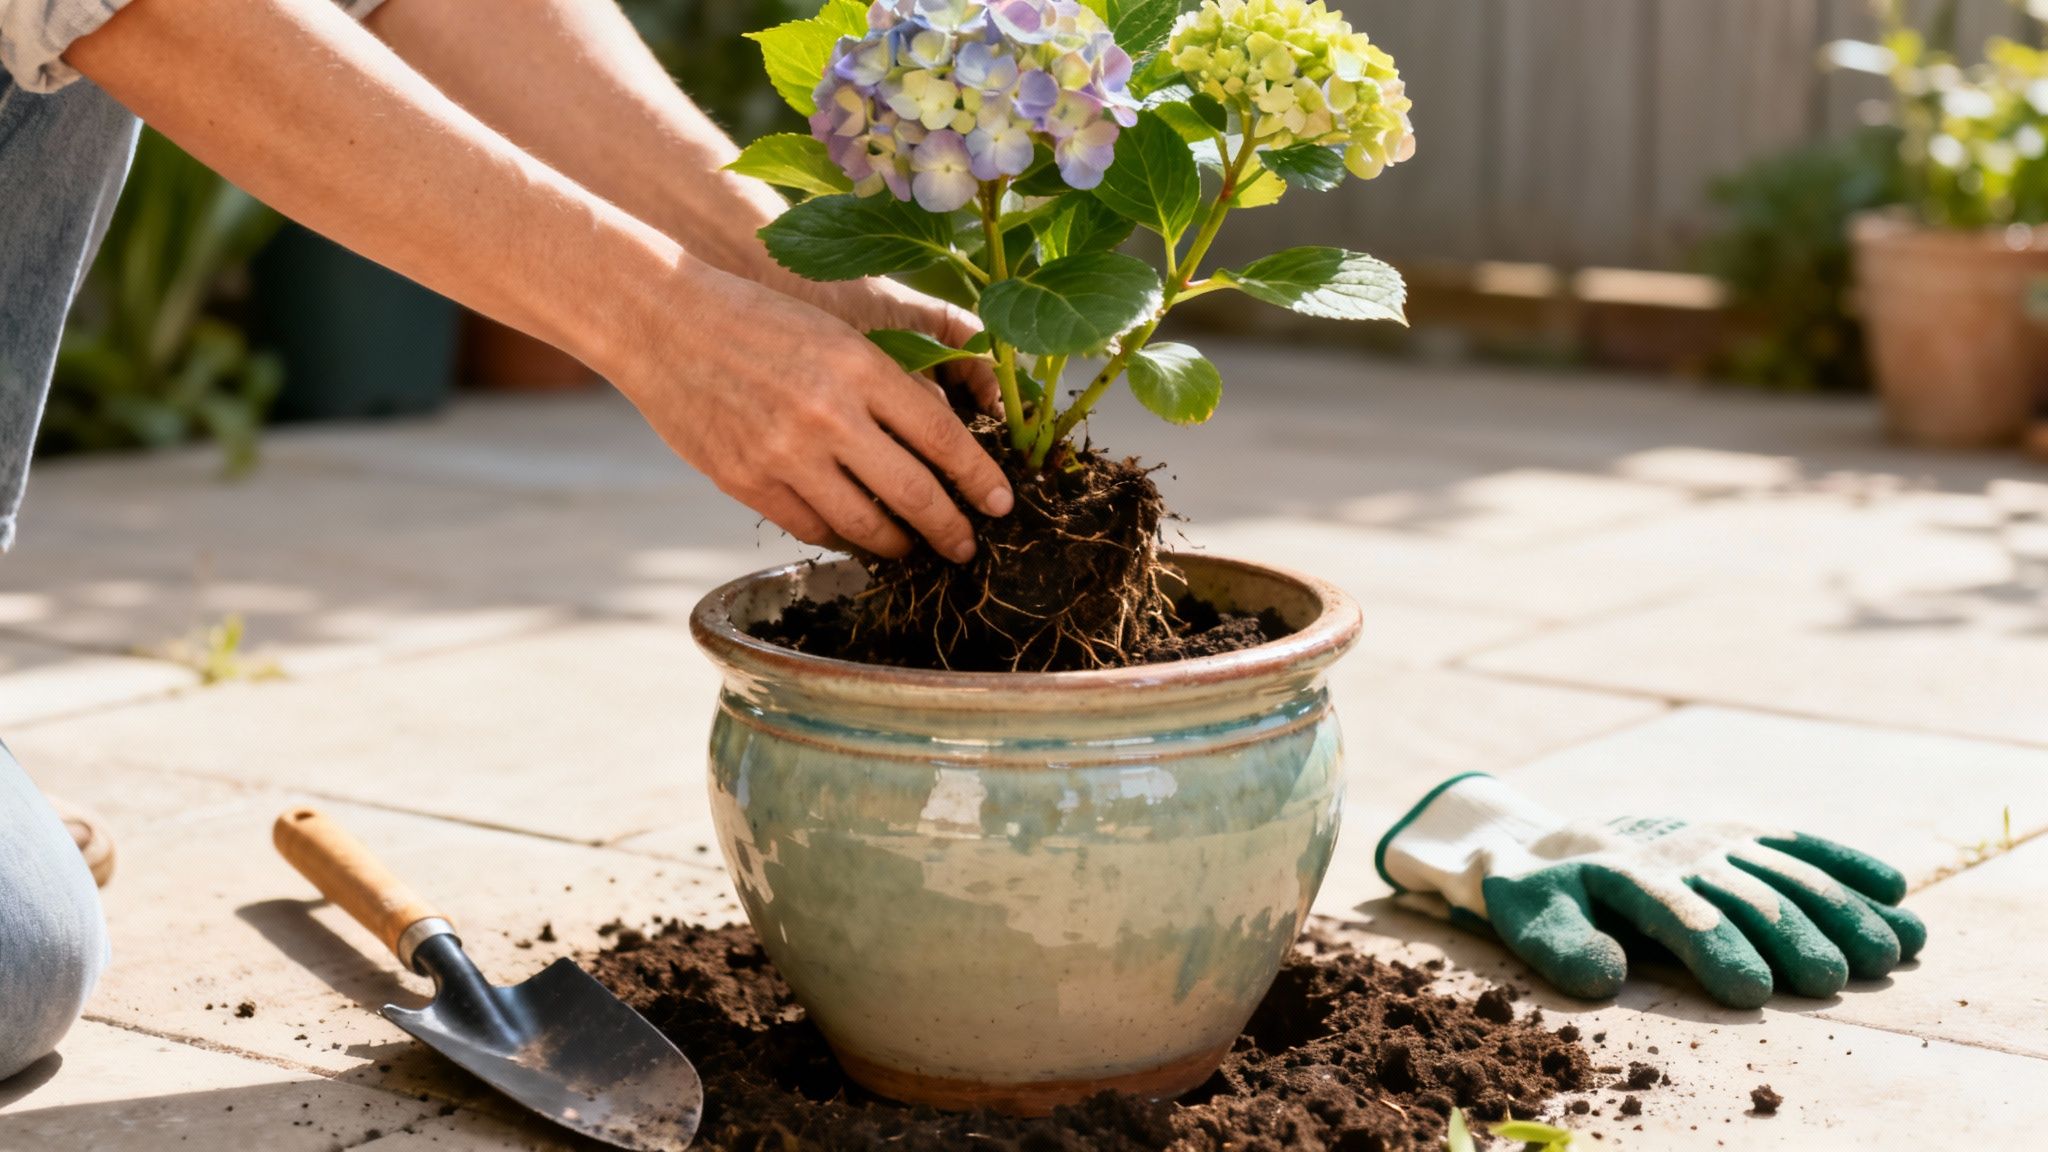
Preparing Your Plant and Pot
Before you even think about uniting plant and pot, a little prep work goes a long way. Start by adding a decent layer of your compost mix to the bottom of the new container.
Next, ease the hydrangea out of its nursery pot. If it’s putting up a fight, a few gentle squeezes on the sides or a firm tap on the bottom should do the trick. Now, have a good look at the root ball. Chances are, you’ll see a tangled, circling mass of roots—this is what gardeners call being 'root-bound'.
Don’t panic. Gently tease the roots apart with your fingers to loosen them up. The aim is to encourage them to grow outwards into all that lovely new compost, rather than continuing to strangle themselves. This little step is crucial for establishing a healthy, sprawling root system.
Getting the Planting Depth Just Right
Pop the hydrangea into its new home. The depth is absolutely vital here. You want the top of the root ball to sit about an inch or two below the rim of the pot.
This gap is your secret weapon. It does two things:
- Stops compost from spilling over the edge every time you water.
- Creates a small reservoir, allowing water to pool and soak down deep to the roots instead of just running straight off the surface.
Once you’re happy with the height, start backfilling around the plant with your compost. Gently firm it down with your fingertips as you go to get rid of any big air pockets, but don’t ram it down. Roots need air to breathe, too.
That first drink is one of the most important you’ll ever give it. Water the pot thoroughly until you see it pouring out of the drainage holes. This gives the plant a much-needed soak and helps the compost settle naturally around the roots, filling in any last air gaps.
The Finishing Touches for Success
With the main job done, a couple of final touches will lock in moisture and give your plant a professional finish.
A layer of decorative bark chips or even fine gravel over the top of the compost works wonders. It's not just for looks; this mulch acts like a lid, dramatically slowing down water evaporation from the soil. This is a game-changer for thirsty hydrangeas in pots, especially on warm, windy days. As a bonus, it helps keep weeds at bay.
These core principles of potting on are brilliant skills for any container gardener to have. If you fancy a deeper dive, many of the same techniques apply to indoor plants too, which you can read about in our guide on how to repot houseplants. Follow these simple steps, and you’ve laid the perfect foundation for a truly show-stopping display.
Mastering Watering and Feeding Schedules
When your hydrangea lives in a pot, you're its everything. Unlike a plant in the garden that can send its roots searching for moisture, your container hydrangea relies completely on you for every drop of water and bite of food. Getting this routine right is the difference between a plant that just gets by and one that puts on a truly spectacular show.
This isn’t about following a strict, unforgiving schedule. It’s about learning to read your plant’s cues. Honestly, the best tool you have is your own finger. Before you even think about picking up the watering can, stick your index finger about two inches into the compost. If it comes out dry and clean, it’s time for a drink. If it feels cool and damp, leave it for another day.
The Art of Watering Hydrangeas in Pots
Forget the little-and-often approach. A light, daily sprinkle only encourages shallow, weak roots to cluster near the surface, making the plant far more vulnerable when the weather gets hot. The goal is to water deeply and thoroughly, but less often.
When you do water, give the pot a proper soak. Keep pouring until you see water running freely from the drainage holes at the bottom. This ensures the moisture gets right down to the entire root ball, encouraging the roots to grow deep and strong. It’s the secret to a more resilient, drought-tolerant plant.
A hydrangea’s thirst changes dramatically through the UK seasons:
- Spring: As new growth starts to push through, check the soil every couple of days. You’ll need to water more as the leaves unfurl and the days get warmer.
- Summer: During the peak growing and flowering season, you might need to water every single day, especially during a heatwave. The 'finger test' is your best friend here.
- Autumn: As the weather cools and growth slows down, you can dramatically cut back on watering.
- Winter: The plant is dormant and needs very little. A quick check every few weeks to make sure the compost hasn't completely dried out is all it needs.
Get into the habit of watering early in the morning. This gives the plant all day to soak up the moisture before the heat of the afternoon sun kicks in, and helps prevent fungal problems by letting the leaves dry off quickly.
A Practical Feeding Guide for Abundant Blooms
All that watering inevitably washes nutrients out of the compost, so a simple feeding plan is essential to fuel those magnificent flower heads.
Start the season off in early spring by mixing a balanced, slow-release fertiliser into the top layer of compost. These clever granules break down over several months, giving your plant a steady supply of nutrients and a solid foundation for healthy growth.
Then, once you see flower buds starting to form, it’s time for a boost. Switch to a weekly or fortnightly feed with a high-potash liquid fertiliser – a standard tomato food works perfectly. Potash (that's the 'K' in NPK) is the key ingredient for promoting bigger, better, and more abundant flowers. Keep this up right through the summer. If you fancy a more natural approach, our guide to homemade plant food has some brilliant DIY recipes.
The Secret to Achieving True Blue Flowers
One of the most magical things about Hydrangea macrophylla is that you can influence the colour of its flowers. That incredible shift from pink to a true, vibrant blue is all down to soil chemistry—specifically, the availability of aluminium.
To get those stunning blue flowers, your plant needs two things: acidic soil and access to aluminium. In a pot, this is surprisingly easy to control. Start by planting it in an ericaceous compost mix, which gives you the acidic base you need.
To keep that colour vivid, UK gardeners aim to maintain a soil pH between 4.5 and 5.5. This keeps the aluminium in the soil unlocked and available for the plant to absorb. You can achieve this by applying a special hydrangea colourant (which contains aluminium sulfate) a few times from early spring. If the soil pH creeps up above 6.0, the aluminium becomes locked up, and your beautiful blues will start reverting to shades of mauve or pink.
Pruning and Overwintering Potted Hydrangeas
If you want your potted hydrangeas coming back stronger and more glorious every year, mastering a bit of pruning and winter prep is your golden ticket. It might sound like a fuss, but honestly, get these two jobs right and you’re basically guaranteeing a spectacular summer show.
A Tale of Two Pruning Times
Here’s the thing about pruning hydrangeas: getting the timing wrong is the number one reason they don’t flower. It’s a classic mistake, but luckily, a really easy one to avoid once you know what you’re dealing with.
- Hydrangea macrophylla (The Mopheads): These are the ones that bloom on ‘old wood’ – the stems that grew last year. If you chop them back in spring, you’re literally cutting off all your potential flowers. The rule here is simple: just snip off the old, faded flower heads in late spring, cutting back to the first pair of fat, healthy-looking buds.
- Hydrangea paniculata (The Panicles): These hardy types bloom on ‘new wood’, meaning this season’s growth. They absolutely love a good prune in late winter or early spring. This encourages strong new stems and those gorgeous cone-shaped flowers. Just cut back last year's growth by about a third.
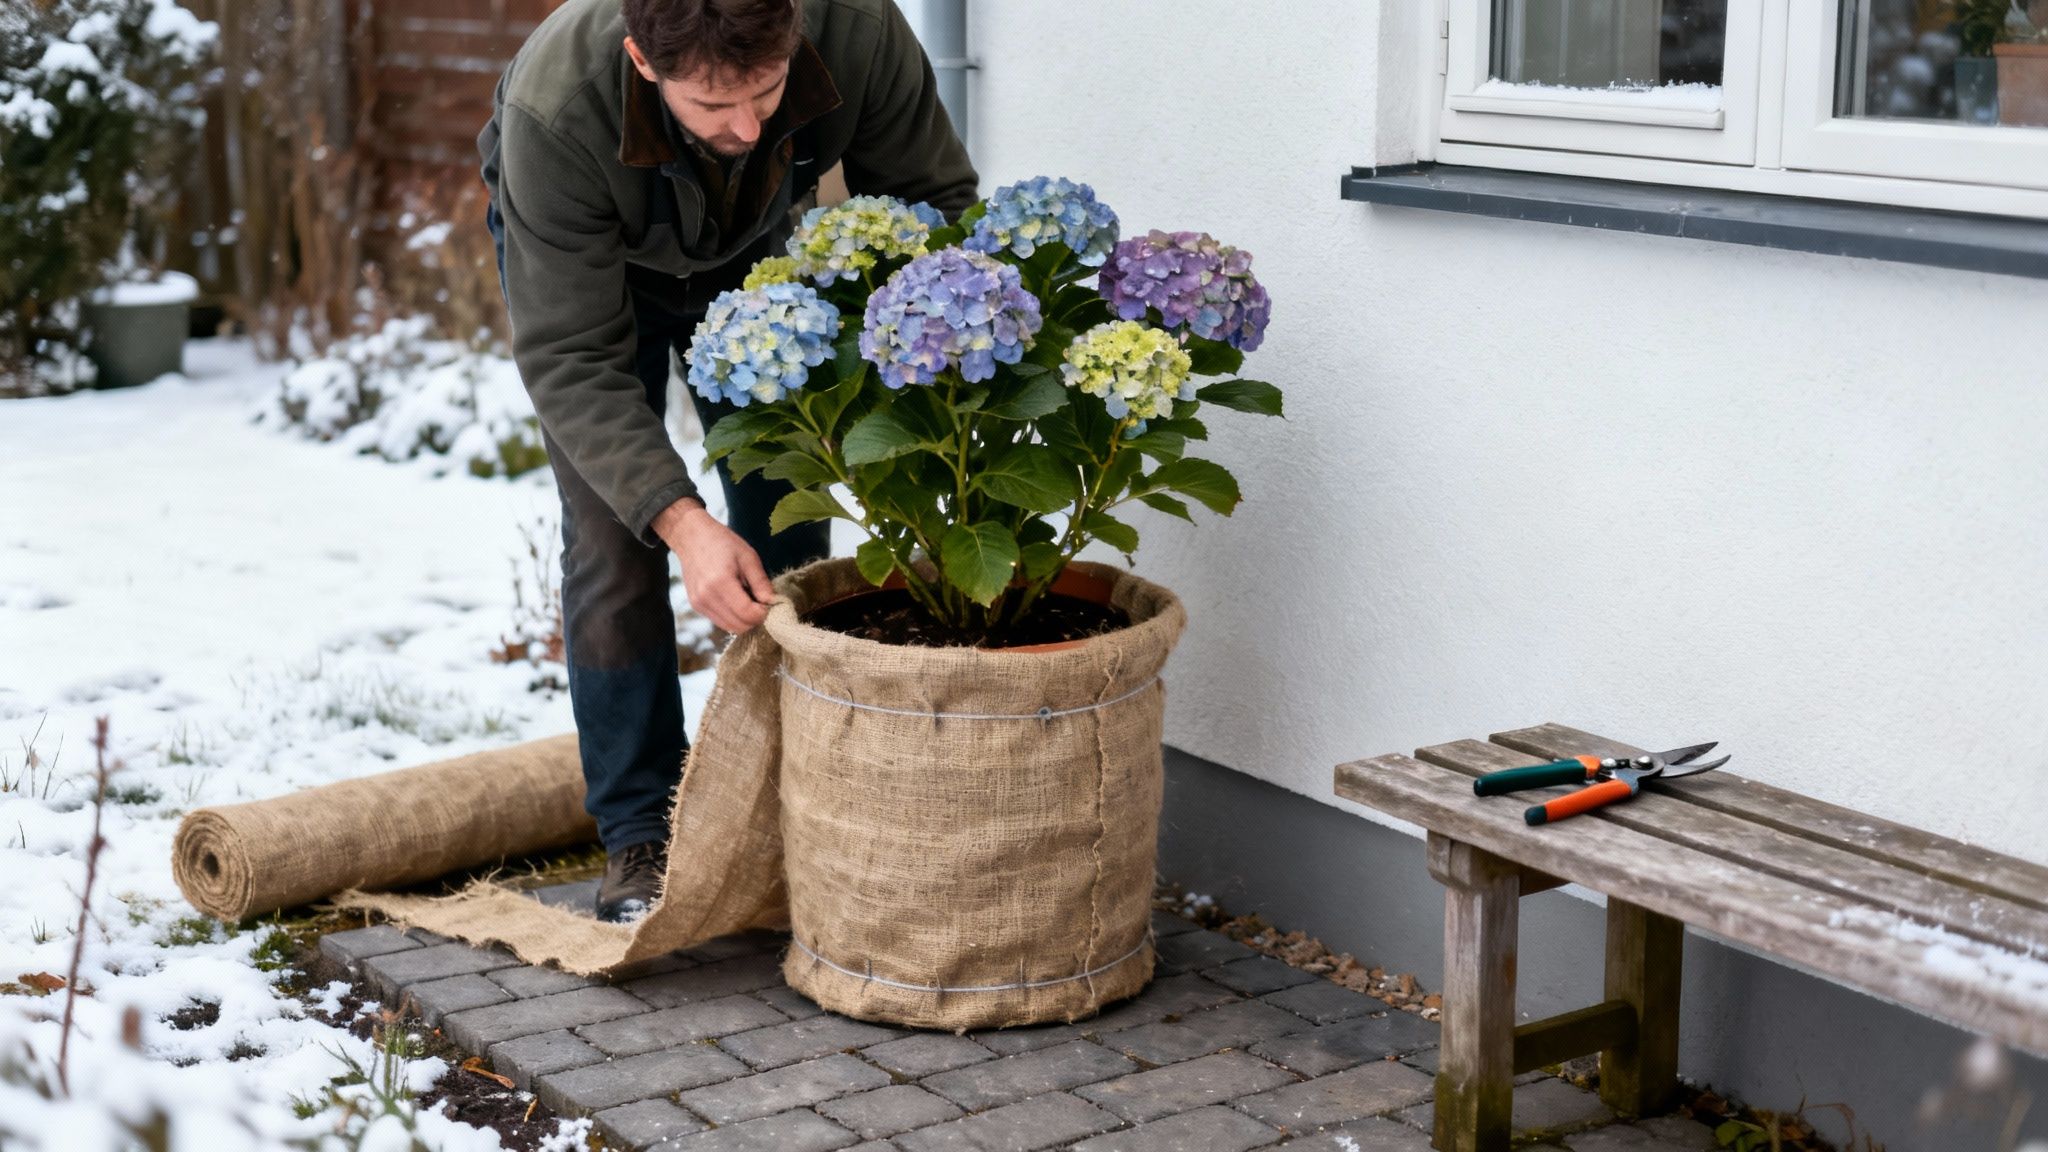
Overwintering Your Potted Hydrangea
Think about it: roots growing in a pot are far more exposed to the cold than those tucked up safely in the ground. Even the toughest hydrangeas need a bit of help in winter, as a long, hard freeze can easily damage or even kill the root system.
The easiest first step is to simply move it. Tuck your pot into the most sheltered spot you have – right up against the house or in a protected corner of the patio is perfect. This shields it from the worst of the wind and icy rain.
Here’s a top tip for Hydrangea macrophylla: don’t be in a rush to tidy it up in autumn. Leaving the old flower heads on over winter provides a surprising amount of frost protection for the delicate new buds forming just below. Think of them as a natural, protective winter hat.
When a serious cold snap is forecast, you’ll want to insulate the pot itself. This is less about keeping the plant ‘warm’ and more about protecting the roots from the harsh freeze-thaw cycles that do the real damage.
- Lag the pot: Wrap the container in a few layers of bubble wrap or hessian, and tie it on with garden twine. This simple ‘pot jacket’ makes a huge difference.
- Huddle up: If you’ve got a few pots, push them all together. Grouping them creates a little microclimate that offers collective protection.
- Get its feet off the ground: Pop the pot on ‘pot feet’ or a couple of old bricks. This lifts it off the frozen ground, which helps with drainage and stops the base from sitting in icy water.
For those of us in colder bits of the UK, moving your hydrangea into an unheated garage, shed, or greenhouse is the ultimate protection. Our guide to protecting plants in winter has even more detail on these tricks. A little effort now is all it takes to see your hydrangea burst back into life next spring.
Common Potted Hydrangea Questions, Answered
Even with the best intentions, hydrangeas can throw a few curveballs when grown in pots. We’ve all been there. Here’s a quick-fire round of the most common questions we get, with straightforward answers to get your container display back on track.
Think of this as your go-to troubleshooting guide.
Why Are the Leaves on My Potted Hydrangea Turning Yellow?
Ah, the dreaded yellow leaf. This is usually down to one of two things: a nutrient issue or a watering blunder. Known as chlorosis, it often means the soil pH is too alkaline, which stops the plant from taking up the iron it needs. But soggy roots from overwatering can look surprisingly similar.
First, check the compost. Stick your finger in a few inches – it should be moist, but never waterlogged. If your watering schedule is sound, then it’s almost certainly a nutritional problem. A dose of sequestrene (which is just chelated iron) or a good quality hydrangea feed will sort it out. Long-term, using rainwater instead of hard tap water is a game-changer for preventing this.
How Often Should I Repot My Hydrangea?
As a rule of thumb, you’ll probably need to repot your hydrangea every two to three years. The most obvious clue? When you spot a tangle of roots escaping from the drainage holes at the bottom of the pot. That’s your plant telling you it’s out of space.
The best time for the job is early spring, just as it’s waking up but before any major new growth kicks in. Choose a new pot that’s only a little bigger – about 5-10 cm wider is plenty. It’s tempting to go for a massive pot to save a job later, but this often leads to soggy compost the roots can’t handle, and that’s a fast track to root rot. And always, always use fresh compost to give it a fresh supply of nutrients.
Pro tip: When you do repot, don't be afraid to gently tease out the root ball. This stops the roots from circling endlessly and encourages them to spread out into the lovely new compost, making for a much stronger, happier plant.
Can I Leave My Potted Hydrangea Outside All Winter in the UK?
This is a bit of a gamble. In the milder corners of the UK, a hydrangea in a really big, well-insulated pot might just about manage in a sheltered spot. But here’s the thing: roots in a pot are far more exposed to frost than they are tucked up safely in the ground.
To be on the safe side, it’s always best to give them some protection. Wrapping the pot in bubble wrap or hessian is a classic for a reason – it works. For those properly frosty spells, moving your hydrangea into an unheated garage, shed, or even a cold greenhouse is the gold standard. While Panicle hydrangeas are tougher than most, every potted plant will thank you for a bit of extra winter TLC.


