Repotting a houseplant is one of the best things you can do to kickstart a new burst of growth, and it’s honestly not as daunting as it sounds. All you’re really doing is moving your plant from its current pot into a slightly roomier one with some fresh potting mix. Think of it as a simple upgrade that gives the roots space to stretch out and access a fresh supply of nutrients. It's a game-changer for a happy, thriving plant.
Is It Time for Your Houseplant to Move Out?
Before you start making a mess with soil and new pots, the first job is to figure out if your plant actually needs a new home. Just like a growing child needs bigger shoes, your plants will drop some pretty clear hints when they've outgrown their current container. If you miss these signals, you can end up with a sad, struggling plant, so learning what to look for is a vital part of indoor gardening.
Reading the Signs of a Root-Bound Plant
One of the most tell-tale signs is when you can physically see roots making a break for it. Have a look at the drainage holes at the bottom of the pot. If you spot roots poking through, that’s a dead giveaway your plant is desperately searching for more room. Sometimes, you'll even see them creeping over the soil surface, too.
Watering habits can also give you a clue. Do you find that water rushes straight through the pot and out the bottom almost immediately? That's a strong indicator that there's more root than soil in there. The dense root ball simply can't hold onto any moisture, which means your plant isn't getting the good drink it needs.
To make it even simpler, here’s a quick checklist of the most common signs.
Quick Checklist Signs Your Plant Needs Repotting
If you're ticking off one or more of these boxes, it's a clear signal to get your repotting station ready.
Why Being Root-Bound Is a Problem
When a plant becomes root-bound, its roots start to circle the inside of the pot, forming a dense, tangled mass. This isn't just about being a bit cramped; it seriously affects the plant's health. The compacted roots can't properly absorb water or the essential nutrients from what little soil is left. This stress often shows up as yellowing leaves, stunted growth, or a plant that just looks a bit miserable and lacklustre.
A root-bound plant is essentially starving and thirsty, no matter how much you care for it. The physical barrier of its own tangled roots prevents it from accessing the resources it needs to flourish.
Here in the UK, a good rule of thumb is to repot your houseplants every 12-18 months to stop them from getting root-bound in the first place. This simple task is crucial for preventing poor drainage and nutrient issues, which can halt growth and even make your plants more susceptible to pests and diseases.
If your plant is drying out way too fast or has become wobbly and top-heavy, it's almost certainly time for a move. If you're just starting your indoor garden, our guide on the best indoor plants for beginners can help you pick some forgiving first plants.
Choosing the Right Pot and Potting Mix
Getting the right kit together is the first step, and honestly, it’s one of the most important parts of repotting. It’s easy to get swayed by a beautiful pot, but for the sake of your plant, function has to come before fashion. Nail these choices, and you’re setting your plant up for a smooth transition and a happy future.
The classic beginner's mistake? Going way too big with the new pot. I know it feels like you're giving your plant a grand new home to stretch out in, but it almost always ends in tears. All that extra soil holds onto water the roots simply can't drink, which leads to a soggy, compacted mess and the dreaded root rot.
As a rule of thumb, only go up one size. That means finding a pot that’s just 1-2 inches (2-5 cm) wider in diameter than the current one. It gives the roots plenty of fresh space to explore without leaving them sitting in a swamp.
Comparing Common Pot Materials
The pot's material matters more than you might think, especially with the changeable conditions inside our UK homes. It directly impacts how often you'll need to water.
- Terracotta: There's a reason these are a classic. The porous clay breathes, letting air and moisture pass right through the walls. This helps the soil dry out evenly and saves many a plant from an over-eager owner. It’s a brilliant choice for succulents, cacti, or really any plant if you tend to be a bit heavy-handed with the watering can.
- Glazed Ceramic and Plastic: These pots are non-porous, meaning they hold onto moisture for much longer. This makes them perfect for thirstier plants that hate drying out, like ferns and Calatheas. The only catch is you have to be more mindful about watering. And whatever you do, make sure they have drainage holes!
Think about your plant's needs and your own habits. Terracotta is forgiving, while glazed or plastic pots can mean less frequent watering. Learning to match the pot to the plant is a massive part of container gardening for beginners.
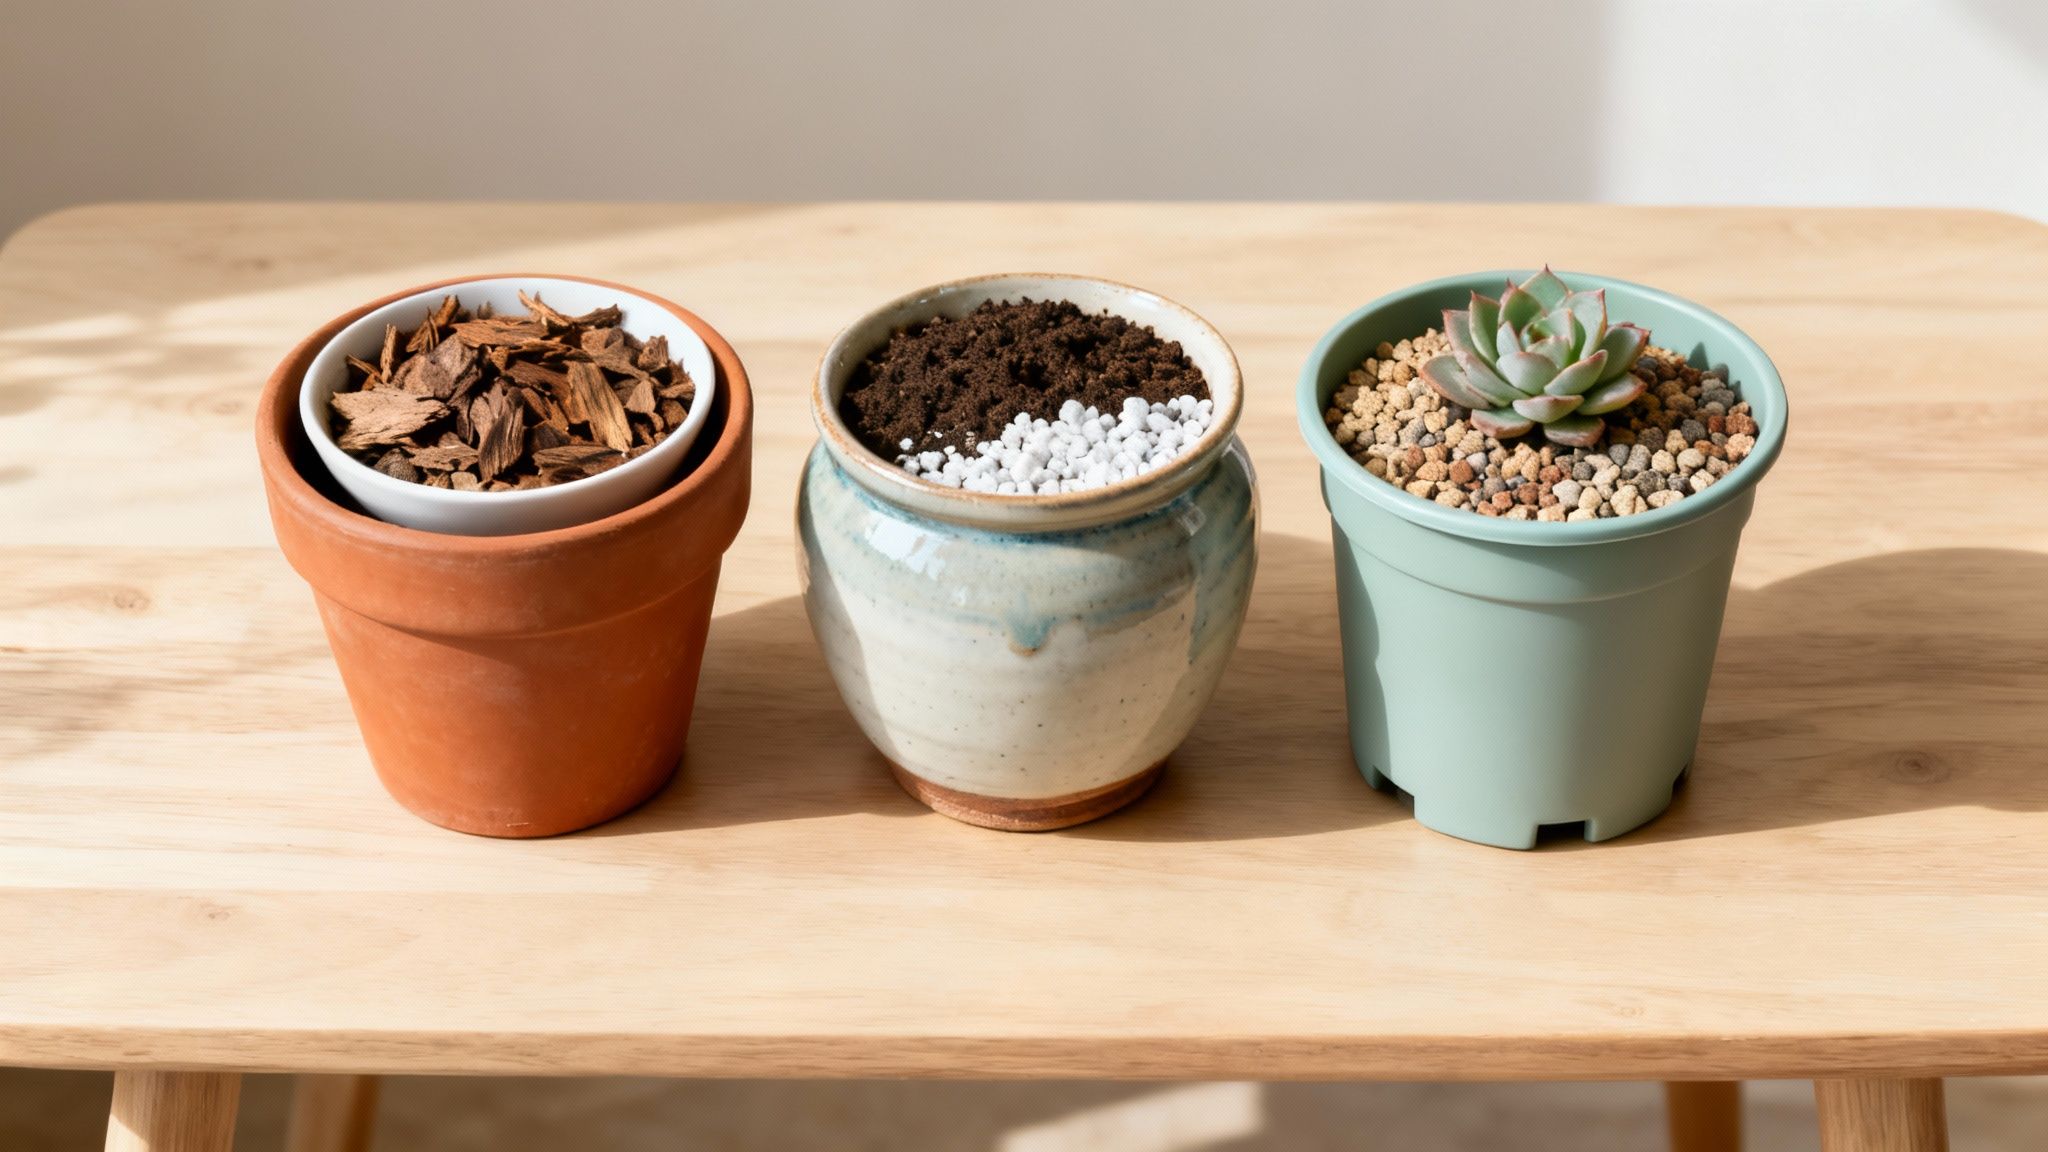
Getting the Potting Mix Just Right
A standard bag of all-purpose potting soil from the garden centre is a decent starting point, but mixing your own is a real game-changer. Plants come from all over the world, from arid deserts to humid rainforest floors, and giving them a soil that feels like home makes a huge difference.
A great potting mix is a balancing act between holding water and letting the excess drain away freely. Here are the main ingredients you'll want to get familiar with:
- Coco Coir or Peat Moss: This is the base of most mixes. It provides the bulk and is great at holding onto moisture for the roots. Coco coir is a fantastic, sustainable alternative to peat.
- Perlite: Those little white, lightweight bits of volcanic rock are your best friend for aeration. They create tiny air pockets throughout the soil, stopping it from becoming a solid brick and letting the roots breathe. I'd say this is non-negotiable for almost every houseplant.
- Orchid Bark: For plants that grow on trees in the wild (epiphytes), chunky bark is a must. Think orchids, Monsteras, and Philodendrons. It creates much larger air gaps, ensuring fantastic drainage and airflow right where the roots need it.
- Grit or Sand: If you're growing cacti or succulents, adding some horticultural grit or coarse sand is key. It helps water rush through the pot, just like it would in their natural, dry habitats.
Once you have these, you can whip up a custom blend for anything. For my aroids, I might use equal parts potting soil, orchid bark, and perlite. For a succulent, it'd be mostly soil with a big handful of grit mixed in. It sounds complicated, but customising your soil is probably the single most effective thing you can do to help your repotted plant thrive.
Your Guide to the Repotting Process
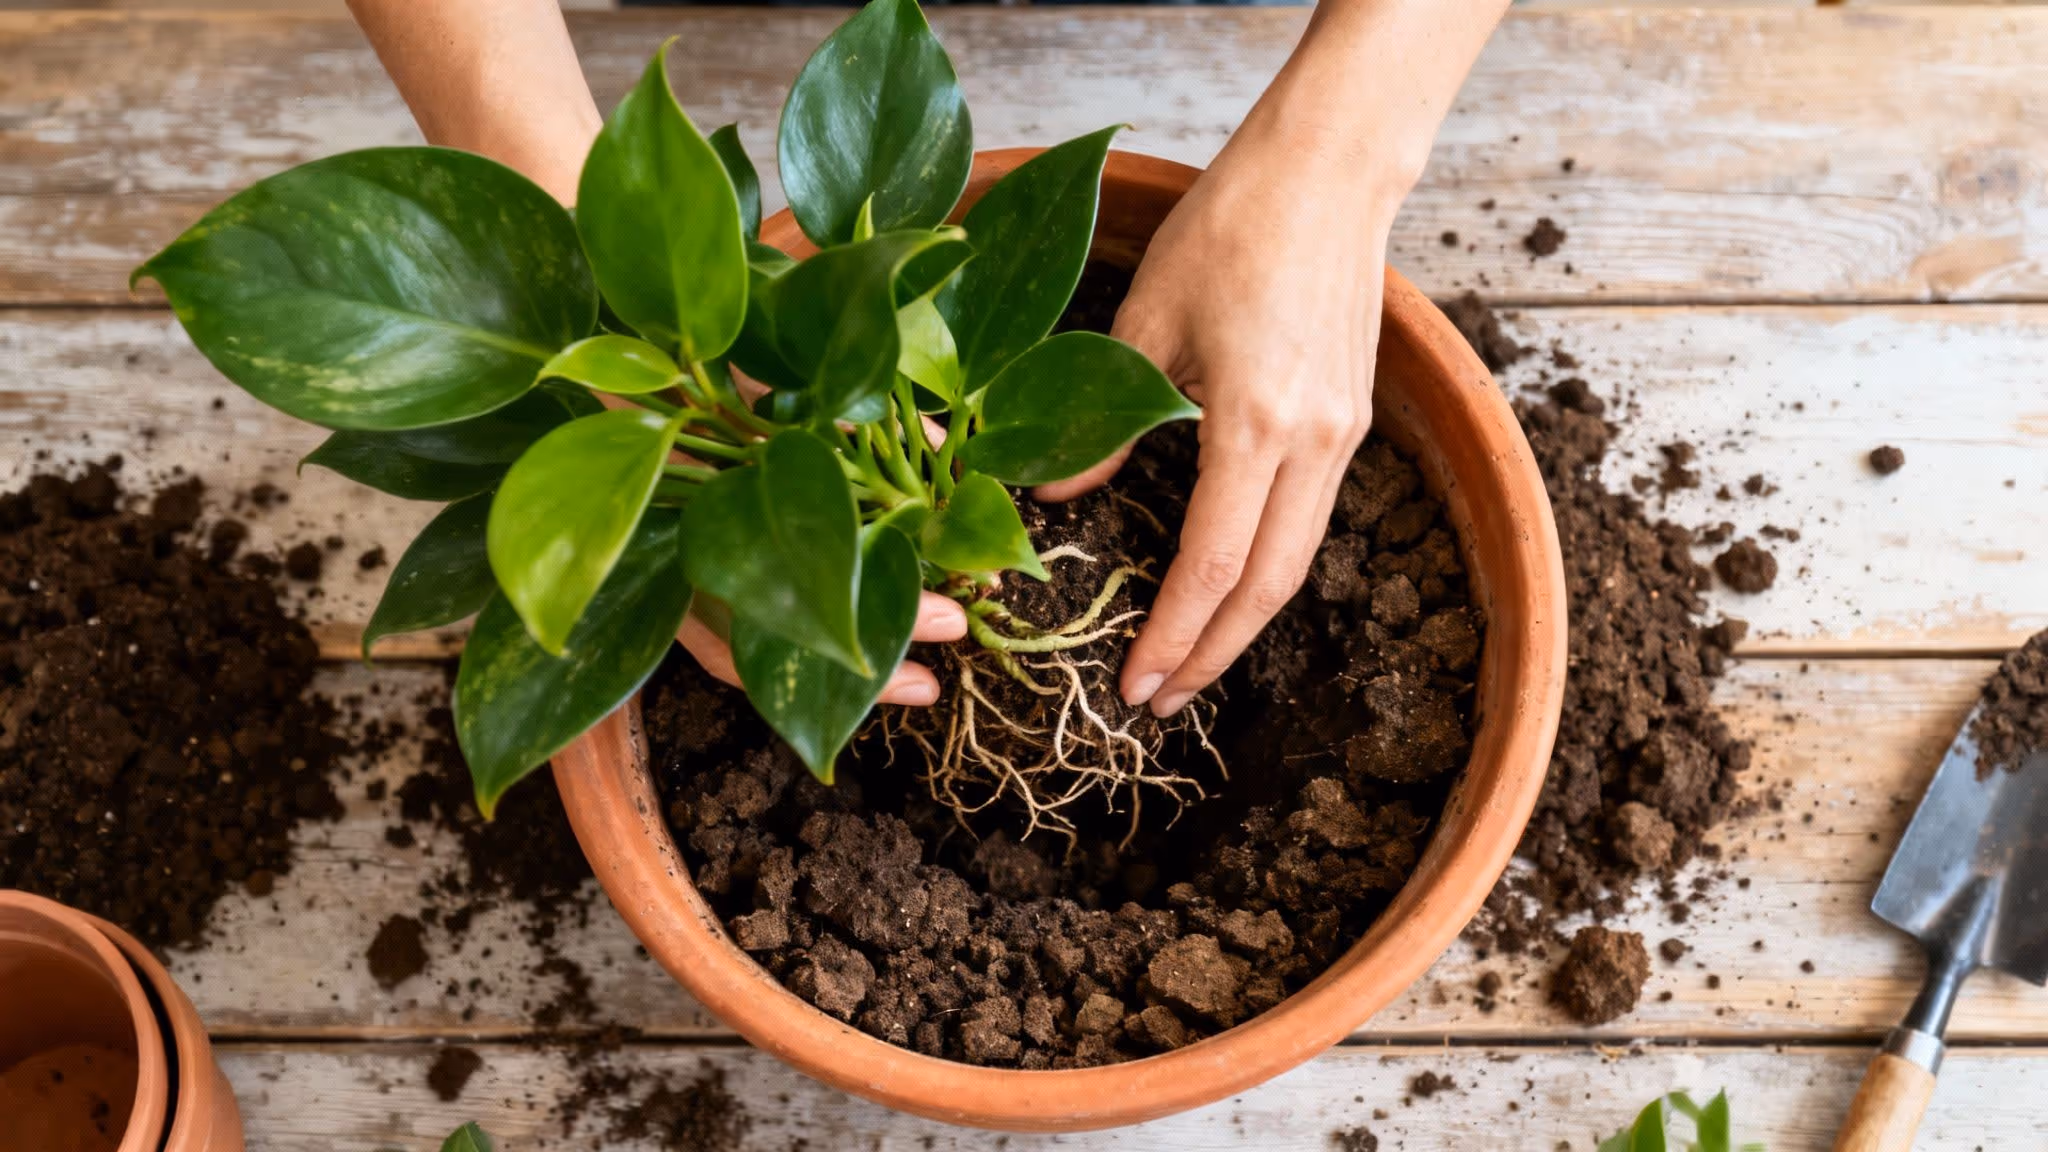
Alright, this is the satisfying bit – getting your hands dirty and giving your plant its new home. Think of this less as a rigid procedure and more as a gentle operation. Your goal is to minimise stress, and a calm, careful approach will make all the difference in how quickly your plant bounces back.

Here's a pro tip I swear by: water your plant thoroughly a day or two before you plan to repot. This simple step makes the root ball hydrated and the soil easy to work with. It's the difference between the plant sliding out smoothly and you having to wrestle a dry, compacted brick from its pot, which is a surefire way to damage delicate roots.
Gently Removing the Plant
When you're ready to go, turn the pot on its side, hold the plant gently by the stems near the soil line, and give the bottom a few firm taps. A little encouragement is usually all it needs to slide free. If it’s being stubborn, a blunt knife or a palette knife run around the inside edge of the pot will help loosen its grip.
With the plant out, you've got a golden opportunity to inspect the root system. You want to see firm, light-coloured roots—a sign of good health. If you spot anything black, mushy, or whiffy, that’s root rot. Don't hesitate to snip those bits off with clean scissors to stop it from spreading.
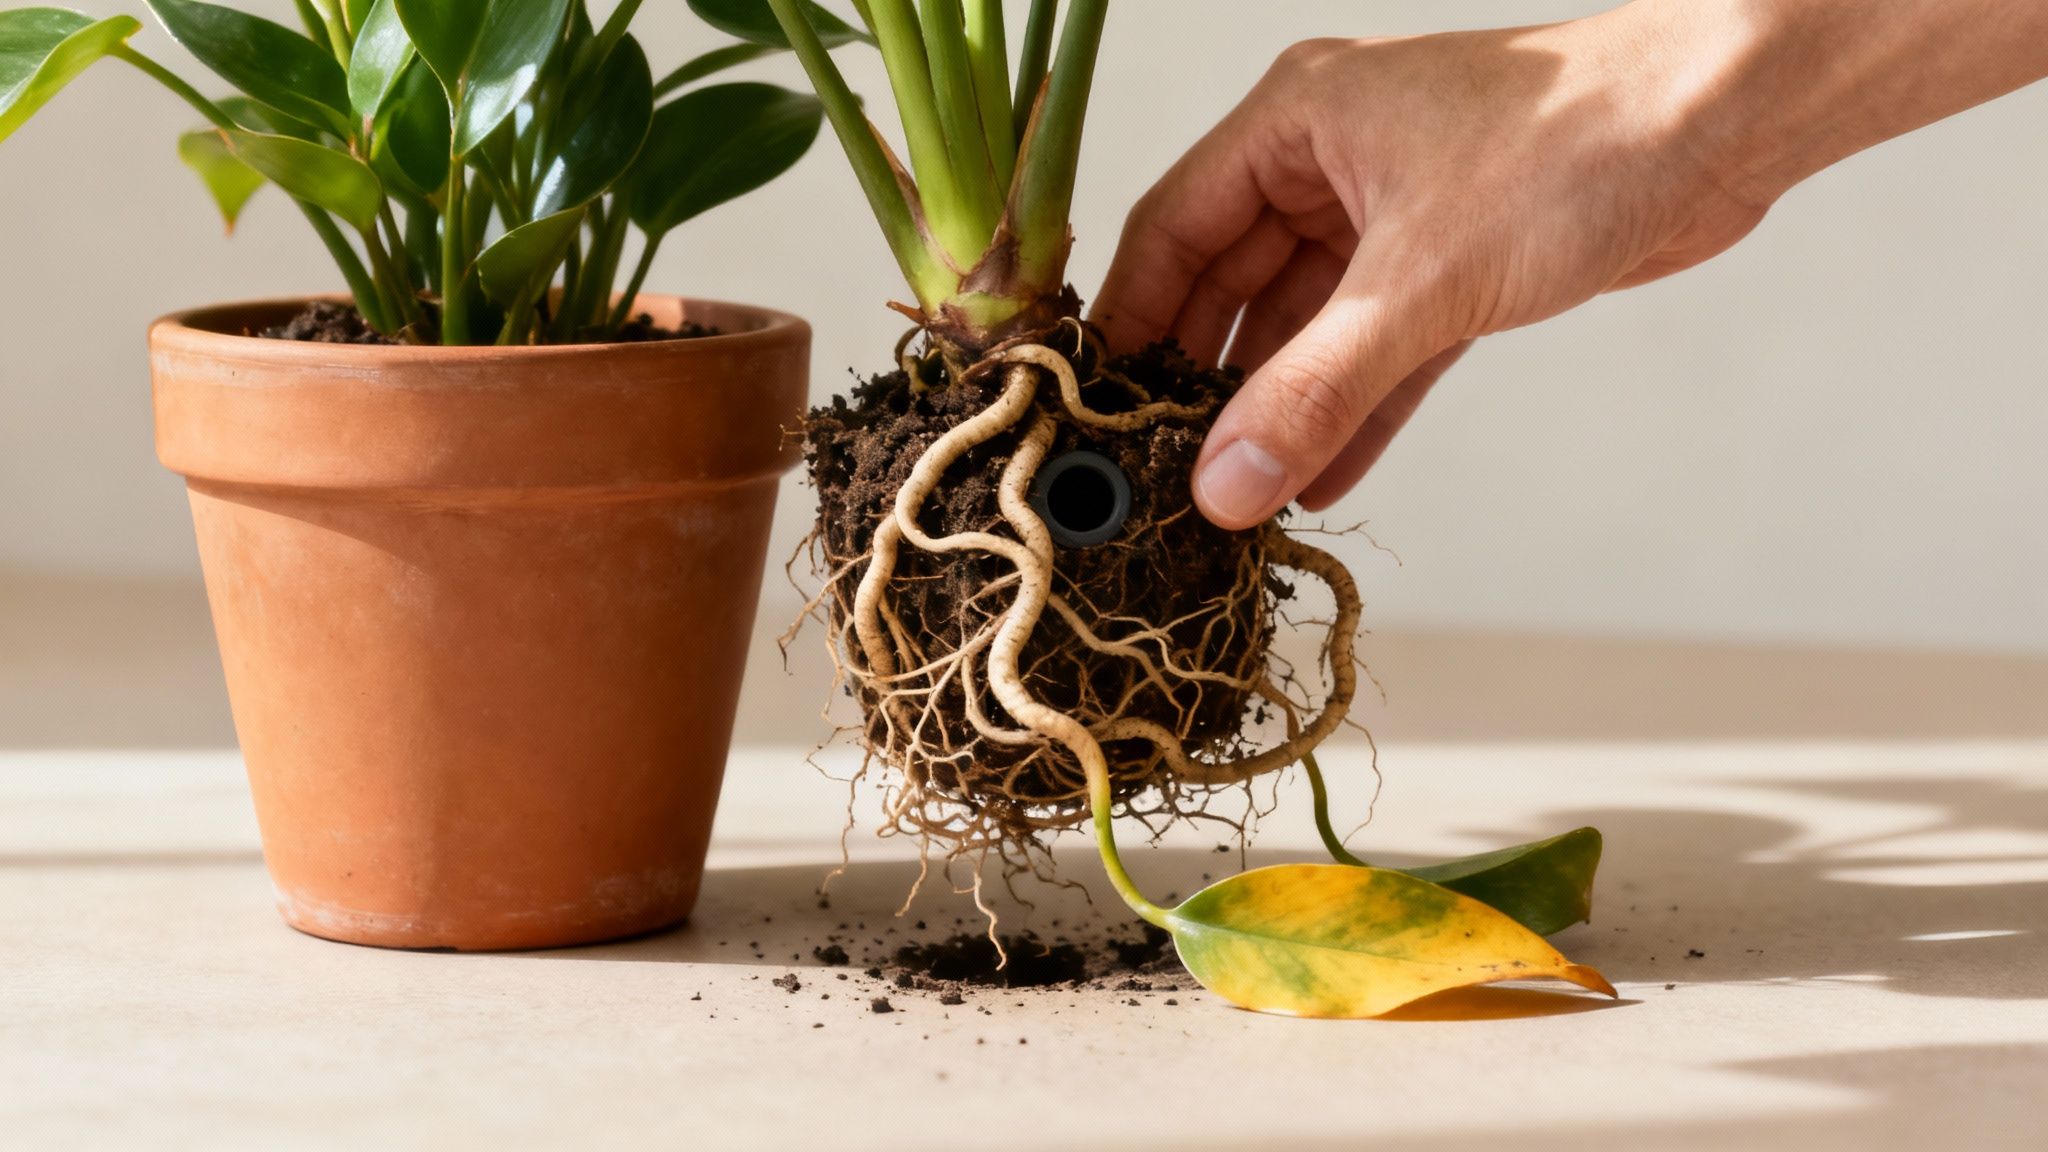
Dealing with Tangled Roots
More often than not, especially with a plant that’s overdue for a repot, you'll find a tangled mass of roots circling the bottom. This is what we call root-bound. If you just move this solid clump into a bigger pot, the roots will likely keep growing in that same tight circle, never exploring the new soil you've given them.
To get them growing outwards again, you need to break them up a bit.
- Tease them out: Use your fingers to gently pull the roots apart at the bottom and sides of the root ball. Be gentle but firm.
- A little trim: For a really dense root ball, don't be afraid to make a few shallow, vertical cuts into the sides with a clean knife. It feels a bit drastic, I know, but it works wonders to stimulate fresh root growth.
- Shake it off: Gently shake away about one-third of the old soil. This gets rid of depleted potting mix and ensures the roots make direct contact with all the good stuff in your fresh mix.
In the UK, timing is everything. Spring is the perfect season for this task, as plants are naturally kicking into a growth spurt. When you're teasing the roots, keep an eye out for "girdled" ones—those growing in tight circles that can eventually strangle the plant. For more seasonal plant care tips, The Independent offers some great local insights. But whatever you do, try to avoid repotting in late autumn or winter, as the shock combined with the cold can be too much for many houseplants.
Positioning and Backfilling the New Pot
Now for the final placement. Start by adding a layer of fresh potting mix to the bottom of the new pot. You want just enough so that the top of the plant's root ball sits about an inch or so below the pot's rim. This space is crucial – it stops soil and water from spilling over the edge every time you give it a drink.
With one hand, hold the plant steady in the centre of the pot. Use your other hand to backfill with fresh soil all around the sides. The biggest mistake people make here is packing the soil down too tightly, which can suffocate the roots. A much better way is to gently tap the sides of the pot to help the soil settle naturally and fill in any air pockets.
Once it's filled, give the plant a good, thorough watering until you see it draining from the bottom. This helps settle the soil one last time and gives the roots an immediate drink in their new home. And that’s it – your plant is officially repotted and ready to thrive.
Post-Repotting Care for a Happy Plant
You’ve successfully moved your plant into its new home, but the job isn’t quite finished. Think of the next few weeks as a recovery period. Your plant has just been through a bit of an ordeal, and the right aftercare is what makes the difference between it just surviving and truly thriving.
https://www.youtube.com/embed/GrvtFU9u2Ao
One of the most common things people worry about after repotting is a bit of wilting or drooping. This is completely normal and often called transplant shock. The plant’s delicate root system has been disturbed and needs a moment to get its bearings and start drawing up water efficiently again. Don't panic; a little TLC is usually all it takes to see it perk back up.
Creating a Recovery Zone
Right now, your plant's biggest enemy is stress. To keep it to a minimum, find a temporary spot for it away from any harsh conditions. That means no bright, direct sunlight, which can scorch the leaves and demand more water from those already-struggling roots. A corner with gentle, indirect light is perfect.
On that same note, keep it clear of any draughts or sudden temperature changes. A stable, comfortable environment lets the plant focus all its energy on what really matters: establishing its roots in the new soil.
Watering and Feeding After the Move
You’ll need to adjust your watering routine slightly during this phase. Although you gave it a good soak right after repotting, you should now let the soil dry out a little between waterings. The goal is to keep the soil consistently moist, but never, ever waterlogged. Overwatering is a huge risk at this stage, as the vulnerable roots can easily rot if they're left sitting in a bog.
And definitely hold off on the fertiliser for a while. Fresh potting mix comes loaded with nutrients, and adding more right now is just too intense for the recovering roots. You risk causing "fertiliser burn," which can do more harm than good.
Give your plant at least four to six weeks to settle in before you even think about feeding it. This waiting period allows the roots to heal and start actively growing into the new soil without being overwhelmed.
When you do resume feeding, why not try making your own? You can learn how to craft a gentle, natural blend with our guide on homemade plant food. It's a great way to provide nutrients without any harsh chemicals.
Spotting Trouble vs. Normal Shock
It's crucial to know the difference between normal transplant shock and a sign that something is genuinely wrong.
- Normal Shock: A bit of wilting or a few yellowing lower leaves in the first week or so is to be expected. The plant should start to look happier and perkier within about a week or two.
- Signs of Trouble: If the wilting gets progressively worse after a week, or if you spot widespread yellowing, soft, mushy stems, or mould on the soil, it could point to a more serious issue like root rot from overwatering.
If you don't see any improvement, gently check the soil's moisture level. If it feels soggy, hold off on watering and make sure the pot is draining properly. A little patience is your best tool here; most plants will bounce back beautifully with the right care.
Common Repotting Mistakes and How to Fix Them
We've all been there. Even with years of experience, a simple repotting session can go sideways. Learning the ropes of repotting often comes from a bit of trial and error, but knowing what not to do from the start can save your plants a world of stress. Let's look at the most common blunders I see and how you can sidestep them.
The number one mistake? Picking a pot that’s way too big. It feels like you're giving your plant a mansion to grow into, but it usually backfires. All that extra soil holds onto moisture the roots can't possibly drink, creating a swampy environment perfect for root rot. As a rule of thumb, only go up 1-2 inches (2-5 cm) in pot diameter. This gives the roots space to explore without leaving them waterlogged.
Avoiding Damage and Disappointment
Another classic error is being too rough during the move. Never yank a plant out by its stem! This can tear the delicate feeder roots and seriously set back its recovery. On the flip side, packing the new soil down too tightly is just as bad. Roots need air as much as they need water, and compacted soil suffocates them.
Here are a couple of other things to watch out for:
- Burying the Crown: The base of the plant, where the stems meet the soil, should sit at the same level it did in its old home. Planting it any deeper is an open invitation for stem rot.
- Fertilising Straight Away: Fresh potting mix comes loaded with nutrients. Adding more fertiliser right after repotting is like force-feeding a patient—it can burn the sensitive, recovering roots. Hold off for at least a month.
It's interesting to see that while surveys show around 65% of UK indoor gardeners repot their plants every year or two, many put it off simply because they're afraid of getting it wrong. You can read more about UK houseplant trends and why timing matters over on Claire Moran Designs.
Remember, repotting should be a gentle upgrade for your plant, not a traumatic event. A little bit of care goes a long way, and your plant will reward you with lush new growth instead of a long, stressful recovery.
Knowing these common pitfalls is half the battle won. If you find a recently repotted plant is looking a bit sad, run back through this checklist. Is the soil too dense? Is the crown buried? It's not too late to fix it, even if that means carefully re-doing the job.
For tips on specific plants that often need a new home, you can learn more about caring for a Spider Plant in our detailed guide.
Got a Few More Repotting Questions?
Even after you've got the hang of repotting, it's natural for a few more questions to crop up. You're not alone! Let's clear up some of the most common queries I hear, so you can feel completely confident every step of the way.
What’s the Best Time of Year to Repot Houseplants in the UK?
Hands down, the best time to repot your houseplants in the UK is during the spring. Think late March through to May. This is when your plants are naturally waking up and kicking into their active growing season.
Repotting during this growth spurt means their roots will recover much faster and eagerly explore their new, roomier home. If you can, try to avoid repotting in late autumn or winter. Growth slows right down then, and disturbing the roots can put the plant under a lot of stress with a much longer, tougher recovery.
Can I Reuse an Old Pot?
Yes, absolutely! Reusing old pots is a great way to be sustainable. But, and this is a big but, you must clean it properly first. Old pots can hide all sorts of nasties, from mineral salt buildup to invisible pests and disease spores just waiting for a new host.
Giving the pot a good scrub with hot, soapy water is the first step. To be extra safe, you can sterilise it by soaking it for about 10 minutes in a solution of one part household bleach to nine parts water. Just be sure to rinse it incredibly well afterwards and let it air dry completely before you introduce your plant.
Taking the time to properly clean an old pot is non-negotiable. It's the only way to prevent passing on old problems and to give your plant the genuinely fresh start it deserves.
Why Is My Plant All Droopy After Repotting?
Seeing your plant looking a bit sad and droopy right after a repot can be alarming, but don't panic. This is a classic case of transplant shock, and it's perfectly normal.
Think about it—its entire root system has just been disturbed. It needs a little time to settle in, repair any minor damage, and start drawing up water efficiently again.
To help it bounce back, move it out of any direct, harsh sunlight for a week or so. Keep the soil lightly moist, but never waterlogged. It should perk right back up within a week or two as its roots get re-established.
Should I Put Rocks in the Bottom of the Pot for Drainage?
This is one of the most persistent gardening myths out there! The short answer is no, please don't. It seems logical, but adding a layer of gravel or rocks at the bottom of a pot actually hinders drainage rather than helping it.
What it does is create a false bottom, raising the level of saturated soil in the pot. This perched water table keeps the roots sitting in a soggy, airless layer, which is a perfect recipe for root rot.
The best and simplest way to ensure great drainage is to use a pot with a hole in the bottom and a high-quality, well-draining potting mix. That's all you need.
For more ideas on great plants to add to your collection, take a look at our guide to the best houseplants for air purification.


