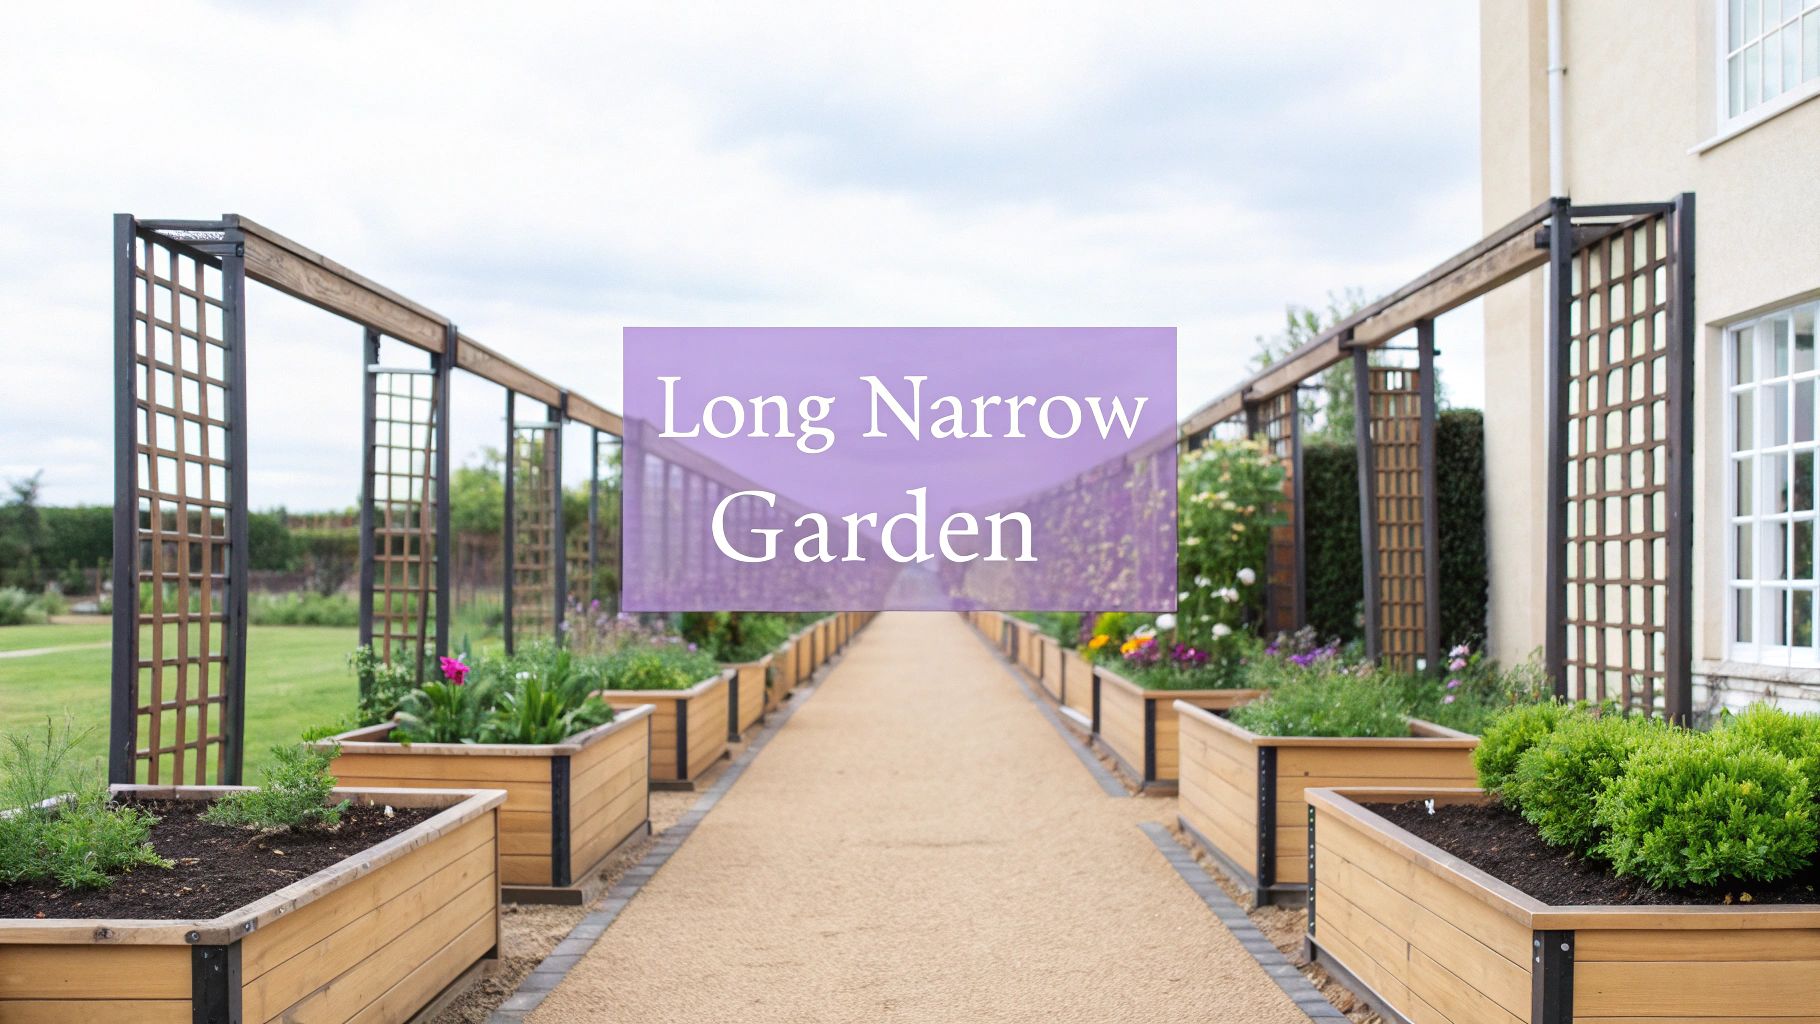
A long, narrow garden can often feel more like a corridor than a sanctuary, presenting a unique set of design challenges. The 'tunnel' effect can be disheartening, making the space seem restrictive and difficult to furnish or plant. However, with the right approach, these limitations can become your greatest assets. By embracing clever design principles, you can transform a challenging layout into a series of enchanting spaces, full of depth, interest, and functionality. This guide explores eight innovative long narrow garden ideas, moving beyond generic advice to offer practical, actionable strategies that really work.
We will delve into specific techniques that manipulate perception, such as using diagonal pathways to create a sense of width and circular zones to break up the linear flow. You will discover how to maximise vertical space with layered planting, cleverly disguise boundaries to blur the edges, and strategically place focal points to draw the eye on a journey through the garden. From linear water features that add movement and sound to the transformative power of mirrors, each idea is designed to be implemented in your own outdoor space. Prepare to see your garden not as a challenge, but as a canvas for creativity, ready to become a beautiful and immersive retreat.
1. Diagonal Pathway Design
One of the most effective long narrow garden ideas for overcoming the "bowling alley" effect is to disrupt the linear perspective with a diagonal pathway. Instead of a straight path running down the centre, this design lays the route at an angle across the garden. This simple geometric trick forces the eye to travel from side to side, creating a sense of greater width and turning a simple walk into a journey of discovery.
This approach has been masterfully executed by renowned designers like Piet Oudolf and Dan Pearson, and is often a feature in award-winning narrow plots at the RHS Chelsea Flower Show. It breaks the monotony of straight lines, introducing dynamic energy and making the space feel more curated and expansive.
How to Implement a Diagonal Pathway
Successfully creating a diagonal path involves more than just laying pavers at an angle. It requires thoughtful integration with the rest of the garden's elements to maximise its impact.
- Materials Matter: Emphasise the diagonal lines by using contrasting materials. For instance, pair light-coloured stone pavers with dark gravel infills, or lay slim, dark clay pavers in a herringbone pattern that runs contrary to the main direction of the garden.
- Planting Strategy: Soften the hard edges of your path with low-growing, creeping plants like thyme, mind-your-own-business (Soleirolia soleirolii), or creeping phlox. This blurs the boundaries and prevents the path from looking too severe, maintaining a natural visual flow.
- Create Destination Points: A diagonal path is most effective when it leads the eye and the feet towards specific features. Use it to connect a small patio at one end to a secluded seating area or a striking sculpture at the other, creating a reason to explore the full length of the garden.
- Consider Scale: Ensure the path is wide enough for comfortable use, a minimum of 90cm (approximately 3 feet) is a good rule of thumb for single-file walking. If you want two people to walk side-by-side, aim for 1.2-1.5 metres.
2. Circular Zones and Rooms
One of the most transformative long narrow garden ideas involves breaking up the linear space into a series of distinct ‘rooms’ or zones defined by curves and circles. This design cleverly counteracts the tunnel-like feel by interrupting the eye’s natural tendency to shoot straight to the back fence. Instead, it encourages exploration, creating pockets of interest and a sense of mystery about what lies beyond each curve.

This concept was pioneered by iconic garden designers like Lawrence Johnston at Hidcote Manor Garden and Vita Sackville-West at Sissinghurst Castle Garden. By using hedges, walls, and clever planting to create a sequence of enclosed spaces, they turned long plots into captivating journeys. The use of circles for lawns, patios, or planting beds within these rooms softens the harsh geometry of a narrow garden, making it feel more organic and spacious.
How to Implement Circular Zones and Rooms
Creating a successful garden room requires careful planning to ensure the space feels cohesive rather than disjointed. It's about dividing the garden while maintaining a harmonious flow from one area to the next.
- Define with Planting: Use clipped hedging like yew or box to form soft, curved walls between your garden rooms. Alternatively, use tall, airy perennials or ornamental grasses to create semi-transparent screens that hint at the space beyond without completely blocking the view.
- Establish a Focal Point: Give each circular zone a clear purpose and a central feature. This could be a circular lawn, a round patio for dining, a tranquil pond, or a densely planted bed with a bird bath or sculpture at its heart.
- Create Smooth Transitions: Link your 'rooms' with gently curving paths or subtle openings in the dividing hedges. A stone archway or a rose-covered pergola can serve as a beautiful and functional doorway, enhancing the sense of moving from one distinct space to another.
- Unify with Repetition: To prevent the garden from feeling chaotic, use a consistent material or a recurring plant throughout the different zones. A common paving stone, a repeated colour in the planting scheme, or the same style of pot can tie the entire design together.
3. Layered Vertical Planting
When ground space is at a premium, one of the most transformative long narrow garden ideas is to think upwards. Layered vertical planting is a technique that maximises the perceived depth and lushness of a space by creating multiple tiers of vegetation at different heights. It’s about building a plant community, from tall, slender trees down to ground-hugging cover, to create a rich, three-dimensional tapestry of foliage and colour.
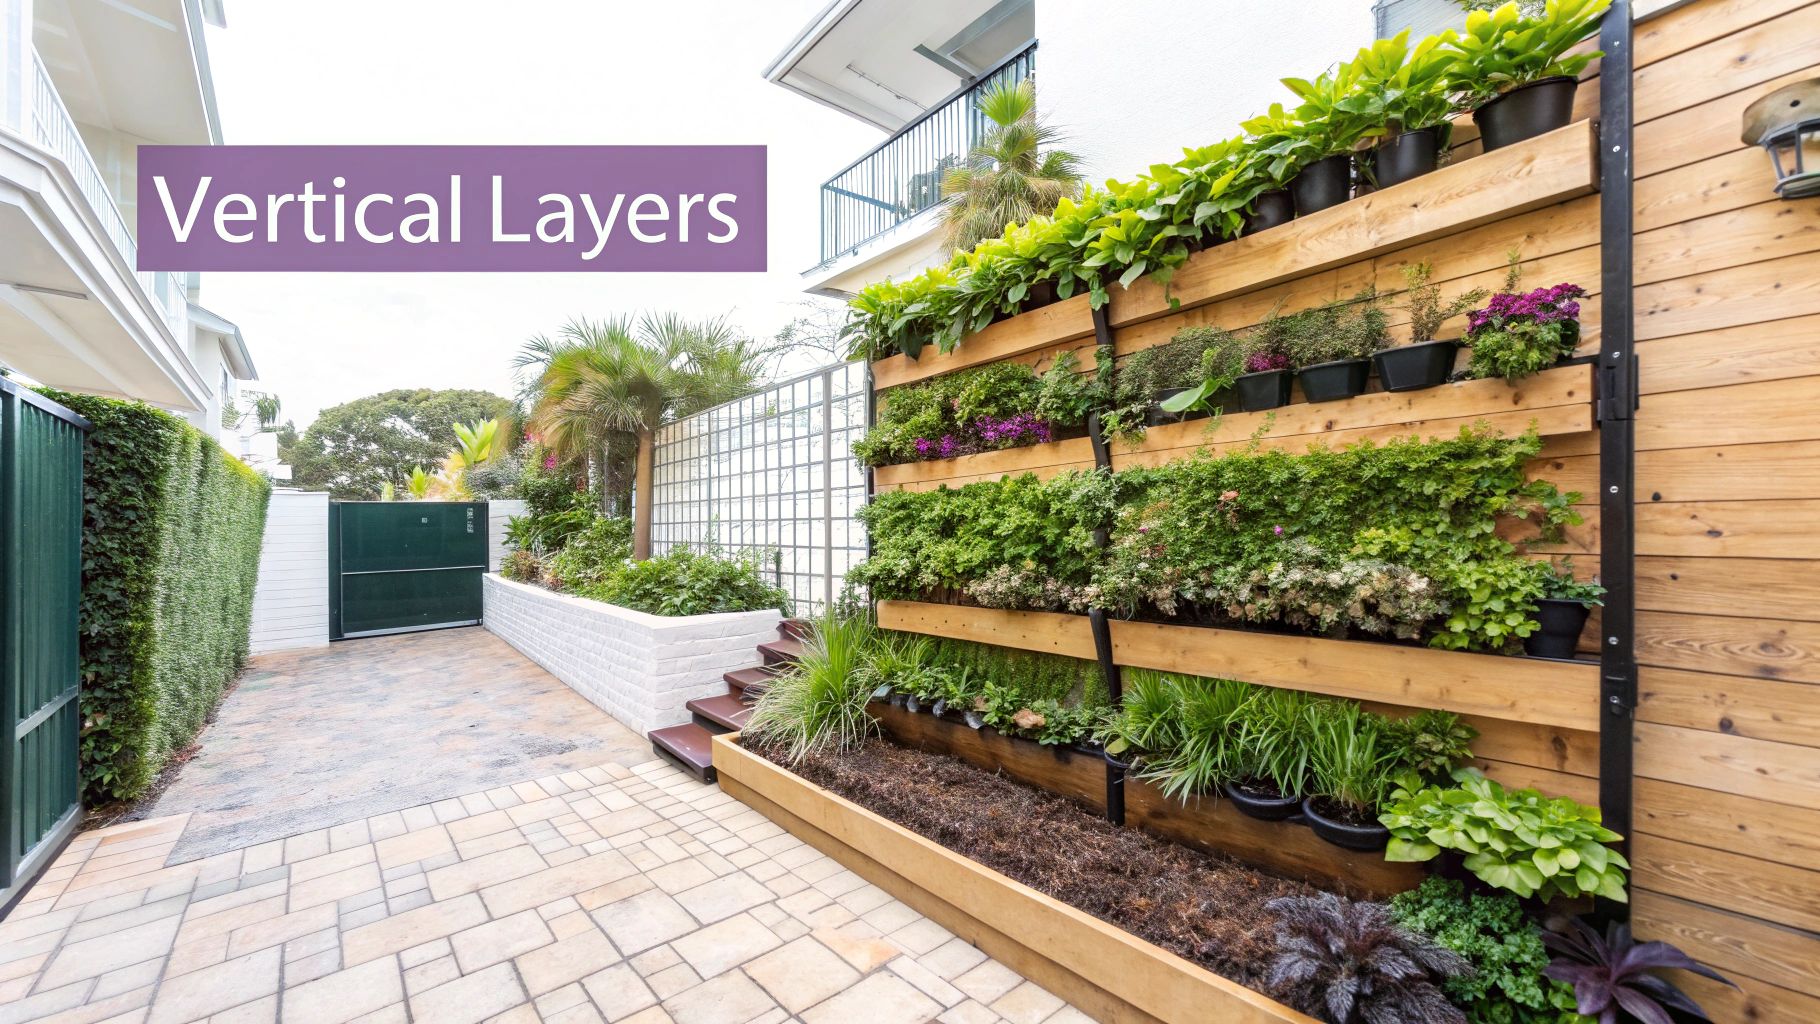
This ecological approach draws inspiration from natural woodlands and has been championed by legendary gardeners like Beth Chatto and Piet Oudolf. By borrowing from nature's playbook, you can turn a flat, uninspiring corridor into a dynamic ecosystem that draws the eye upwards and outwards, effectively blurring the constricting boundaries of the plot and making the garden feel much larger and more immersive.
How to Implement Layered Vertical Planting
Creating a successful layered scheme requires careful planning to ensure the plants not only look good together but also thrive as a community. It’s about creating a balanced composition from canopy to ground level.
- Structure with Height: Start with the 'bones' of the garden. Select slender, upright trees like Amelanchier lamarckii or ornamental cherries (Prunus serrula) that provide height without casting excessive shade or taking up too much width. These form the uppermost layer.
- Build the Mid-Layer: Beneath the trees, add medium-sized shrubs and tall perennials. Think hydrangeas, viburnums, or taller grasses like Calamagrostis 'Karl Foerster'. This layer adds substance and is crucial for obscuring boundary fences, which helps to create an illusion of greater space.
- Fill with Perennials and Ground Cover: The lower layer should be filled with shorter perennials, ferns, and ground cover plants like Geranium 'Rozanne' or Alchemilla mollis. This knits the entire scheme together, suppresses weeds, and ensures there are no bare patches of soil, contributing to a full, lush appearance.
- Unified Needs: To ensure your planting scheme is sustainable, group plants with similar soil, light, and water requirements together. A successful layered planting works like a self-sufficient community, reducing maintenance in the long term.
4. Mirror and Reflective Elements
One of the most clever long narrow garden ideas involves using mirrors and other reflective surfaces to manipulate perception. By strategically placing these elements, you can create a convincing illusion of greater width and depth, effectively "borrowing" space and light. This technique tricks the eye into seeing more than is actually there, doubling the visual impact of your planting and breaking down the confining feeling of the garden's boundaries.

This approach is championed by contemporary designers like Christopher Bradley-Hole and Luciano Giubbilei, who use reflection to add complexity and brightness to their designs. From the sleek contemporary gardens of Melbourne to the water channels of historic Persian gardens, reflective surfaces have long been used to enhance the sense of space and create captivating visual effects.
How to Implement Mirror and Reflective Elements
Effective use of reflection is an art form that requires careful placement and integration to appear natural and avoid gimmickry. It’s about creating a subtle illusion that enhances the garden's atmosphere.
- Clever Positioning: Avoid placing a mirror at the very end of the garden where it will simply reflect the viewer. Instead, angle it on a side wall or fence to reflect dense planting, creating the illusion of a pathway or an opening into another garden area.
- Safety and Durability: Standard indoor mirrors are not suitable for outdoor use. Opt for weatherproof acrylic mirrors, which are lighter, shatter-resistant, and built to withstand the elements. Always ensure they are securely mounted to a solid surface.
- Frame with Foliage: The key to making a mirror blend in is to disguise its edges. Frame it with climbers like ivy or clematis, or position it behind architectural plants like ferns or grasses. This makes the reflection feel like a natural extension of the garden.
- Incorporate Water: Don't forget that water is nature's mirror. A simple, still water feature in a dark bowl or a narrow rill can reflect the sky and surrounding foliage, adding light and a sense of tranquillity to a dark corner.
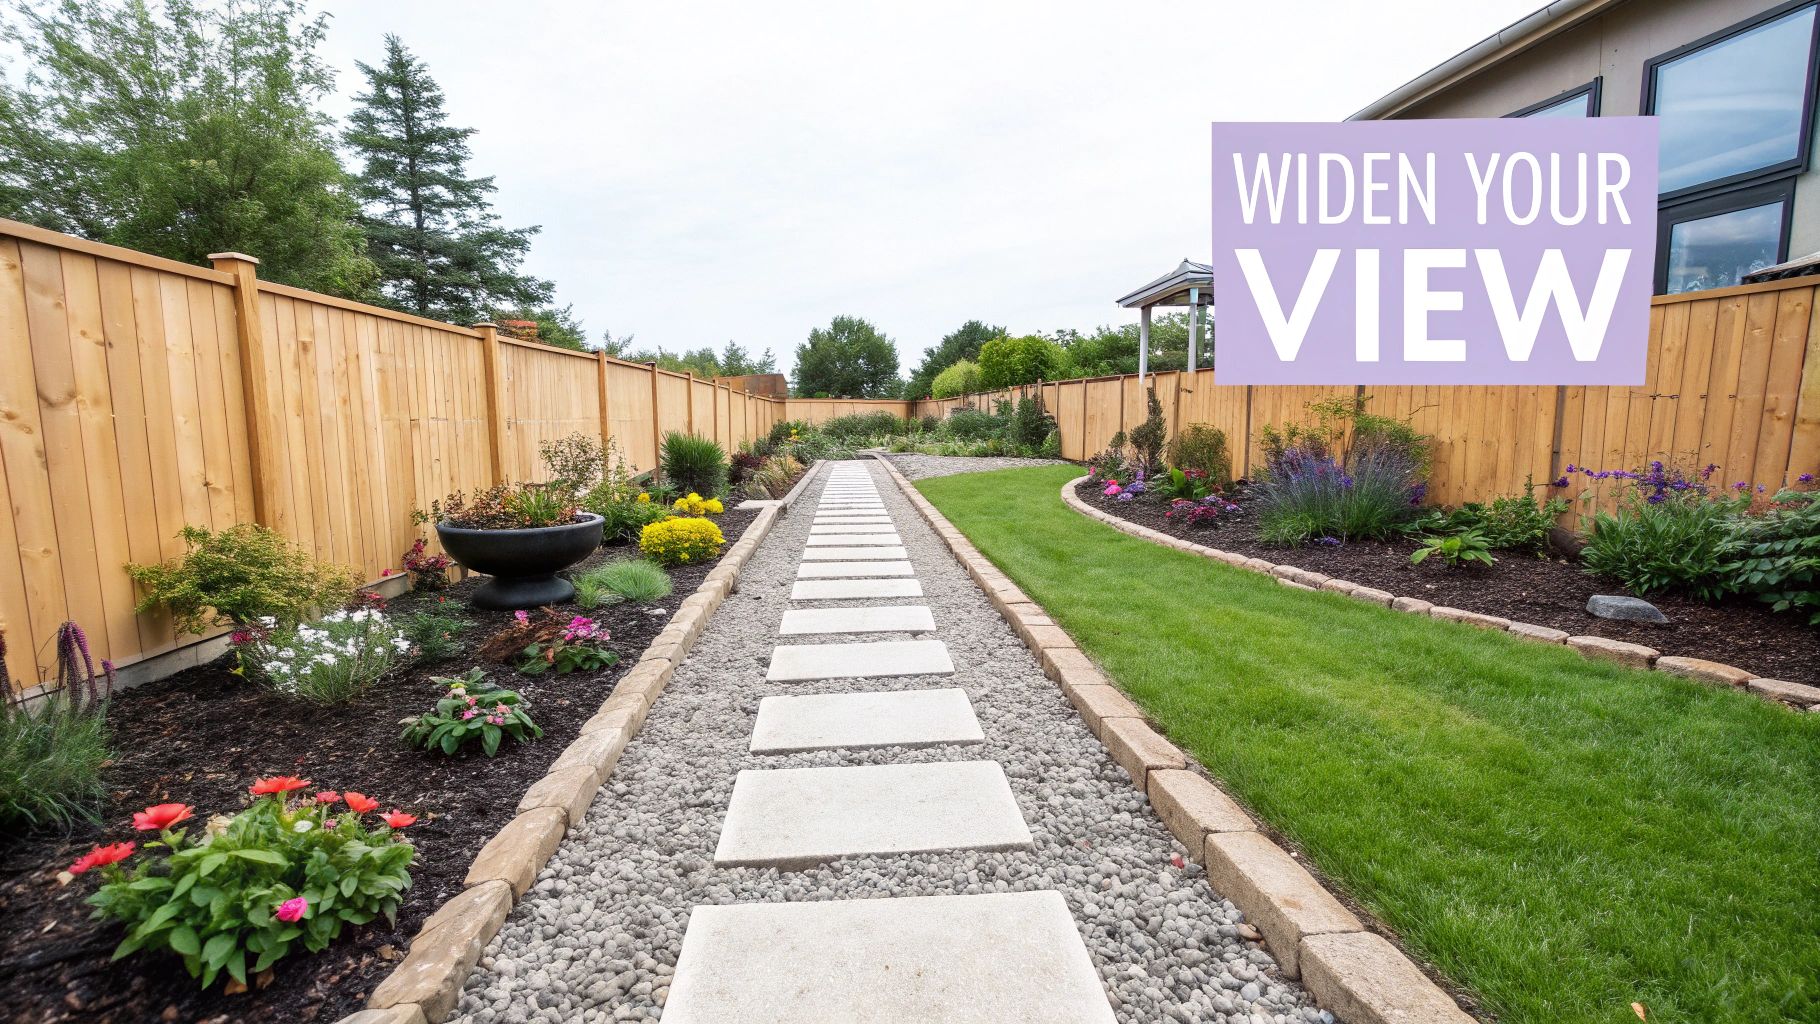
5. Raised Beds and Terracing
One of the most transformative long narrow garden ideas involves introducing changes in vertical height through raised beds and terracing. This strategy directly combats the flat, two-dimensional feel of a narrow plot by creating distinct levels. The addition of height breaks up the long, uninterrupted sightline, adds depth, and provides a structured framework for planting schemes.
Pioneered by visionaries like California landscape architect Thomas Church, this technique turns a challenge into a feature. It adds immense visual interest and maximises planting space while offering practical benefits such as improved drainage and easier access for maintenance. From contemporary urban gardens in Toronto to the sloped lots of San Francisco, terracing is a proven solution for adding dimension.
How to Implement Raised Beds and Terracing
Creating effective levels requires careful planning to ensure both structural integrity and aesthetic harmony. The goal is to build a garden that feels layered and intentional, not just stacked.
- Choose Cohesive Materials: For a sophisticated, unified look, use consistent materials for your retaining walls or raised bed surrounds. Corten steel offers a modern, industrial edge, while sleepers provide a rustic charm. Using the same material throughout prevents the space from looking busy and fragmented.
- Prioritise Drainage: This is critical. Ensure any retaining wall has adequate drainage behind it to prevent water pressure from building up, which can cause bulging or collapse. Incorporate weep holes and a layer of gravel behind the wall to allow water to escape freely.
- Plan Access and Flow: Think about how you will move between the different levels. Integrate wide, comfortable steps or a gently sloping path to connect the terraces. This ensures every part of the garden is accessible and invites exploration, rather than feeling like a series of disconnected platforms.
- Consider Structural Load: If your garden is on a rooftop or over a basement, be acutely aware of the weight of soil, water, and construction materials. Always consult a structural engineer to ensure the underlying structure can safely support the proposed design.
6. Focal Point Strategy
A powerful method for managing the perspective in a long, thin space is the focal point strategy. This design approach involves placing dramatic visual anchors at strategic locations to deliberately guide the eye, creating interest and drawing attention away from the garden's restrictive proportions. Instead of letting the eye shoot straight down the "tunnel," you create a series of compelling visual stops that encourage a more measured and engaging experience.
This technique is a hallmark of designers like the legendary Brazilian landscape architect Roberto Burle Marx and contemporary artist-designer Topher Delaney. It transforms a simple garden into a curated gallery, where each element is placed with purpose. You can see this principle applied brilliantly in the clever use of water features in Brooklyn brownstone gardens or the integration of sculpture in narrow London mews houses.
How to Implement a Focal Point Strategy
Effectively using focal points is an art of placement and proportion. It's about creating visual punctuation that enhances, rather than overwhelms, the space.
- Choose Complementary Pieces: Select focal points that align with your garden's overall aesthetic. A sleek, modern metal sculpture works well in a contemporary design, while a rustic birdbath or a classical urn might be better suited to a traditional cottage garden. The key is harmony.
- Scale and Proportion: The size of your focal point is crucial. It must be substantial enough to command attention but not so large that it dwarfs the narrow space. A tall, slender sculpture can add vertical interest without consuming valuable floor space.
- Use Odd Numbers: For a more natural and visually balanced composition, group focal points in odd numbers, such as a trio of matching pots of varying heights. This is a classic design rule that creates a sense of dynamic equilibrium.
- Strategic Placement: Position focal points where they will have the most impact. Place one at the very end to provide a final destination, or stagger several along the length to break up the journey and create distinct zones, ensuring they are visible from key viewing areas like a kitchen window or patio.
7. Boundary Disguise Techniques
A highly effective strategy in the long narrow garden ideas toolkit is to soften or completely disguise the garden's boundaries. By camouflaging fences, walls, and hedges, you can blur the hard edges of the space, making it feel less confined and more expansive. This visual trickery prevents the eye from immediately registering the garden's limits, creating an illusion of a larger, more immersive environment.
This concept was championed by garden design legends like Gertrude Jekyll and Penelope Hobhouse, who understood that a garden's magic often lies in what is partially hidden. Instead of a stark fence line drawing a definitive border, this technique uses layered planting and clever materials to create a sense of mystery and depth, transforming a restrictive plot into a lush, secluded retreat.
How to Implement Boundary Disguise Techniques
Successfully blurring the boundaries involves more than just planting climbers. It’s about creating layers of visual interest that distract and delight the eye, making the perimeter an attractive feature rather than a limitation.
- Layer Your Planting: Don't just plant a single row of shrubs against a fence. Create deep borders with a mix of small trees or large shrubs at the back, medium-sized perennials in the middle, and lower-growing plants at the front. This layered approach creates depth and obscures the line where the garden ends.
- Utilise Colour and Texture: Paint fences and walls a dark, recessive colour like charcoal grey or deep green. This makes them visually recede, allowing the vibrant colours and textures of your plants to pop. Use a rich tapestry of foliage: feathery ferns, bold hostas, and delicate grasses to create a complex, engaging scene.
- Employ Vertical Elements: Use trellises or tensioned wires to support climbing plants like clematis, roses, or jasmine. This transforms a flat, boring boundary into a living green wall, adding vertical interest and a sense of enclosure without feeling claustrophobic.
- Borrow the View: Strategically create small gaps or "windows" in your planting to frame a pleasant view beyond your garden, such as a neighbour's mature tree or a distant church spire. This technique, known as shakkei in Japanese gardening, "borrows" the scenery, making your own space feel much larger.
8. Linear Water Features
Rather than fighting the long, narrow shape of a garden, this idea embraces it by incorporating a linear water feature. A formal rill, a sleek channel, or a narrow pond that runs parallel to the boundaries can transform the space. This design adds the mesmerising qualities of sound, movement, and reflection, turning a simple corridor into a serene and purposeful journey.
This approach is famously seen in the historic water channels of the Alhambra and has been reinterpreted by modern masters like Mexican architect Luis Barragán. By guiding the eye along a shimmering surface, a linear water feature accentuates the garden's length in a positive way, creating a powerful central spine that organises the entire design and offers a profound sense of calm.
How to Implement a Linear Water Feature
Creating a successful linear water feature requires careful planning to ensure it is both beautiful and functional. The key is to integrate it seamlessly into the garden’s overall aesthetic.
- Material and Style: The materials define the feature's character. Use Corten steel for a contemporary, industrial look, or smooth, dark slate for a modern, reflective channel. For a more traditional or Mediterranean feel, consider rendered blockwork or stone-clad sides.
- Ensure Circulation: A crucial aspect of any water feature is preventing stagnation. Install a suitably sized pump to keep the water moving, which oxygenates it and discourages algae and mosquitoes. A solar-powered pump is an excellent, environmentally friendly option for many UK gardens.
- Integrate Lighting: Submersible LED uplighters or strip lighting along the edges can turn your water feature into a stunning focal point after dark. The light will dance on the moving water, creating dramatic shadows and highlighting its path through the garden.
- Plan for Maintenance: All water features require upkeep. Design with access in mind for cleaning out leaves and debris. In colder climates, you will need a plan for winter, which may involve draining the feature or using a pond heater to protect the pump and structure.
8 Key Design Ideas Comparison
Cultivating Your Perfect Narrow Garden
Embracing the unique dimensions of a long, narrow garden is less about overcoming a challenge and more about seizing a distinct creative opportunity. As we've explored, the most transformative long narrow garden ideas don’t fight the shape; they celebrate it. By shifting your perspective and employing clever design principles, you can turn a seemingly awkward space into an enchanting and functional outdoor sanctuary. The key takeaway is that strategic design can manipulate perception, making your garden feel wider, more intriguing, and infinitely more spacious than its footprint suggests.
Key Principles for Success
Let's recap the core strategies that unlock the potential of these specific spaces:
- Interrupt the 'Corridor Effect': The single most important goal is to break the direct, uninterrupted view from one end to the other. Techniques like introducing diagonal pathways, creating distinct circular zones, or using staggered raised beds effectively disrupt this linear path, encouraging the eye to wander and explore rather than rush to the end.
- Master the Art of Illusion: Your greatest assets are light and height. Integrating mirrors creates a powerful illusion of depth and width, while layered vertical planting and disguised boundaries draw the eye upward and outward. This vertical focus makes the garden's narrowness a secondary, less noticeable feature.
- Create a Journey, Not a Destination: A successful narrow garden unfolds as a series of experiences. By strategically placing a compelling focal point at the far end and designing 'rooms' along the way, you create a sense of mystery and purpose. The journey through the garden becomes as rewarding as arriving at any single point within it.
Your Actionable Next Steps
Feeling inspired? The best way to begin is by choosing one or two concepts that resonate with you and your garden's current state. You don't need a complete overhaul overnight.
Pro Tip: Start with a high-impact, low-effort change. For instance, painting a boundary fence in a dark, recessive colour like charcoal or deep navy can instantly make it recede, creating a sense of spaciousness before you've even planted a single flower.
From there, consider your next move. Could you install a simple linear water feature to add sound and movement? Or perhaps you could start by defining a small circular patio area at the far end to serve as your new destination spot. Remember that a garden is a living, evolving project. It grows and changes with you. By implementing these tailored long narrow garden ideas, you're not just decorating a space; you're crafting a dynamic environment that provides beauty, function, and a personal connection to nature, proving that great design isn't about the size of the space, but the scale of the vision.


