
The humble wooden pallet, a symbol of industrial logistics, has found a second life as a champion of sustainable style and DIY creativity. More than just scrap wood, pallets offer a fantastic, low-cost material for crafting unique furniture, striking décor, and practical solutions for your home and garden. This guide moves beyond simple inspiration, providing a curated collection of diverse pallet wood projects designed to suit various skill levels and tastes. From a rustic coffee table that becomes the heart of your living room to a functional vertical garden for your balcony, each idea is broken down with actionable insights.
We will explore eight distinct projects, outlining the necessary tools, estimated difficulty, and key construction steps. Crucially, we will also cover the essentials of working safely with reclaimed pallets. This includes how to properly dismantle them and, most importantly, how to identify the right type of wood by looking for the "HT" stamp, which signifies it has been heat-treated rather than chemically treated with methyl bromide (MB). This ensures your creations are safe for your home. Prepare to transform discarded timber into a treasured centrepiece, proving that sustainable design can be both accessible and beautiful.
1. The Rustic Centrepiece: A Pallet Wood Coffee Table
A pallet wood coffee table is one of the most popular and rewarding pallet wood projects, serving as a functional and stylish centrepiece for any living room. This project transforms discarded shipping pallets into a sturdy, character-filled table that exudes rustic charm. Its appeal lies in its simplicity and the natural, weathered aesthetic of the timber, which adds warmth and texture to your home décor.
This project is an excellent starting point for beginners, as the basic construction is straightforward, yet it offers plenty of room for customisation. By stacking two pallets or building a simple box frame, you can create a table with a built-in lower shelf, perfect for storing magazines, remote controls, or decorative baskets.
Key Considerations for Your Build
- Difficulty Level: Beginner to Intermediate
- Estimated Time: 4-6 hours (excluding drying time for finishes)
- Essential Tools: Pry bar, hammer, sander (orbital or belt), saw (circular or hand), drill, and measuring tape.
Actionable Steps for Success
To ensure a high-quality finish, proper preparation of the wood is crucial. Begin by carefully dismantling the pallet, removing all nails and staples. Thoroughly sand every plank to eliminate splinters and create a smooth, safe surface. This is also the ideal time to inspect the wood for any stamps, like "HT" (heat-treated), ensuring it's safe for indoor use.
When assembling the tabletop, arrange the planks to showcase the most interesting grain patterns and rustic details. For added stability and a more polished look, consider framing the tabletop with additional pallet wood planks. Finally, protect your creation with a clear varnish to highlight the natural colour and texture, or use a wood stain to match your existing furniture. Adding castors to the base is a practical touch, making the table easy to move for cleaning or rearranging your space.
2. The Space-Saving Solution: A Vertical Pallet Garden
A vertical pallet garden is one of the most ingenious pallet wood projects, perfect for those with limited outdoor space. This project transforms a simple shipping pallet into a multi-tiered planter, ideal for cultivating herbs, flowers, succulents, or leafy greens on a balcony, patio, or small yard. Its appeal lies in its efficiency, allowing you to maximise growing space while adding a touch of rustic, green charm to any vertical surface.
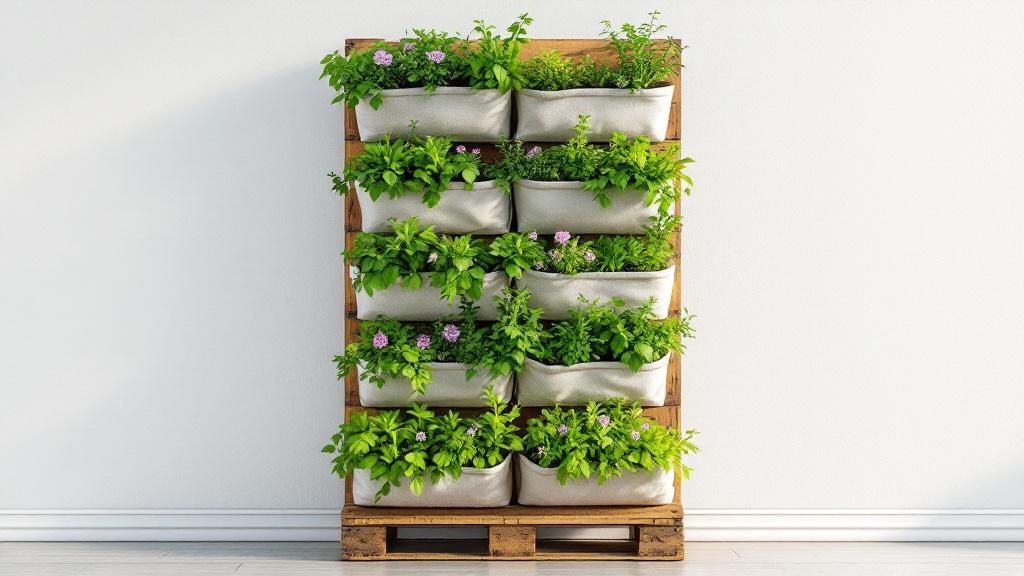
This project is exceptionally beginner-friendly and has been popularised by the urban gardening movement for its low cost and high yield. By standing a pallet upright and creating planting pockets with landscape fabric, you can create a productive and beautiful living wall. It’s a fantastic way to grow fresh ingredients right outside your kitchen or introduce a cascade of colourful flowers to a previously bare wall.
Key Considerations for Your Build
- Difficulty Level: Beginner
- Estimated Time: 2-3 hours (excluding planting time)
- Essential Tools: Staple gun, heavy-duty staples, landscape fabric, scissors, sander, and gardening gloves.
Actionable Steps for Success
For a safe and thriving garden, especially if you plan to grow edibles, selecting the right pallet is paramount. Look for the "HT" stamp, indicating it has been heat-treated rather than chemically treated. Sand down any rough spots or potential splinters to create a cleaner, safer structure before you begin.
To construct the planters, lay the pallet flat and staple a double layer of landscape fabric to the back, bottom, and front of the slats, creating pocket-like troughs for your soil and plants. Ensure you staple generously to secure the fabric and prevent soil from spilling. When planting, start with robust herbs like mint and thyme or leafy greens like lettuce, as they adapt well to this environment. For best results, position your garden where it will receive morning sun and some afternoon shade to avoid scorching the plants.
3. A Rustic Retreat: The Pallet Wood Headboard
A pallet wood headboard is a fantastic way to introduce a touch of rustic elegance into your bedroom, transforming it into a cosy, farmhouse-inspired retreat. This project takes reclaimed timber and repurposes it into a stunning focal point that adds warmth, texture, and character. Its popularity in modern home décor, from boutique hotels to features in HGTV designs, stems from its ability to blend a raw, natural aesthetic with a clean, contemporary feel.
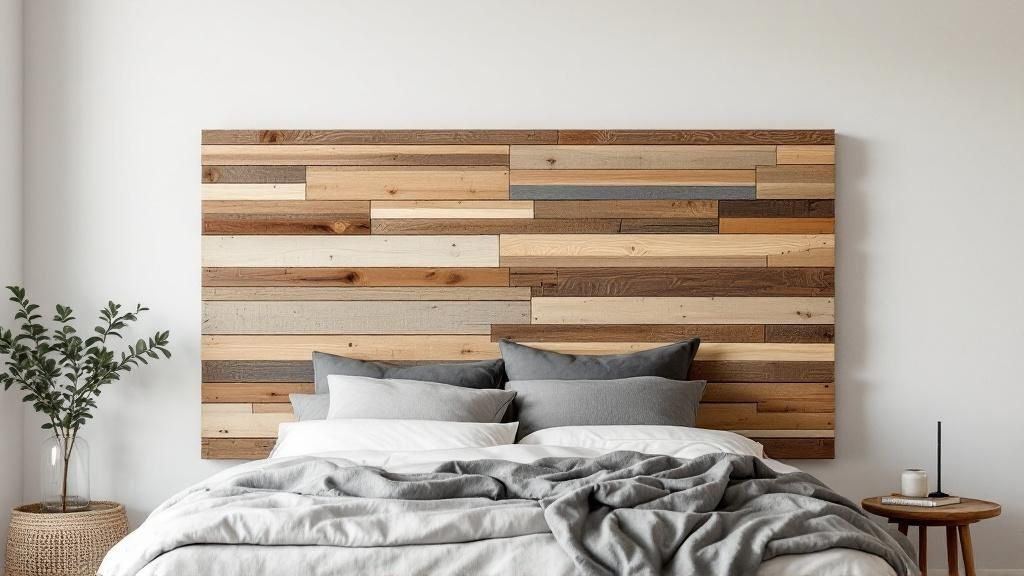
This is one of those pallet wood projects that offers incredible visual impact for a minimal cost. The beauty of this build lies in its versatility; you can arrange the planks horizontally, vertically, or in a herringbone pattern to create a design that is uniquely yours. Whether you mount it directly to the wall or attach it to your bed frame, a pallet headboard creates an immediate sense of style and comfort.
Key Considerations for Your Build
- Difficulty Level: Beginner to Intermediate
- Estimated Time: 3-5 hours (excluding drying time for finishes)
- Essential Tools: Pry bar, sander, saw, drill, measuring tape, and a spirit level.
Actionable Steps for Success
Precision is key to a professional-looking headboard. Start by measuring the width of your bed frame, adding an extra two to four inches to create a slight, visually pleasing overhang. After dismantling your heat-treated (HT) pallets, meticulously sand every plank to create a surface smooth enough that it won't snag bedding or pillows. For a flawless finish, use wood filler to patch up any nail holes or significant gaps between the boards before staining or sealing.
When assembling, lay out your boards to create the most appealing arrangement of colours and grains before securing them to a backing frame. For safety, ensure the headboard is mounted securely to wall studs, not just the plasterboard. A final coat of clear polyurethane will protect the wood, and for a touch of modern ambiance, consider installing a hidden LED strip light behind the top edge to cast a soft, warm glow.
4. The Versatile Organiser: A Pallet Bookshelf
A pallet bookshelf is an incredibly functional and stylish storage solution, transforming humble shipping pallets into a striking feature for any room. This project cleverly utilises the natural slat construction of pallets to create built-in shelves, perfect for displaying books, plants, or cherished trinkets. Its industrial-chic aesthetic adds a touch of character and rustic charm, making it a standout piece in a home office, living room, or even a child's bedroom.
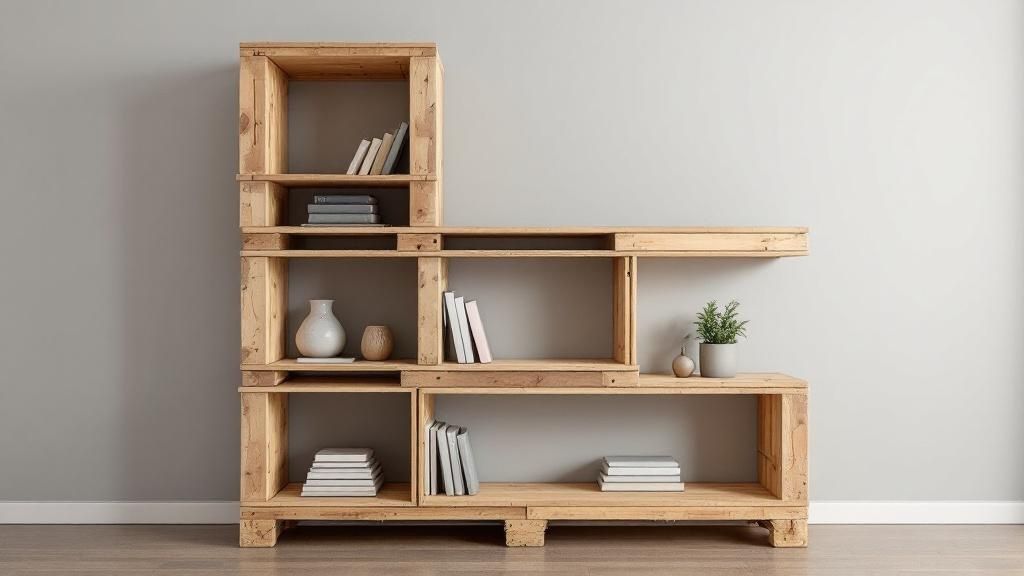
This pallet wood project is highly adaptable, allowing for designs ranging from simple, wall-mounted display ledges to larger, freestanding bookcases. The versatility is a key part of its appeal, seen in creative applications like children’s libraries using colourful painted versions for community reading programmes, or trendy coffee shops showcasing local authors' work. The inherent sturdiness of the wood makes it a reliable and long-lasting organisational system.
Key Considerations for Your Build
- Difficulty Level: Beginner to Intermediate
- Estimated Time: 3-5 hours (excluding finishing time)
- Essential Tools: Saw (jigsaw or circular), sander, drill, measuring tape, and wood screws.
Actionable Steps for Success
Success with a pallet bookshelf lies in reinforcing its structure and ensuring a smooth finish. After dismantling the pallet and selecting your best planks, focus on sanding every surface that will come into contact with your books or belongings to prevent any damage. Reinforce all joints with wood screws rather than just nails for superior stability, especially if you plan to store heavier items.
For a more polished and professional look, consider adding a thin plywood backing, which also prevents smaller items from falling through gaps. To make the shelves more flexible, you could even install adjustable shelf brackets inside a larger frame. Before loading it up, apply a clear protective varnish to prevent splinters and make dusting easier. Remember to gradually test the weight capacity of each shelf to ensure it's secure.
5. Pallet Wood Outdoor Furniture Set
Creating a complete outdoor furniture set is one of the more ambitious yet incredibly gratifying pallet wood projects you can undertake. This project transforms simple shipping pallets into a cohesive and inviting outdoor living space, perfect for patios, gardens, or balconies. A full set, often including benches, chairs, and a matching table, offers a functional and stylish solution for alfresco dining and relaxation, all while maintaining a charmingly rustic aesthetic.
The appeal of a pallet wood outdoor set lies in its affordability and customisability. You can design pieces to fit your specific space and needs, from a simple two-seater bench to an expansive L-shaped sofa. This project is a fantastic way to furnish an entire outdoor area on a budget, delivering a unique, handcrafted look that you can’t find in a shop.
Key Considerations for Your Build
- Difficulty Level: Intermediate to Advanced
- Estimated Time: 10-15 hours (excluding finishing and drying time)
- Essential Tools: Pry bar, sander, circular saw, drill, measuring tape, spirit level, and socket wrench.
Actionable Steps for Success
Success with outdoor pallet wood projects hinges on durability and weather resistance. Start by selecting only heat-treated (HT) pallets and dismantle them carefully. A thorough sanding is essential to prevent splinters and prepare the wood for finishing. When constructing your furniture, always pre-drill screw holes to avoid splitting the wood, which is crucial for structural integrity over time.
To ensure your furniture withstands the elements, use stainless steel or galvanised hardware that won’t rust. The most critical step is the finish; apply several coats of a high-quality marine-grade varnish or exterior paint. This creates a protective barrier against moisture and UV damage. Designing table tops and seats with a very slight slope will also help with water runoff, preventing pooling and rot. For ultimate comfort and longevity, add removable, weather-resistant cushions that can be easily stored indoors.
6. Unique Décor: Pallet Wood Wall Art
For those looking to infuse their home with a personal touch, pallet wood wall art is one of the most creative and versatile pallet wood projects available. This project involves transforming individual pallet planks into a canvas for decorative installations, from rustic signs to abstract geometric patterns. The natural imperfections, varied tones, and weathered texture of the wood provide a unique backdrop that adds character and warmth to any room, serving as a striking focal point.
This project’s appeal lies in its limitless potential for customisation, making it suitable for artists and DIY enthusiasts of all skill levels. You can create farmhouse-style family name signs, feature walls with branded messaging for a business, or even colourful world maps for a child's bedroom. The scope for creativity is vast, allowing you to produce a piece that is truly one-of-a-kind.
Key Considerations for Your Build
- Difficulty Level: Beginner to Advanced (depends on design complexity)
- Estimated Time: 3-8 hours (depending on painting and detail work)
- Essential Tools: Saw, sander, drill, measuring tape, level, paint brushes, and stencils or painter's tape.
Actionable Steps for Success
Success begins with a clear vision. Before cutting any wood, sketch your design on paper to finalise the layout, dimensions, and colour scheme. Once you have dismantled the pallet and thoroughly sanded each plank, assemble them into your desired shape, securing them from the back with brace pieces. Lightly sanding the front surface again will help paint and stain adhere more evenly.
For crisp lines and professional-looking text, use high-quality painter's tape or stencils. When your artistic work is complete and dry, apply a clear sealant or varnish to protect the finish and enhance the wood's natural grain. To truly make your artwork pop, consider installing subtle lighting to highlight the rich textures and contours of the pallet wood.
7. Pallet Wood Storage Solutions
One of the most practical pallet wood projects involves creating bespoke storage solutions that bring order and rustic flair to any part of your home. This project leverages the inherent sturdiness of pallet timber to build versatile organisational systems, from rugged garage shelving to charming toy boxes or pantry organisers. The appeal lies in crafting functional items perfectly sized for your specific needs, transforming cluttered spaces with a touch of handmade character.
These projects are highly adaptable, catering to a wide range of needs and skill levels. You can construct simple, open-topped crates for craft supplies or firewood, or embark on more complex builds like a full closet organiser or a multi-compartment unit for a workshop. The natural durability of the wood makes it ideal for heavy-duty applications, providing a low-cost alternative to flimsy, mass-produced storage.
Key Considerations for Your Build
- Difficulty Level: Beginner to Advanced
- Estimated Time: 3-8 hours (depending on complexity and size)
- Essential Tools: Measuring tape, saw (circular or hand), drill, sander, pry bar, and hammer.
Actionable Steps for Success
To begin, accurately measure the space where your storage unit will live to ensure a perfect fit. After dismantling the pallets and selecting the best planks, thoroughly sand all surfaces, paying special attention to the interior to prevent snagging or splinters on stored items. This is particularly important for storing fabrics or children's toys.
When constructing your solution, think about practicality. Adding castors to the base of a storage box makes it easy to move, while incorporating simple lids or doors can keep contents dust-free and out of sight. For multi-compartment units, consider labelling each section for easy identification. For a more refined finish inside crates or boxes, you can line them with fabric or a plastic liner, which also helps protect the contents and makes cleaning easier.
8. The Functional Heart: A Pallet Wood Kitchen Island
A pallet wood kitchen island is a transformative project that adds both counter space and rustic character to the heart of your home. This build elevates humble shipping pallets into a substantial, functional workspace, perfect for food preparation, extra storage, or even a casual dining spot. Its popularity, fuelled by kitchen renovation shows and the farmhouse design trend, comes from its ability to offer a custom, high-end look on a budget, while introducing the warm, textured appeal of reclaimed timber.
This project is more ambitious than smaller decorative pieces but is immensely rewarding, creating a central hub for kitchen activity. By stacking and securing pallets, you can construct a sturdy base with built-in shelving, ideal for storing pots, pans, and cookbooks. Topping it with a butcher block or even a custom concrete slab can elevate the design further, making it a standout feature.
Key Considerations for Your Build
- Difficulty Level: Intermediate to Advanced
- Estimated Time: 10-15 hours (excluding drying and curing times)
- Essential Tools: Pry bar, sander, circular saw, drill, spirit level, measuring tape, and framing square.
Actionable Steps for Success
Safety and functionality are paramount for a kitchen island. Always use heat-treated (HT) pallets and ensure every surface is meticulously sanded to be completely smooth and splinter-free. Apply a food-safe finish, such as food-grade mineral oil or a specific butcher block conditioner, to the countertop to protect both the wood and your health.
Before building, carefully plan the island's placement to ensure there is adequate clearance for traffic flow around it, typically at least 90cm on all sides. For enhanced practicality, consider installing heavy-duty, lockable castors rated for the island's total weight, making it mobile for cleaning or entertaining. If you plan to incorporate electrical outlets, it is crucial to consult a qualified electrician to ensure all work complies with local building codes.
Pallet Wood Project Comparison Guide
Your Next Masterpiece Awaits
From rustic coffee tables that become the centrepiece of a living room to intricate wall art that tells a unique story, the potential locked within a simple wooden pallet is truly remarkable. We have explored a diverse range of pallet wood projects, each offering a unique blend of creativity, functionality, and sustainable design. You have seen how these humble materials can be transformed into everything from a statement headboard to a practical and stylish kitchen island, proving that beautiful home décor does not have to come with a hefty price tag or a significant environmental footprint.
The journey from a discarded shipping pallet to a finished piece of furniture is a rewarding one. It’s a process that combines practical skills with artistic vision, allowing you to create something that is not only useful but also deeply personal. Each nail you remove and every board you sand is a step towards crafting an item that reflects your taste and dedication.
Key Takeaways from Your Pallet Wood Journey
As you embark on your own projects, remember the core principles that ensure success and safety:
- Source Safely: Always prioritise safety by selecting heat-treated (HT) pallets and avoiding those marked with "MB" for methyl bromide. A quick inspection for stamps, stains, and odours is your first and most crucial step.
- Prepare Meticulously: The quality of your finished project is directly linked to the effort you put into preparation. Thoroughly cleaning, dismantling without splitting the wood, and sanding every surface smooth are non-negotiable stages that elevate your creation from rustic to refined.
- Finish with Finesse: The final seal protects your hard work. Whether you choose a clear varnish to celebrate the wood's natural grain, a vibrant paint for a pop of colour, or a durable outdoor stain, the right finish ensures longevity and provides a professional look.
Your Action Plan for Getting Started
Feeling inspired? It is time to move from planning to doing. Here are your next actionable steps:
- Select Your First Project: Revisit the list and choose a project that aligns with your skill level and available space. A vertical garden or a simple bookshelf can be a fantastic starting point for beginners.
- Gather Your Tools and Materials: Create a checklist based on your chosen project. Ensure you have the essentials: safety glasses, gloves, a pry bar, a hammer, a sander, and your chosen finishing products.
- Find Your Pallets: Begin your search at local businesses, garden centres, or construction sites, always asking for permission before taking any materials.
- Embrace the Process: Remember that DIY is a journey of learning. Do not be discouraged by imperfections; they add character and are a testament to the handcrafted nature of your work. The satisfaction of completing one of these pallet wood projects is immense, leaving you with a tangible, beautiful result and the confidence to tackle the next one. Your next masterpiece is waiting to be built.


