Hanging a picture frame is about more than just whacking a nail in the wall. It’s an art in itself. The right placement can turn a simple photo into a stunning focal point, making your art look intentional and professional, not like a last-minute addition.
Your Foundation for Flawless Picture Hanging
Let's be honest, we've all seen it: the crooked frame, the picture hung so high you have to crane your neck. These small details can throw off the entire feel of a room, separating a thoughtfully designed space from one that just feels… off. This guide is here to take the guesswork out of the equation, giving you the confidence to hang your art perfectly, every single time. We'll break down the entire process, whether you’re hanging a single cherished print or creating a full-blown gallery wall.
The first step is understanding what you’re working with. In the UK, walls are notoriously varied – from modern plasterboard to solid Victorian brick. Each type demands a different approach to make sure your art is safe and secure. Getting these basics right from the start is the real secret to success.
Why Getting It Right Matters
Properly hung art does so much more than just fill a blank space. It injects personality, tells a story, and sets the mood for the entire room. It’s one of the most effective ways to make a house feel like your home, which is why paying attention to the details is so crucial.
It's no surprise that we're all spending more time perfecting our homes. In fact, the UK picture frame market is set to grow at a compound annual rate of approximately 3.6% between 2022 and 2030, a trend driven by our desire to elevate our interiors. You can read more about this on Straits Research. This just shows how much we value those finishing touches that make a space unique.
A well-hung picture doesn't just sit on a wall; it speaks to the furniture, the lighting, and the architecture around it. It's that final, essential layer that pulls a whole room together.
The best part is, getting this right doesn't have to cost a fortune. Small, thoughtful changes often have the biggest impact. For more ideas on refreshing your space without breaking the bank, have a look at our journal for some great tips on affordable interior design. Think of this guide as the practical first step to getting it done.
Choosing the Right Tools for Any Wall
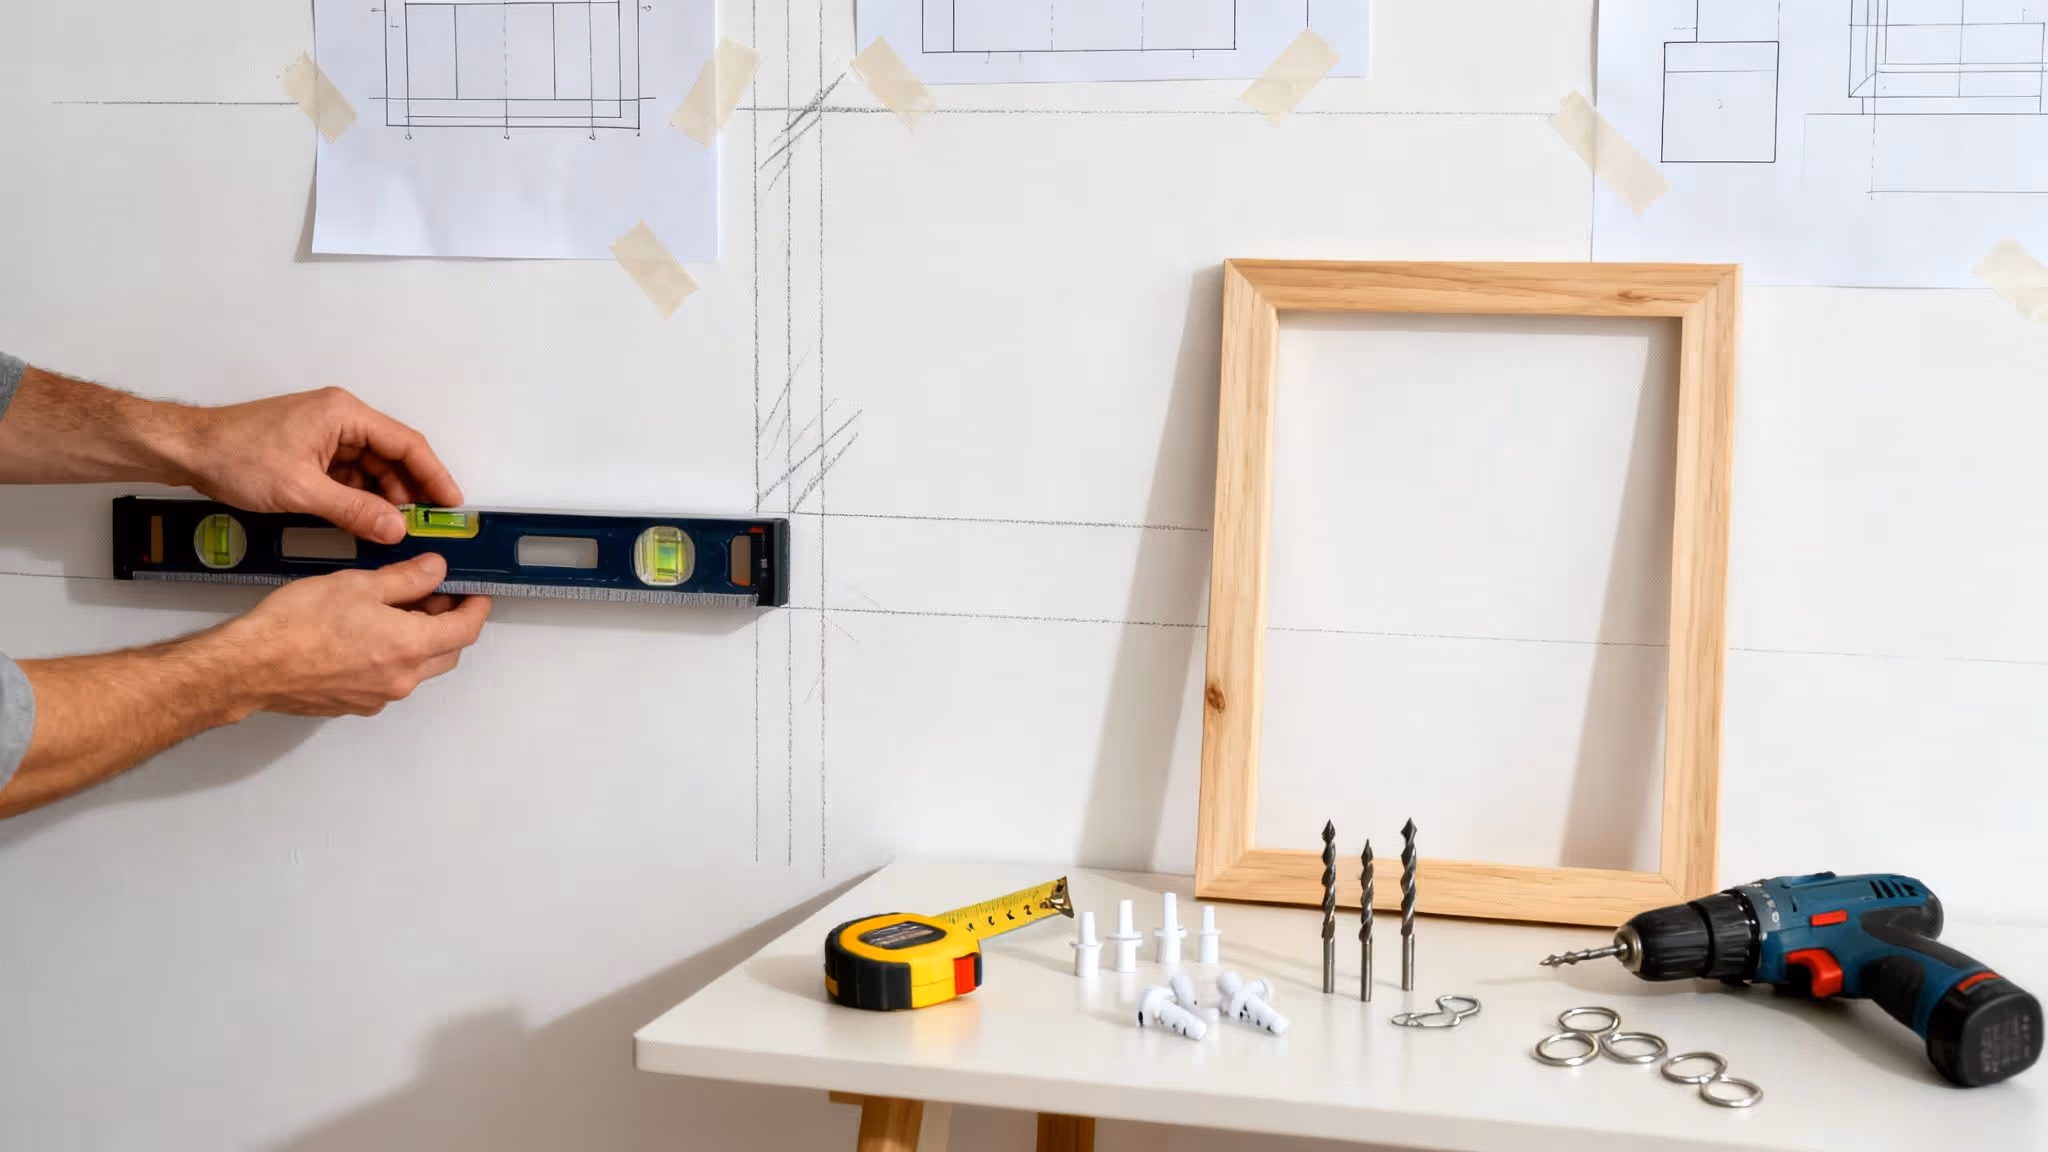
Before you even think about making a mark on the wall, the most crucial thing you can do is gather the right kit. Having the proper tools to hand not only makes the job quicker and easier, but it’s your best defence against frustrating mistakes. Get this right, and your art will stay securely in place for years to come.
It’s tempting to just grab a hammer and a nail, but a truly professional finish needs a little more thought. The right equipment is what stands between a perfectly level frame and one that’s always slightly askew. Honestly, taking a few minutes to prepare is a cornerstone of good DIY and helps you avoid common renovation mistakes that almost always happen when you rush.
The Essential Toolkit for Every Project
You don’t need a professional-grade workshop, but a few items are absolutely non-negotiable for hanging pictures properly. These basics will see you through everything from a single print to an ambitious gallery wall.
- A Quality Tape Measure: Precision is your best friend here. A good, retractable tape measure is essential for getting your placement and spacing spot-on.
- A Spirit Level: Don't trust your eyes—they can easily fool you. A spirit level is the only way to be sure. A small one is fine for a single frame, but a longer one makes lining up multiple pieces a breeze.
- A Pencil: A soft-leaded pencil is perfect for making light, erasable marks on your wall. No smudges, no permanent indentations.
- A Hammer: Nothing fancy needed. Your standard claw hammer is ideal for tapping in picture hooks and nails.
- A Drill: As soon as you’re dealing with anything heavier than a small print, or hanging on brick or masonry, a drill becomes essential. You'll need it to create pilot holes for wall plugs and screws.
If you’re planning something more complex like a gallery wall, a laser level is an absolute game-changer. It projects a perfectly straight line across the entire wall, making it incredibly easy to align the tops or bottoms of a dozen frames without endless measuring.
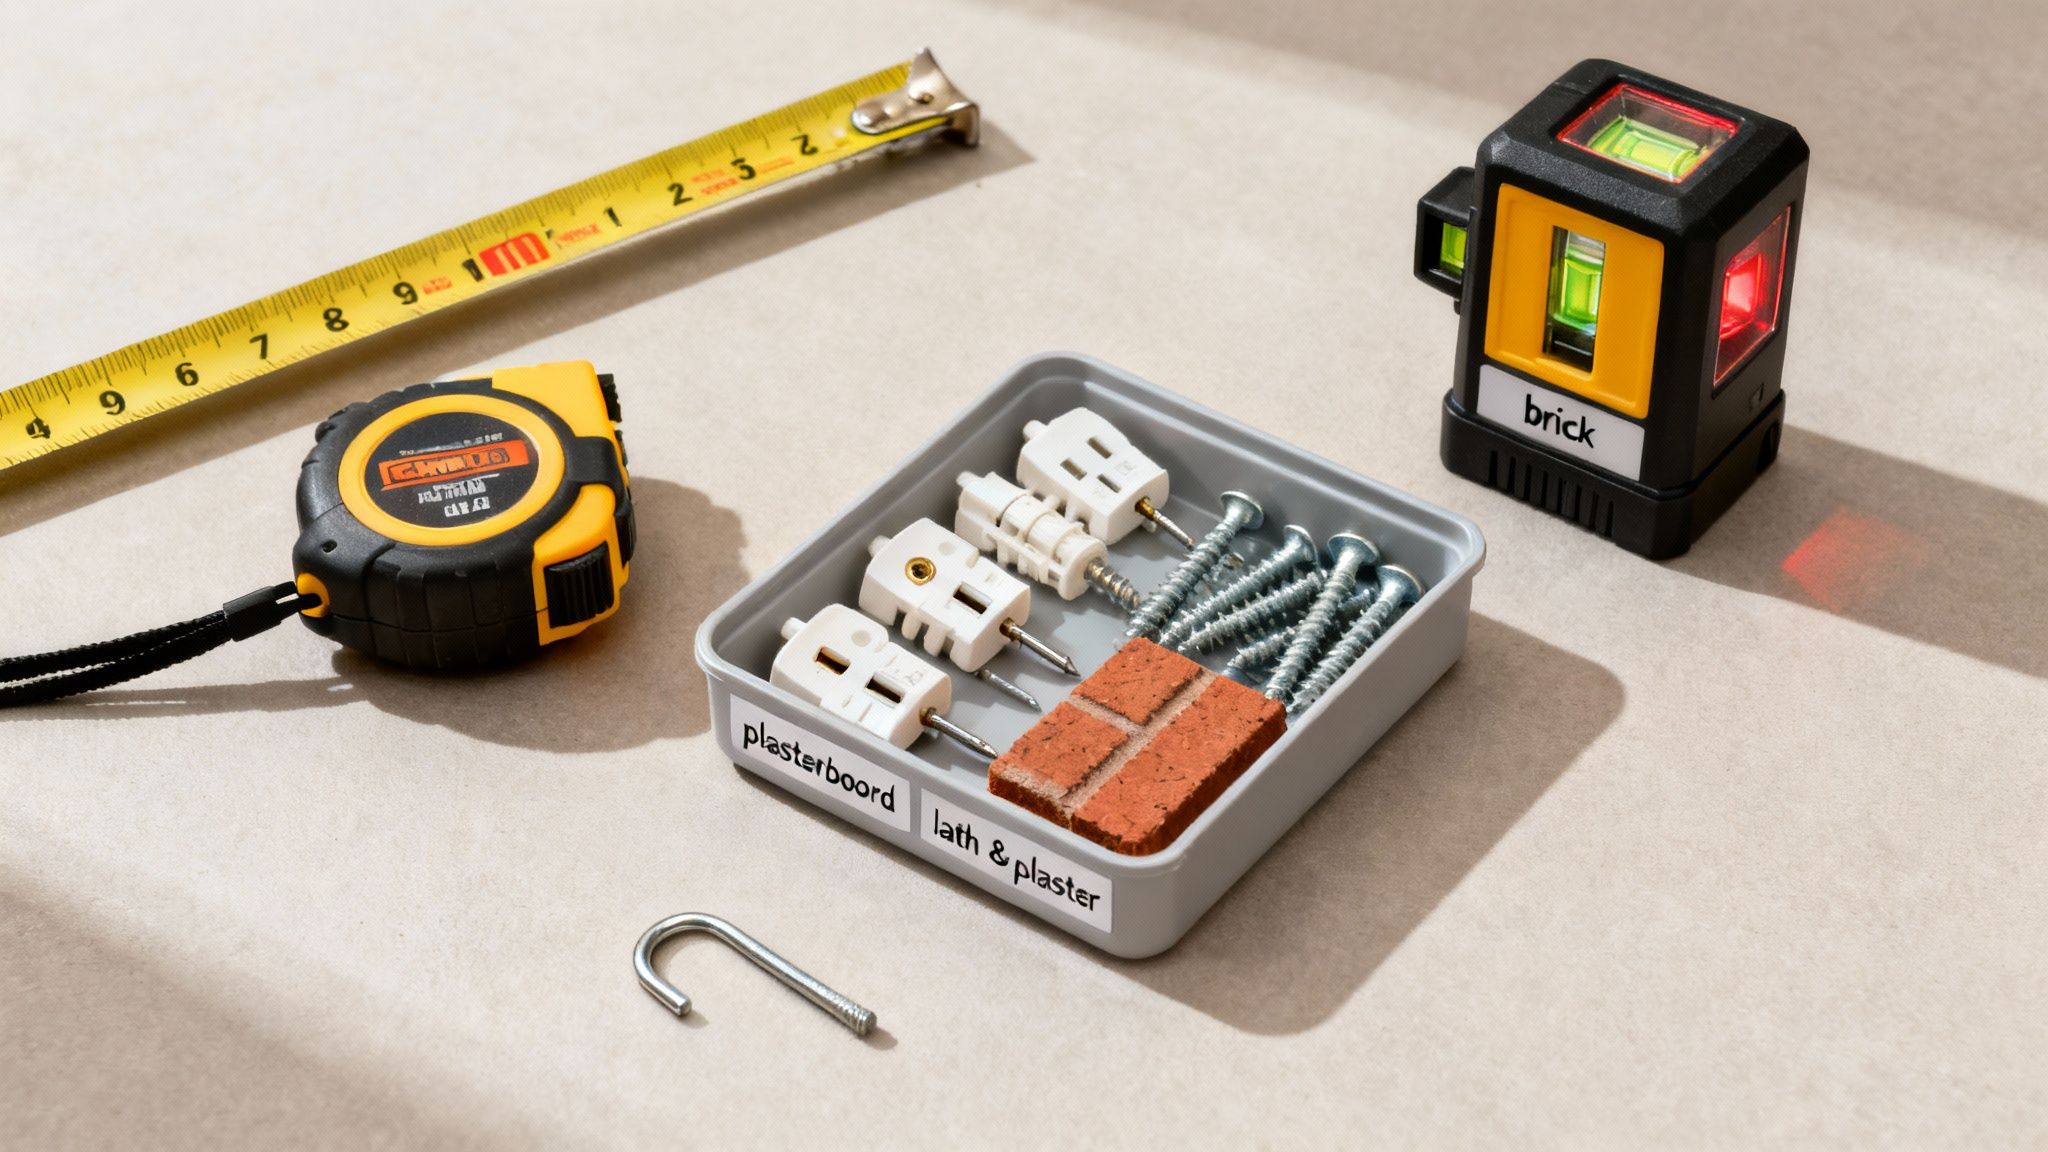
Understanding Your Walls and Fixings
Here in the UK, you’ll generally come across a few common wall types, and each one demands its own specific kind of fixing. Using the wrong hardware is probably the number one picture-hanging sin, and it can lead to damaged walls or, even worse, a smashed frame.
Plasterboard is what you’ll find in most modern homes. It's basically a plaster core sandwiched between paper, which means it’s hollow. A simple nail just won't cut it for anything with a bit of weight.
Brick or Masonry walls are solid as a rock, but they require a bit more muscle. You can't just hammer a nail into brick. You have to drill a hole first and use a wall plug to give the screw something secure to grip onto.
Lath and Plaster is common in older British properties. It’s made from thin wooden strips (laths) covered in plaster, and it can be notoriously brittle and prone to cracking if you’re not careful.
The single biggest mistake people make is underestimating their walls. A heavy frame needs more than just hope and a small nail to stay put, especially on plasterboard. Always choose a fixing rated to hold at least double the weight of your frame for total peace of mind.
To make things simple, it’s all about matching the right fixing to your wall. Here’s a quick guide to help you choose the correct hardware every time.
Matching Your Wall with the Right Hardware
Choosing the right fixing can feel a bit daunting, but this table breaks down the most common UK wall types and what you'll need to hang your frames securely and safely.
By taking a moment to figure out your wall type and grab the right fixings, you're setting yourself up for a successful, stress-free project. It’s this little bit of prep that ensures your pictures don't just look great, but stay that way.
Mastering Placement and Visual Balance
The difference between a room that feels effortlessly chic and one that just feels… off, often comes down to composition. Getting your art on the wall is one thing, but getting the placement right is what creates a sense of visual harmony. It’s that final touch that connects your art to the furniture, lighting, and architecture around it.
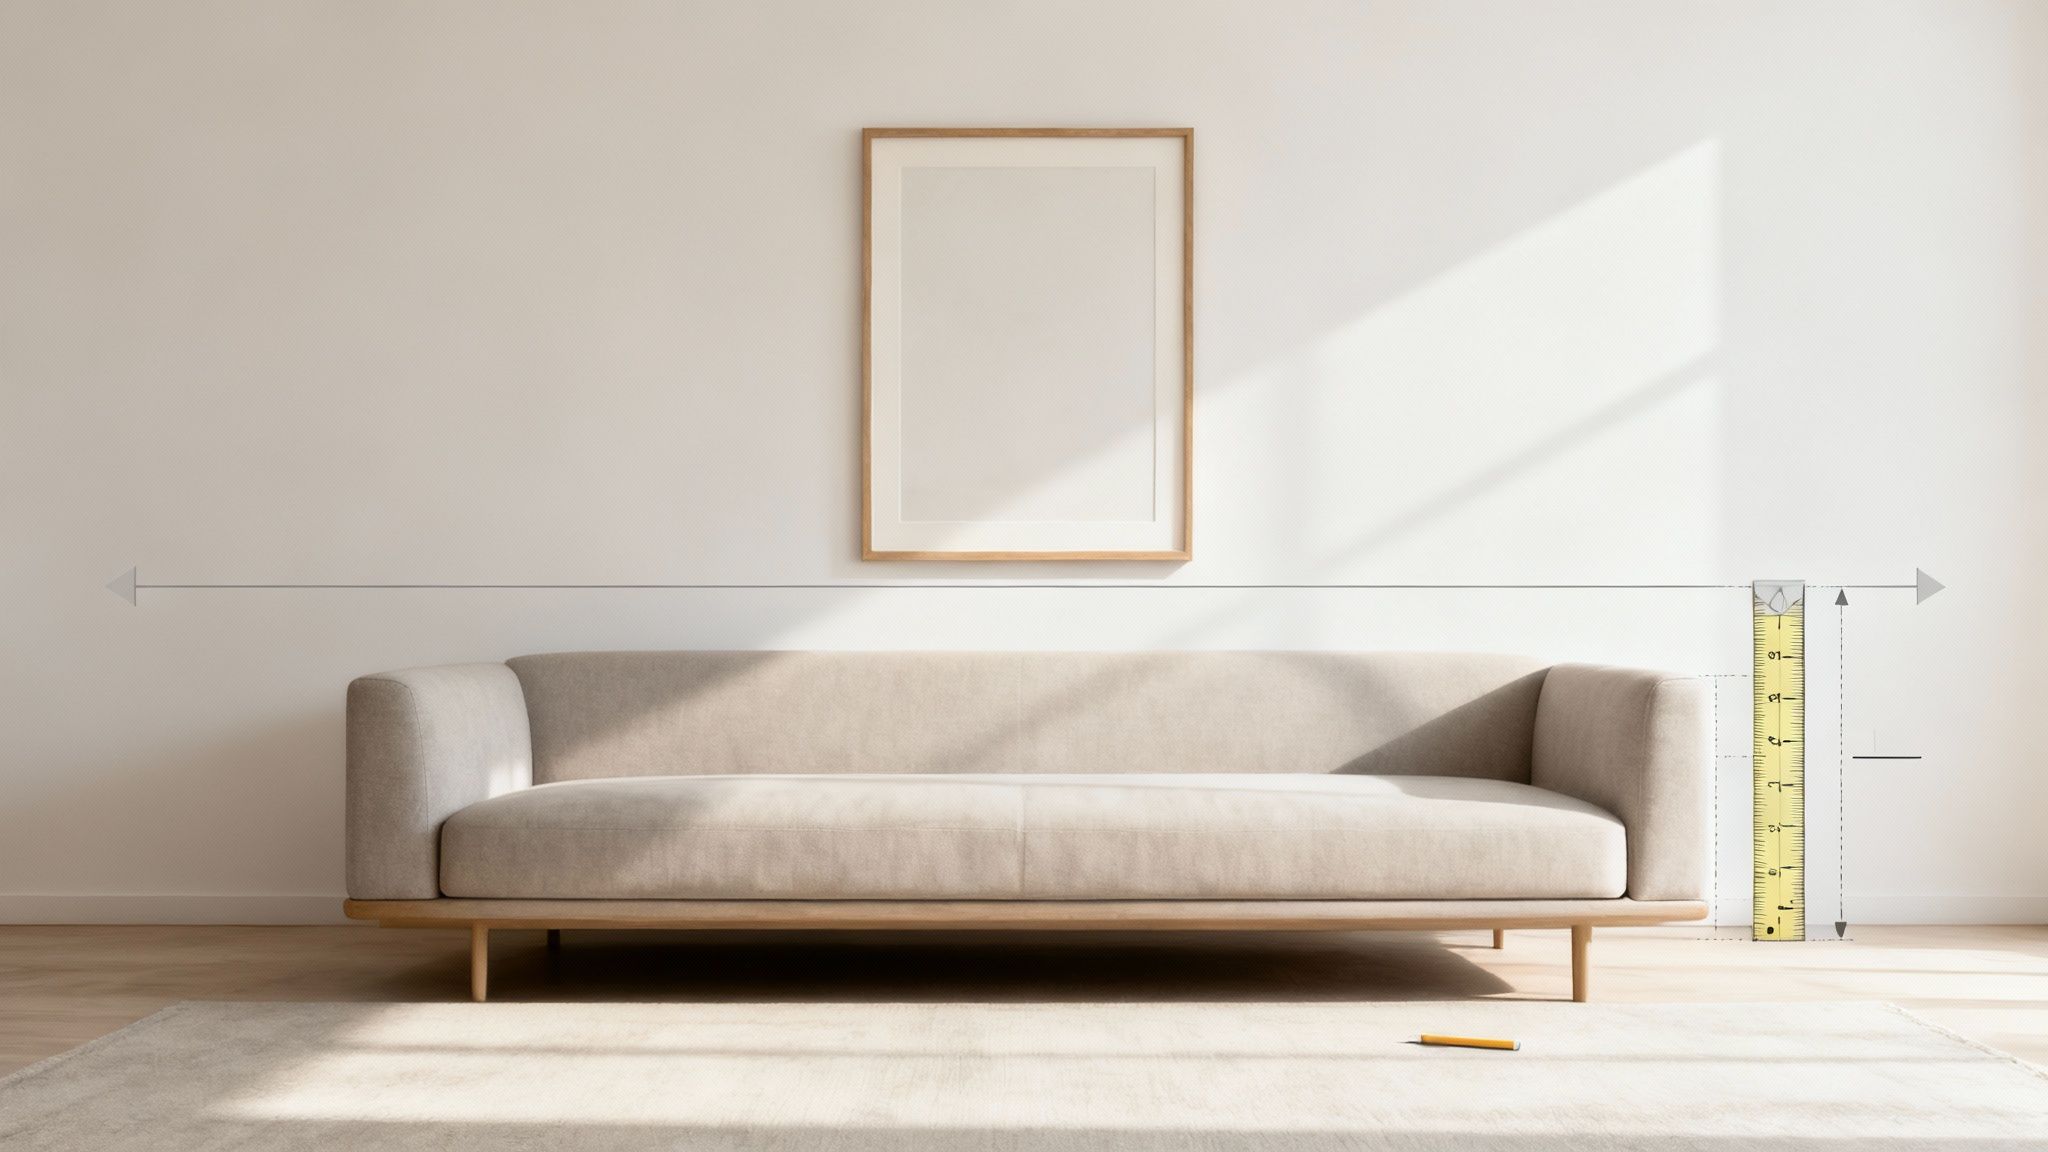
You’ve probably heard the old "hang at eye-level" rule, but that’s a bit vague, isn't it? After all, whose eye level? Instead, the gallery world has a much more useful guideline: aim for the centre of the artwork to be roughly 57 to 60 inches (about 145-152 cm) from the floor.
This measurement is a fantastic starting point because it places the art at a comfortable viewing height for most people. It also helps you sidestep the most common mistake I see: hanging art far too high, which can make a room feel disconnected and unbalanced.
Finding Harmony with Furniture
When you're hanging a picture above a sofa, sideboard, or headboard, the relationship between the two pieces is everything. The art needs to feel anchored to the furniture, creating a unified visual statement rather than looking like it’s just floating awkwardly in space.
A good rule of thumb is to hang the bottom edge of the frame 6 to 8 inches above the top of the furniture. This leaves enough breathing room so the display doesn't feel cramped, but it keeps the two elements feeling visually connected.
Think of your artwork and furniture as a single unit. If the gap is too large, they'll look disjointed. A smaller, considered gap creates a much stronger and more intentional focal point.
The scale of your art is just as important. For a balanced look, your artwork should ideally be about two-thirds the width of the furniture it's hanging over. A tiny print above a large three-seater sofa will look lost, while a massive canvas can easily overwhelm a small console table. Trust me, it's almost always better to go a little too big than too small.
Scale and Proportion on an Open Wall
What about hanging a picture on a completely empty wall? Here, the goal is to make a statement and engage the space without the artwork looking tiny and insignificant.
- Match the Wall's Shape: Work with what you've got. A tall, narrow stretch of wall is perfect for a portrait-oriented piece, while a wide, horizontal wall practically begs for a landscape format.
- Create a Focal Point: A single, large piece of art is a brilliant way to create an immediate focal point. This is especially effective in hallways or entryways where you want to make a strong first impression.
- Group Smaller Pieces: If you have several smaller frames, don't scatter them. Group them together and treat the entire collection as one single, larger piece. This gives them far more visual weight and impact.
This kind of strategic placement is a huge part of why so many of us are investing in our homes' aesthetics. In fact, the UK wall art market, which covers everything we're talking about, generated revenues of around USD 3.6 billion in 2022. This just goes to show how much we value personalising our spaces.
Ultimately, the placement of your art has a direct impact on the flow and feel of your living areas. To see how these principles tie into the bigger picture, take a look at our guide on how to arrange furniture in a living room — it complements these ideas perfectly.
How to Design an Effortless Gallery Wall
The idea of a gallery wall can feel a bit high-stakes, but it honestly doesn't have to be. With a little bit of planning, it can easily become the most personal and character-filled feature in your home. The secret isn’t about having a perfect collection of art; it’s about arranging what you love in a way that feels considered and intentional.
The process should be creative, not chaotic. We’ll break it down so you can build a display that looks curated and polished, moving from your first ideas to a final layout you’re genuinely proud of. The best part? You can do all the heavy lifting before a single nail even thinks about touching the wall.
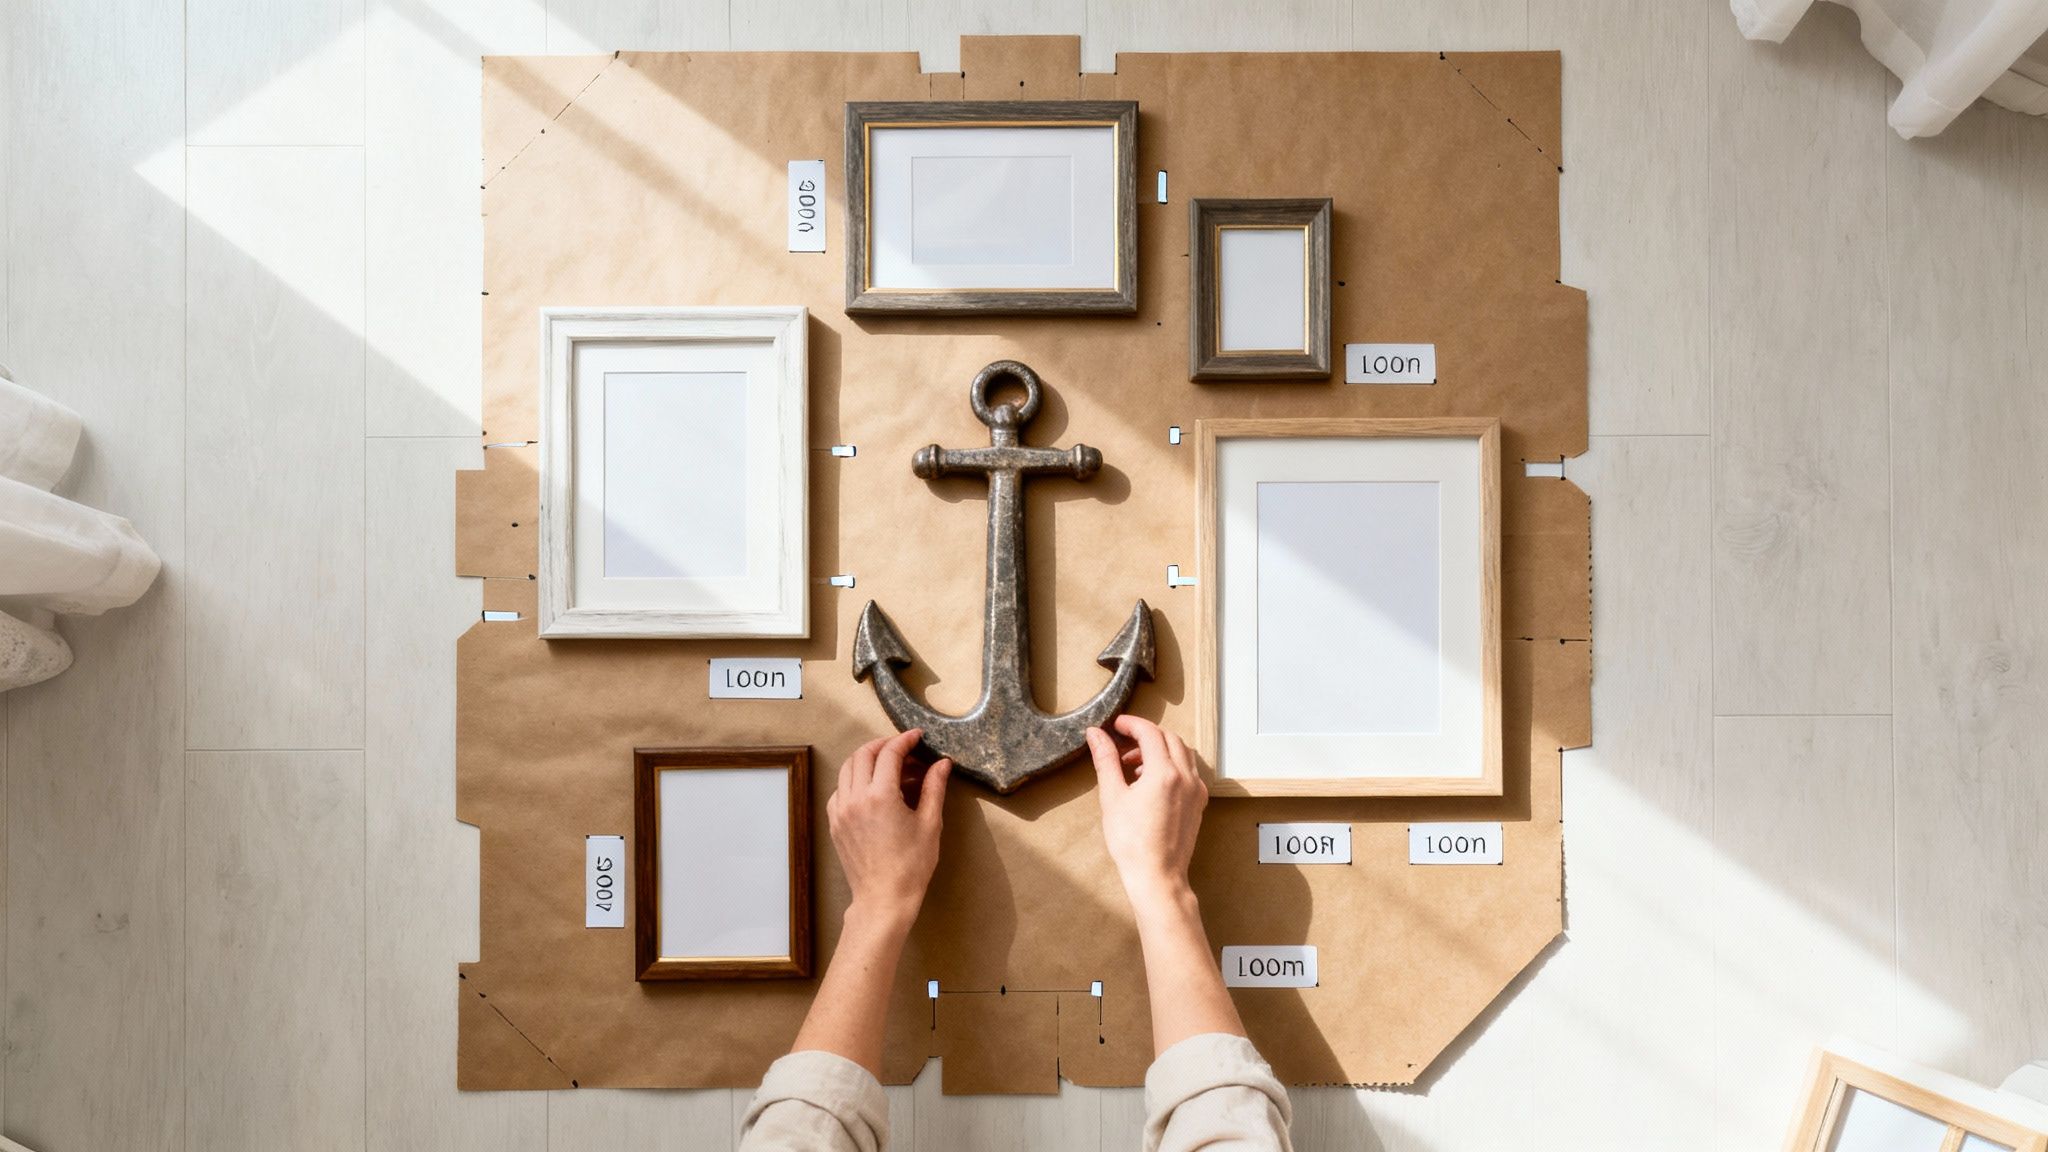
Laying the Groundwork with Paper Templates
Before you even think about committing to holes, grab a roll of craft paper, scissors, and some low-tack painter's tape. Trust me, this simple trick is a complete game-changer for hanging pictures, letting you visualise your entire gallery wall layout risk-free.
Just trace each of your frames onto the paper and cut them out. It’s a good idea to label each template so you know which frame is which. Now for the fun part: you can arrange and rearrange these paper shapes on your wall until you find a composition that just feels right. It lets you play with spacing and balance without any of the usual guesswork.
A great little tip I’ve picked up over the years: once you think you have a layout you like, take a photo of it. Seeing it through a camera lens gives you a totally different perspective and helps you spot any awkward gaps or imbalances you might have missed. It’s an old designer trick that works every time.
When you’ve settled on the perfect layout, you can mark the hanging points directly onto the paper templates. Then, you simply hammer your nail or drill your screw right through the paper. Tear the template away, and your hardware will be in the exact right spot. Simple.
Choosing Your Gallery Wall Style
Gallery walls aren't a one-size-fits-all affair; their style should reflect your personality and the feel of your room. Generally, they fall into two main camps, each with its own distinct aesthetic. Knowing the difference will help you choose the best fit for your art and frames.
The Symmetrical Grid
Think clean, organised, and formal. This style involves hanging frames of the same size and finish in a very precise grid. It’s perfect for creating a sense of order and calm, working beautifully in minimalist or more traditional spaces.
- Best For: A series of prints from the same artist, black and white photography, or a set of architectural drawings.
- Key Tip: Precision is everything here. Use a laser level and tape measure to ensure the spacing between each frame is exactly the same, both horizontally and vertically. A gap of 2 to 3 inches is usually a great starting point.
The Eclectic Salon Hang
This approach is much more organic, playful, and personal. It’s all about mixing different frame sizes, styles, colours, and even shapes into a free-flowing arrangement. It's a fantastic way to show off a diverse collection of art, photos, and personal keepsakes.
- Best For: A mix of paintings, prints, photos, postcards, and even small objects like mirrors or decorative plates.
- Key Tip: To make it feel cohesive, you need a unifying element. This could be a consistent colour palette in the artwork, a common frame material (like all-wood or all-metal), or just keeping the spacing consistent between all the pieces.
Curating a Cohesive Collection
The real magic of a great salon-style gallery wall is making a varied collection feel like it belongs together. Without a thoughtful approach, it can quickly look cluttered rather than curated. The key is to find a common thread that ties everything together.
One of the most effective ways to start is by identifying an anchor piece. This is usually your largest or most eye-catching piece of art. Place it slightly off-centre in your desired area and then build the rest of your arrangement out from there. This gives your layout a natural starting point and a strong focal point.
You also need to think about the flow and balance of the whole thing. If you have a few dark, heavy frames, scatter them throughout the arrangement rather than bunching them together. The same goes for bright pops of colour in your artwork. You're trying to create a visual rhythm that guides the eye across the wall. This is a brilliant strategy to use when looking at decorating ideas for hallways, where you want to create a sense of movement and interest.
Perfecting the Spacing
Consistent spacing is the unsung hero of any successful gallery wall. It’s a subtle detail, but it’s what makes the entire arrangement feel polished and professional, whether you’ve chosen a neat grid or a relaxed salon hang.
As a general rule of thumb, aim for a consistent gap of 2 to 3 inches between each frame. This gives each piece enough breathing room to stand on its own while still feeling like part of the group. A handy shortcut is to use a small piece of wood or a ruler cut to your desired width. You can hold this between frames as you plan your layout, ensuring your spacing is uniform without having to constantly pull out the tape measure. It makes the whole process so much smoother.
The Practical Steps to Hanging Any Frame
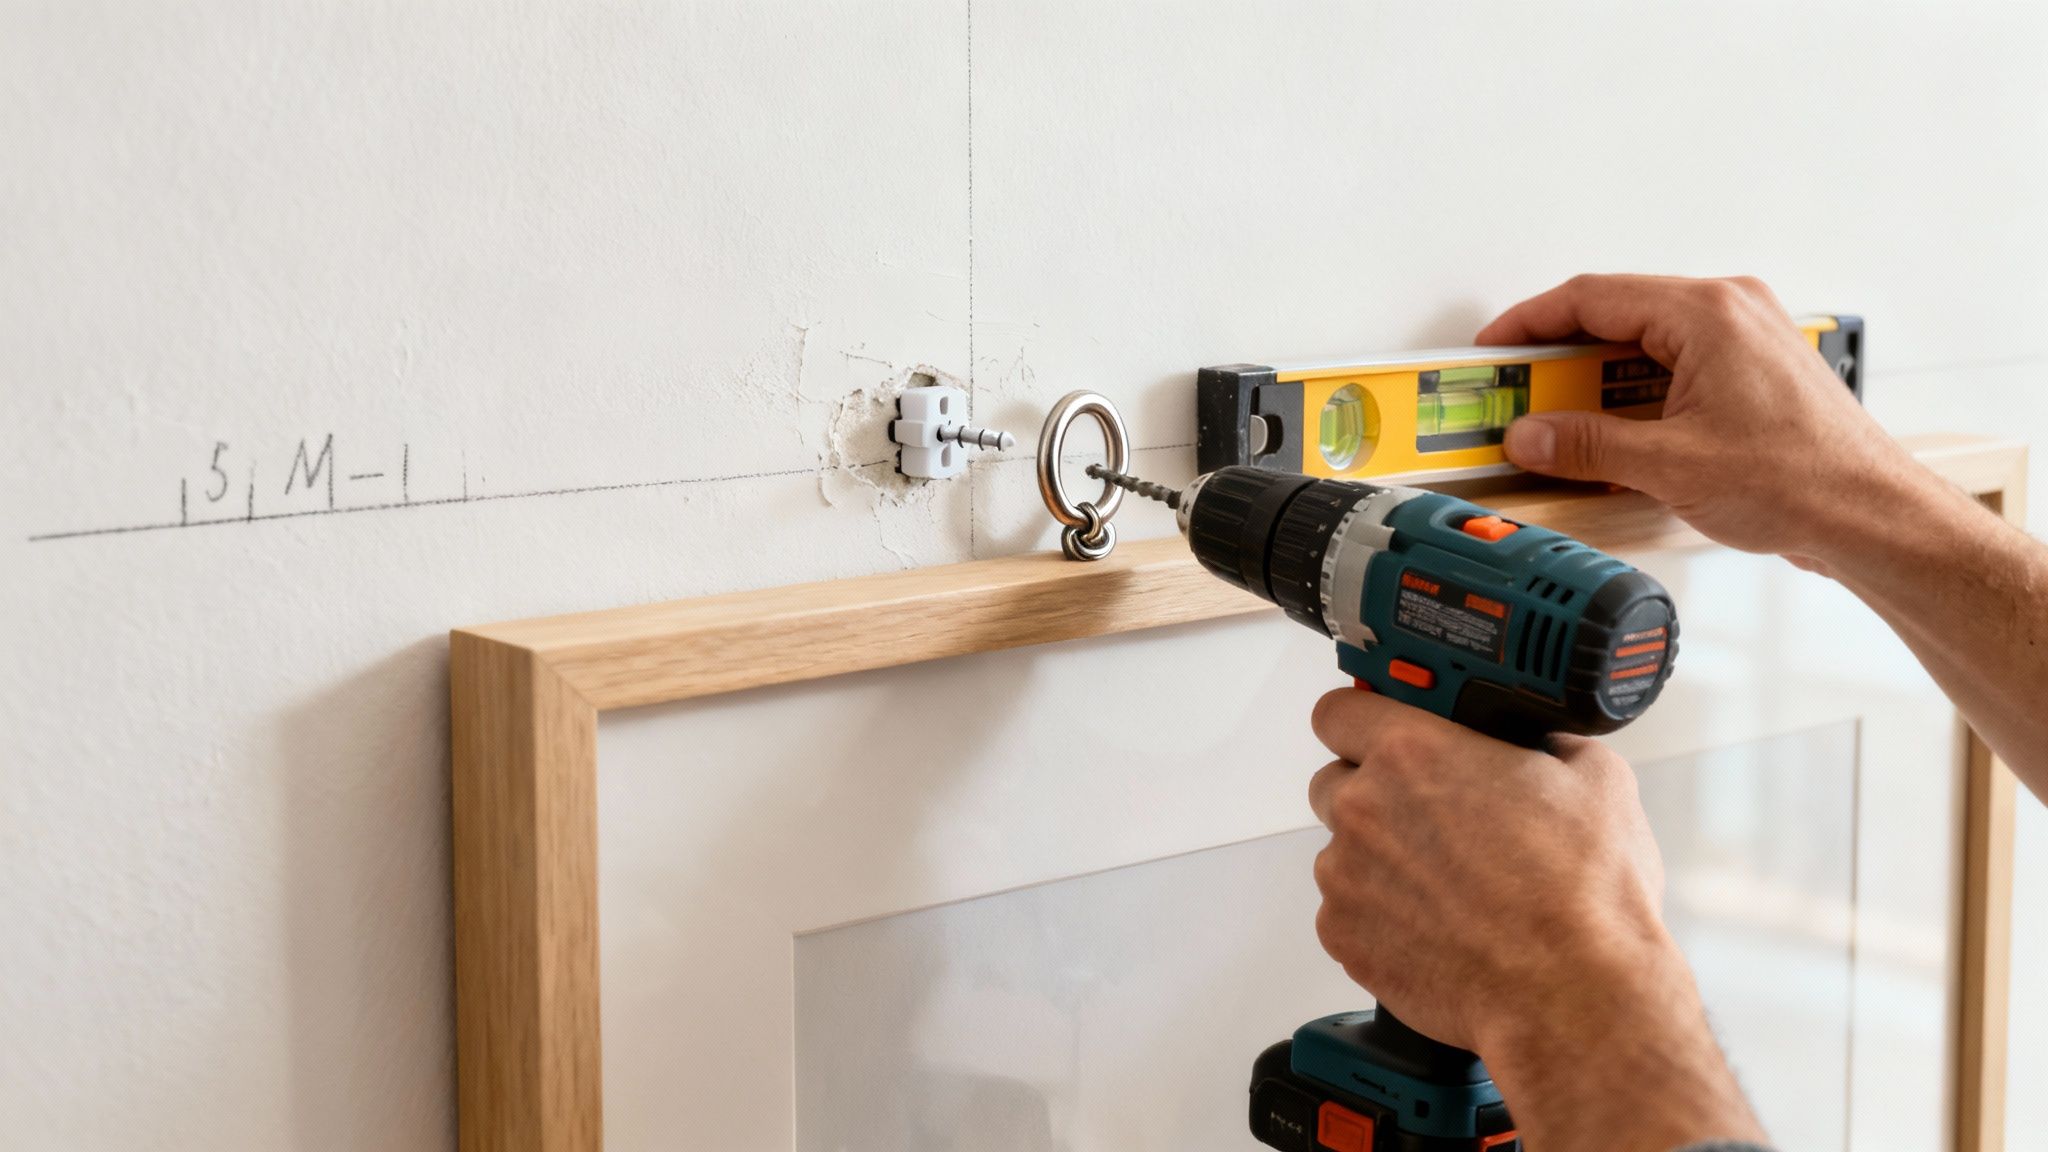
You’ve got your layout sorted and your tools gathered—now for the satisfying part. This is where your vision starts to take shape on the wall. Getting this final stage right is all about careful execution, so we’ll walk through exactly how to get your art hung securely and perfectly level.
All that planning is about to pay off. A little precision here saves you from the classic headaches of crooked pictures, extra nail holes, and damaged walls. First things first, let's look at what's on the back of your frame.
What Kind of Hardware Are You Working With?
Before you pick up a hammer, flip your frame over. The hardware on the back dictates how you'll hang it. You’ll usually find one of three common types, and each has a slightly different approach.
- Sawtooth Hangers: These little serrated metal brackets are common on smaller, lighter frames. They’re dead simple—designed to catch on a single nail or screw. Perfect for a quick job.
- D-Rings: You'll see these sturdy, D-shaped metal rings screwed into both sides of the frame. They're the go-to for medium-to-heavy pieces because they offer a much more secure fix, especially if you use two separate hooks on the wall.
- Picture Wire: This is simply a wire stretched between two D-rings, allowing the frame to hang from one central hook. It’s flexible for levelling on the fly, but I find it can be a bit notorious for shifting out of place over time.
It's no surprise that traditional picture frames are so common. They hold a huge slice of the UK and European markets—in fact, they represent the largest share of the market by type. As we all spend more time perfecting our homes, the demand for customisable decor just keeps growing.
The Measure and Mark Method
Accuracy is everything. Start by measuring the distance from the very top of the frame down to its hanging point. This could be the little notch in the sawtooth hanger, the top curve of the D-rings, or the wire when you pull it tight as if it were hanging.
Got that measurement? Now, transfer it to the wall. Decide where you want the top of your frame to sit, then measure down from that point by the exact "drop" distance you just found. Make a small, light pencil mark right there. That's your target.
A Pro Tip: Instead of a simple dot, I always draw a small horizontal line. Then I add a tiny vertical line to create a '+' symbol. This gives you an unmistakable centre point for your nail or screw, which makes a surprising difference to your accuracy.
Getting the Fixings in Place
With your spot perfectly marked, it’s time to install the hardware. If you're using a simple picture hook, place the nail on your mark and angle it slightly downwards into the wall as you hammer it in. That downward angle gives it a much better grip.
For heavier frames needing a wall plug and screw, drill a pilot hole on your mark. Tap the plug in gently until it’s flush with the wall, then drive in the screw. Leave it sticking out just enough to securely hold your D-ring or wire.
Now, carefully lift your picture and hang it. Grab your spirit level and place it on top of the frame, making those final tiny adjustments until the bubble is perfectly centred between the lines. It's this last step that makes all the difference, much like how a well-chosen piece of art can transform a simple mantelpiece. For more inspiration on that, have a look at our guide to mantelpiece decoration ideas.
A Few Common Picture Hanging Questions, Answered
Even when you think you’ve got it all figured out, a specific question can pop up right in the middle of a project. Getting the right answer can be the difference between a frustrating afternoon and a flawless finish. Here, I'll tackle some of the most common snags people hit when hanging frames.
Think of this as your expert troubleshooter. We’ll build on what you’ve already learned and give you the confidence to solve those little problems that inevitably arise, making sure your art ends up looking exactly how you imagined.
How Can I Hang Frames Without Using Nails or Damaging My Walls?
This is a huge one, especially for renters or anyone who just wants to keep their walls pristine. The good news is there are some fantastic damage-free solutions out there that work brilliantly when you use them correctly.
Adhesive strips are a genuine game-changer. The trick is to always check the weight rating on the packet and pick a set that can easily handle your frame. For the best grip, give the wall a quick wipe with a bit of rubbing alcohol to get rid of any dust or grease, then press the strip firmly for at least 30 seconds.
For really lightweight pictures, adhesive hooks are another great shout. You can also get a bit creative and use what’s already in the room:
- Leaning: Don’t underestimate the power of leaning. A larger frame can look incredibly stylish propped against a wall on a mantelpiece, a sideboard, or even the floor.
- Picture Rails: If you’re lucky enough to have them, traditional picture rails with hooks and cords are a classic, entirely damage-free way to hang your art.
What Is the Safest Way to Hang a Very Heavy Picture or Mirror?
When you’re dealing with something heavy, safety is everything. Your first port of call should always be to find a wall stud. A simple stud finder will help you pinpoint its location, and drilling your screw directly into it gives you the strongest possible anchor.
But what if there's no stud where you need one? You’ll need to turn to a heavy-duty plasterboard fixing. I find toggle bolts are an excellent choice for this; they have spring-loaded wings that open up behind the wall, spreading the weight over a much wider area. If you’re working with solid brick, a robust wall plug and a substantial coach screw are what you need.
Always, always use two anchor points for a heavy frame or mirror. Placing a hook towards each side of the frame, rather than relying on one in the middle, not only doubles your security but also stops the whole thing from swinging or tilting over time.
How Do I Stop My Pictures from Going Crooked?
Ah, the perpetually tilting frame. It's one of the most common and annoying little problems. The culprit is almost always a single hook and wire, which just gives the frame too much room to move.
The most effective fix is to use two hooks on the wall. By hanging your frame from its D-rings onto two separate, level hooks, you create a super-stable two-point system. It makes it nearly impossible for the frame to shift out of place. It’s a simple change, but it makes all the difference.
Already have a frame up on a wire and don’t fancy making more holes? There’s a quick fix for that, too. A tiny piece of museum putty or a discreet dab of Blu-Tack pressed behind each bottom corner adds just enough friction against the wall to hold it perfectly straight.


