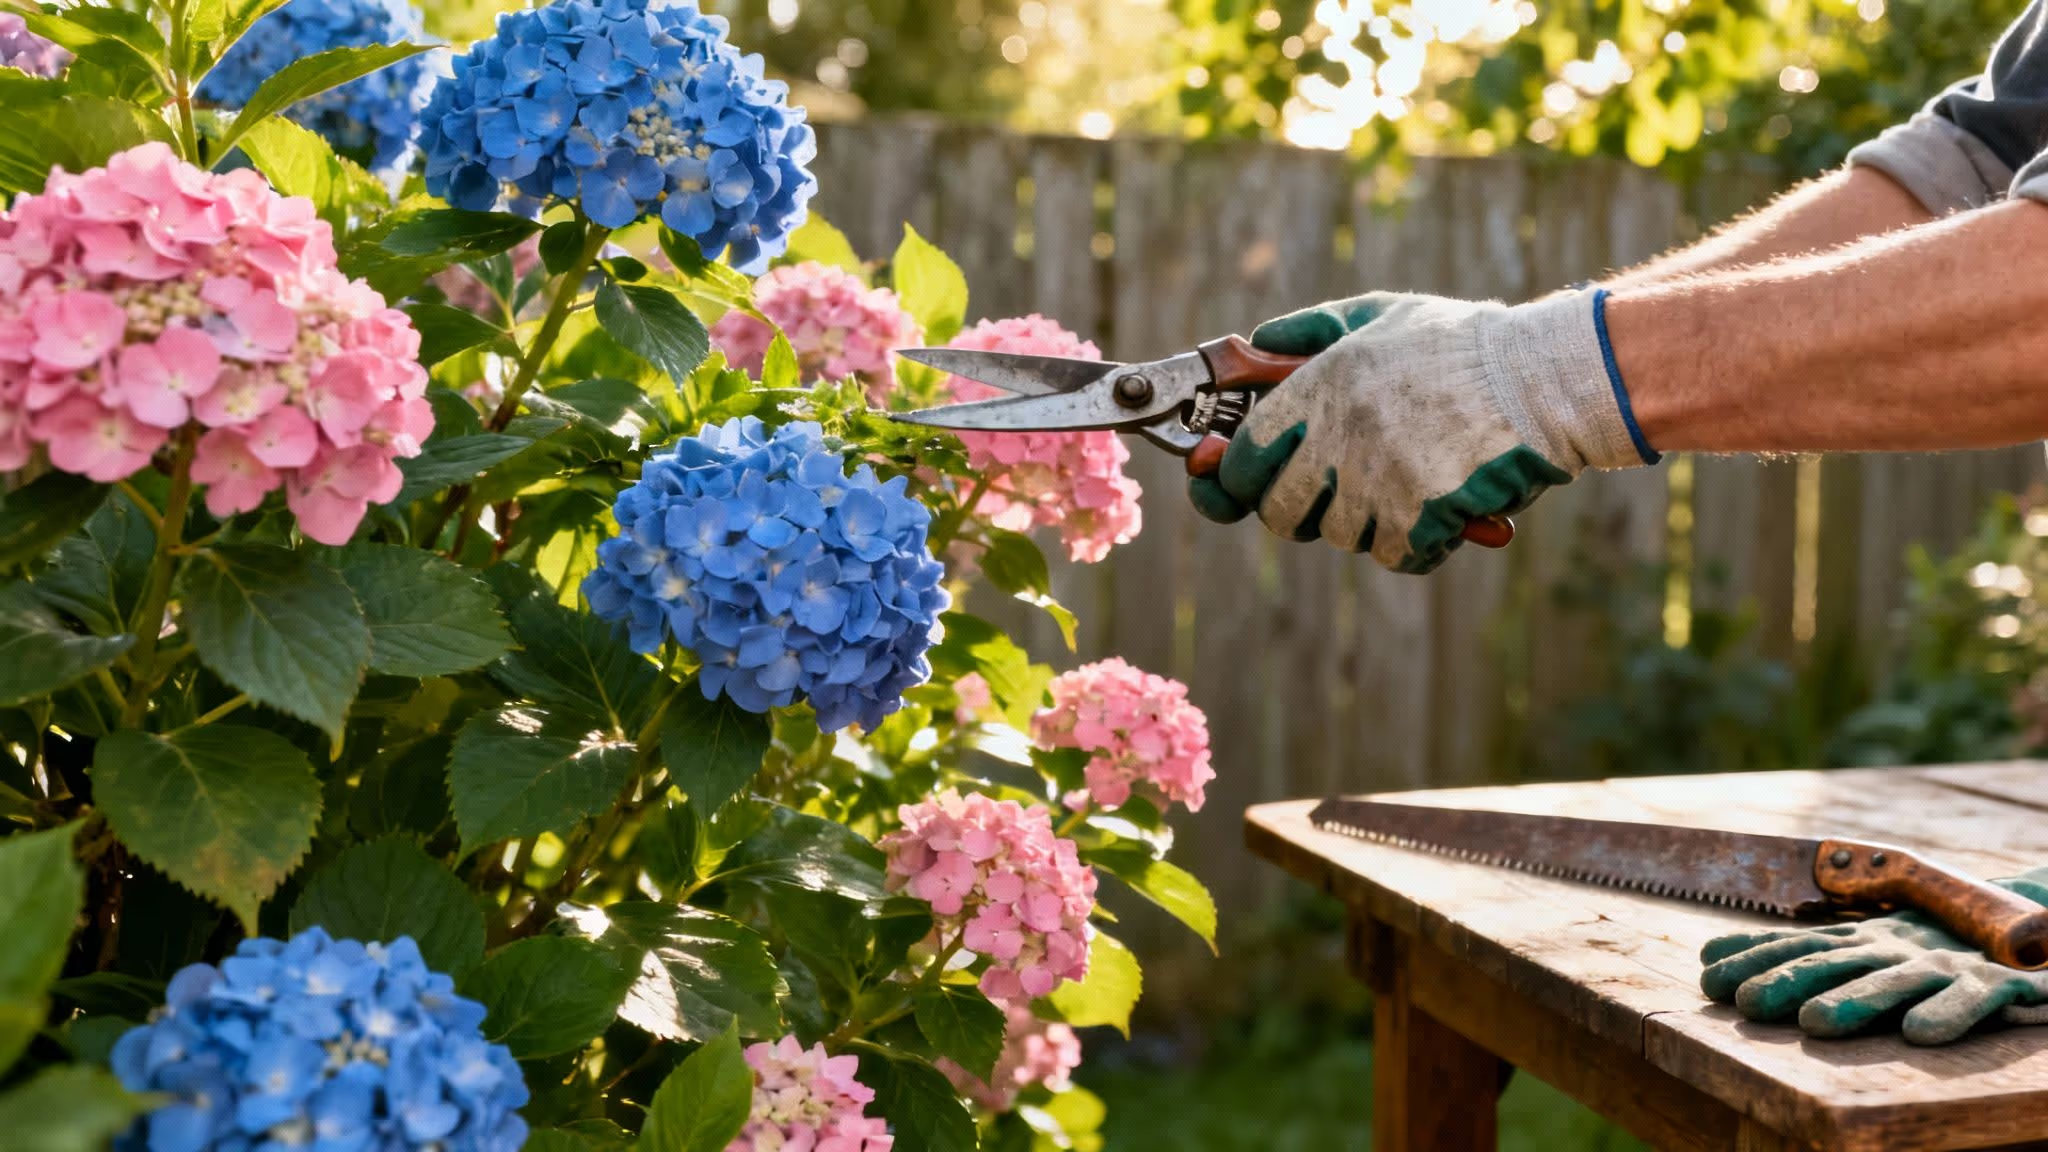
Let’s be honest, stepping into the garden with a pair of secateurs can feel a bit nerve-wracking, especially when you’re standing in front of a gorgeous hydrangea. We’ve all been there, frozen by the fear of making one wrong snip and accidentally wiping out an entire summer’s worth of flowers.
But here’s the secret: getting it right is much simpler than you think. It all comes down to one thing – knowing whether your hydrangea flowers on this year's growth (new wood) or last year’s (old wood). Once you’ve got that sussed, pruning stops being a chore and becomes a simple, satisfying ritual that guarantees a show-stopping display, year after year.
Why Bother Pruning Your Hydrangeas?
A good prune is about so much more than just keeping your hydrangea from taking over the garden path. It’s one of the best things you can do for the health and vitality of your plant.
Think of it as a strategic haircut that encourages bigger, better blooms and a stronger, healthier shrub. When you get it right, you'll see a few key benefits:
- Better Health: Snipping out dead, weak, or crossing stems opens up the plant, letting air flow freely. This simple act is your best defence against fungal problems like powdery mildew.
- More Flowers: A smart prune tells the plant exactly where to put its energy – into producing strong new stems that will support bigger, more impressive flower heads.
- A Beautiful Shape: You’re in control. Pruning helps you maintain a lovely, balanced shape and stops the plant from becoming a tangled, woody mess at its base.
The Golden Rule of Timing
In the UK, the best time to prune most hydrangeas is late winter or early spring – usually February or March. Why then? Because around 70% of the hydrangeas we grow in our gardens flower on old wood. Pruning after the last of the hard frosts but before the new growth really kicks in protects those precious, invisible flower buds that formed last year.
Getting this timing right is crucial. You can easily line it up with your other seasonal tasks by checking a good UK gardening calendar to map out your year. A little bit of knowledge and a well-timed prune is all it takes to turn your hydrangeas into the envy of the neighbourhood.
Gathering the Right Tools for Clean Cuts
Before you even think about making that first snip, let's talk tools. Knowing how to prune hydrangeas is only half the story; using the right kit is absolutely vital for your plant's health. Sharp, clean tools make for tidy cuts that heal quickly, which means less stress for the plant and a much lower risk of disease setting in.
Honestly, think of it as minor surgery for your shrub. A blunt blade will just crush and tear the stem, creating a ragged mess that’s an open invitation for infection. A clean, sharp cut, on the other hand, is like a neat stitch—it allows the plant to get on with healing and push all its energy into growing those gorgeous new flowers.
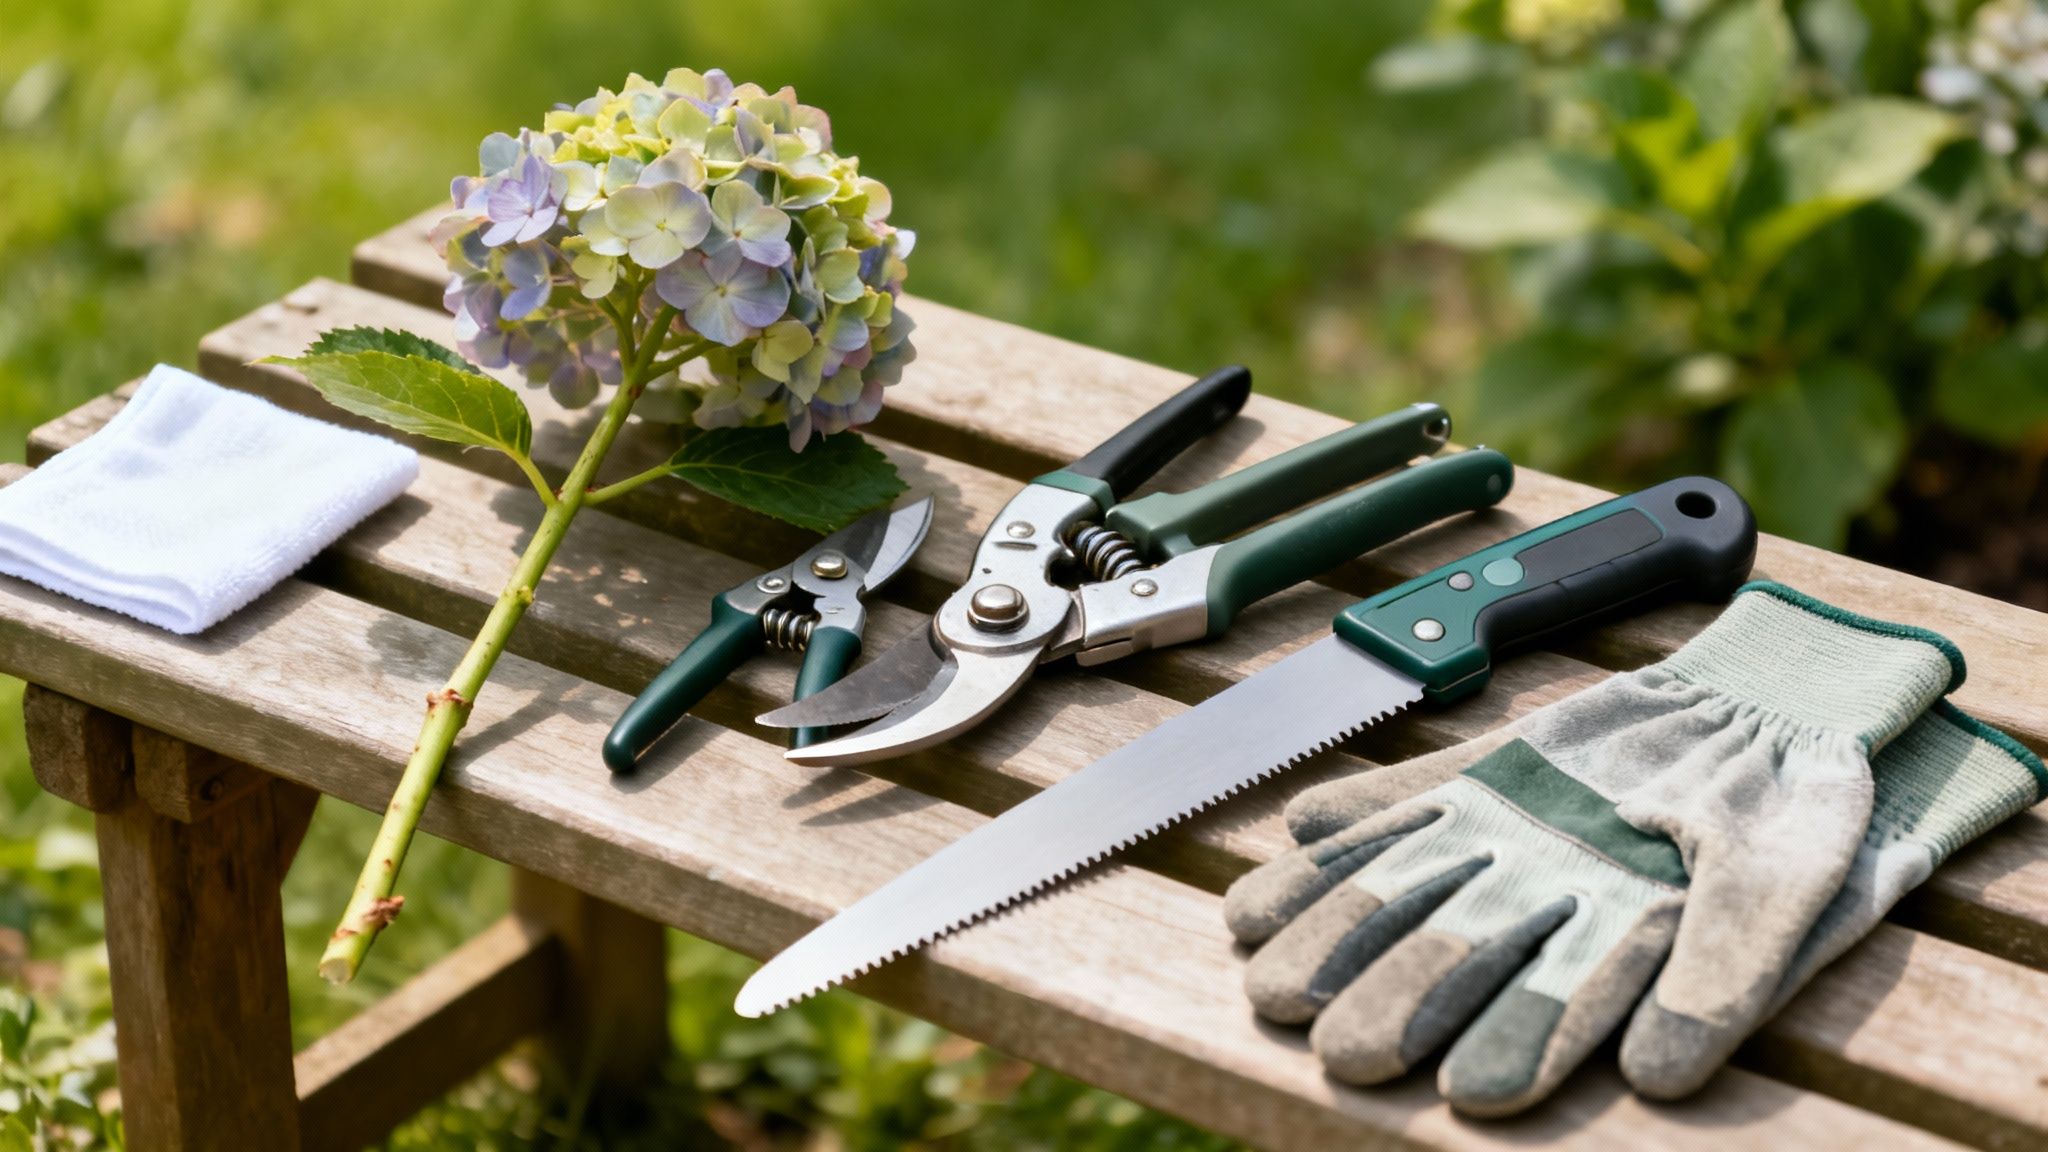
Your Essential Pruning Kit
You really don't need a shed bursting with gear, just a few quality pieces. Having the right tool for the size of the branch you’re tackling makes the job safer for you and healthier for the hydrangea. Simple as that.
Here’s what I always have to hand:
- Bypass Secateurs: These are your daily drivers for most hydrangea stems. Unlike anvil secateurs that can crush delicate stems, bypass versions have two curved blades that slice past each other for a perfectly clean cut. They're ideal for younger, green stems up to about half an inch thick.
- Loppers: For those thicker, woodier branches your secateurs just can’t manage, loppers give you the extra leverage you need. The long handles let you slice through branches up to an inch or more in diameter without a struggle.
- Pruning Saw: When you come across those old, thick stems right at the base of a mature plant—especially if you're doing a big renewal prune—a small pruning saw is your best friend. It’s designed to cut on the pull stroke, which makes it surprisingly easy to use in tight spots.
- Gardening Gloves: A good pair of gloves is a must. They’ll save your hands from scratches and blisters, making the whole job far more enjoyable.
It’s a step so many gardeners skip, but sterilising your tools is non-negotiable. I just give the blades a quick wipe with rubbing alcohol or a household disinfectant between plants. It takes seconds and stops you from accidentally spreading fungal spores or bacteria around the garden.
Keeping Your Tools in Top Shape
Sharp tools make for light work. Before you start, check your blades are sharp enough to slice cleanly through a piece of paper. If they're snagging, a few minutes with a sharpening stone will sort them out.
This little bit of prep pays off massively. When you’re all done, always clean any sap off your tools, dry them properly, and put them away. Good maintenance means better cuts and makes your favourite tools last a lifetime. For some clever ways to keep everything organised, check out these fantastic garden tool storage ideas. With the right gear ready to go, you can get pruning with complete confidence.
Pruning Hydrangeas That Flower on Old Wood
When it comes to hydrangeas that flower on old wood, a light touch and perfect timing are your best friends. This group includes some proper UK garden favourites – think of the classic Mophead (Hydrangea macrophylla), delicate Lacecap (Hydrangea macrophylla normalis), and the stunning Oakleaf (Hydrangea quercifolia). What they all have in common is a little quirk: they form next summer’s flower buds on the stems they grew last year.
Get a bit too scissor-happy at the wrong time, and you could accidentally snip off all of next season’s glorious blooms before they even get a chance.
The trick is to see this job as a tidy-up, not a total overhaul. You're simply clearing out the old to make way for the new. It's a subtle art, but once you get the hang of it, you’ll be pruning these beauties with complete confidence.
Timing Your Pruning Perfectly
For these "old wood" bloomers, the sweet spot for pruning in most of the UK is late winter or the very first blush of spring, usually around February or March. There’s a clever reason for waiting. Those faded, papery flower heads from last summer aren’t just for looks; they act as a natural frost blanket, protecting the tiny new buds nestled just below them from the worst of the winter chill.
If you prune too early in autumn, you leave these tender buds exposed. A little patience pays off massively, giving your plant the best possible start for a summer bursting with colour.
The Gentle Art of Deadheading
Your main job here is simply deadheading the old flowers and snipping out any dead or weak-looking stems. It’s a satisfying task that helps the plant focus all its energy on the healthy stems that are ready to perform.
Just follow these simple steps for each old flower:
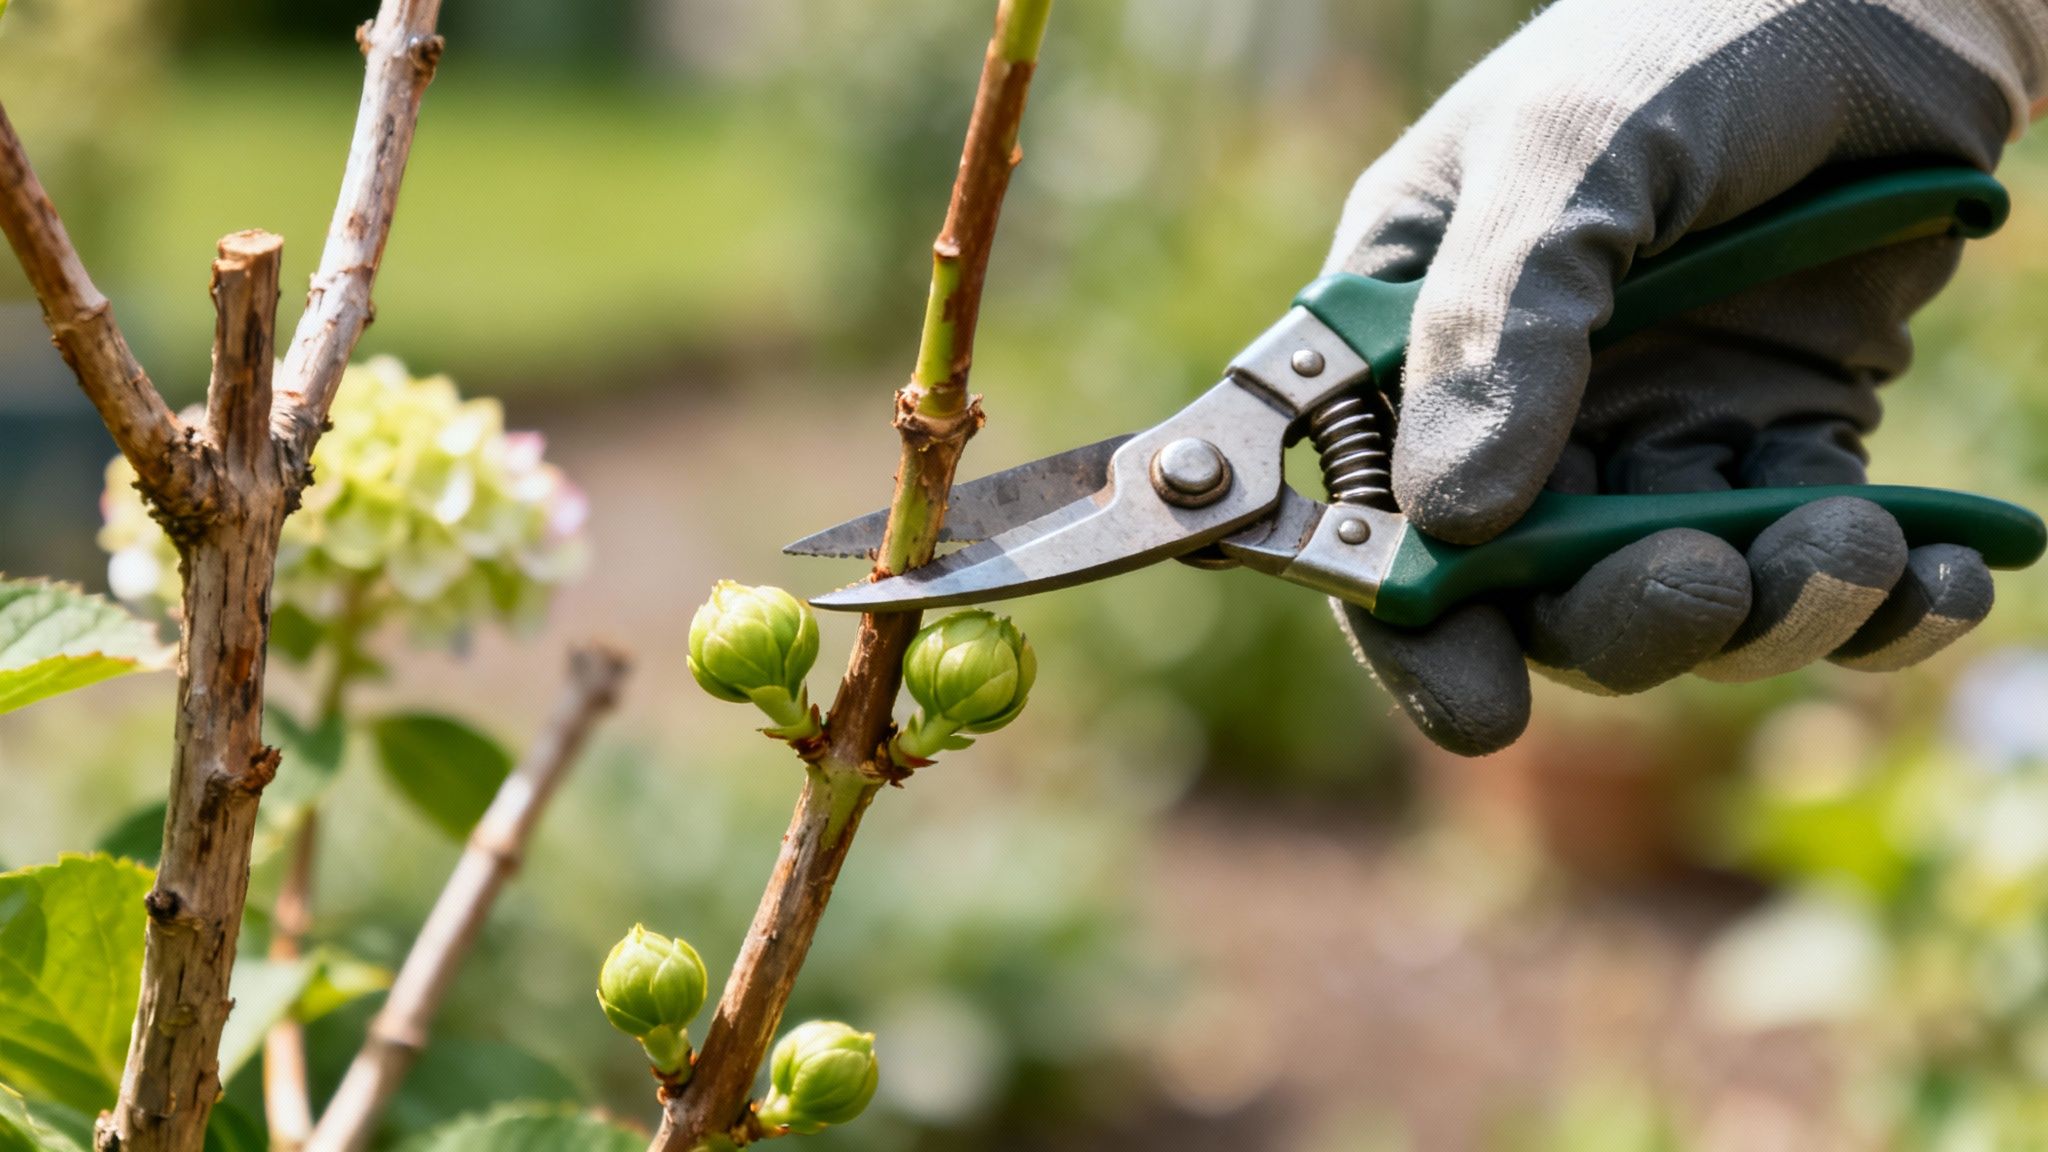
- Find the spent flower head from last summer.
- Follow the stem down with your eyes.
- Spot the first pair of fat, healthy buds. They’ll look plump and ready to go, often a fresh green or reddish colour.
- Make your cut. With sharp secateurs, snip cleanly about half an inch above this pair of buds. A slight angle on the cut helps water run off, but don’t stress about it too much.
As you work your way around the shrub, keep an eye out for any stems that are dead, broken, or just thin and spindly. These can be cut right back to the base to improve airflow and keep the whole plant healthy. It’s a very similar approach to the one we use for other flowering shrubs, as you’ll see in our guide on how to prune roses correctly.
Revitalising Overgrown Shrubs: The One-Third Rule
But what if you’ve got a huge, woody hydrangea that’s become a tangled mess and isn't flowering well? Hacking it all back might seem like the obvious answer, but with an old-wood variety, that means no flowers for a year or more. Luckily, there’s a much smarter way.
This gradual renewal is the secret to bringing a tired old plant back to its former glory without sacrificing a whole season of beautiful blooms. Within three years, you'll have a completely refreshed shrub.
Identifying Stems for Renewal Pruning
Knowing which stems to take out is easy once you know what you're looking for. You’re targeting the oldest, most tired-looking stems.
- Look for: Thick, woody stems that might have grey, peeling, or flaky bark. They just look less vibrant than the younger ones.
- Trace them right back to where they emerge from the ground.
- Cut them cleanly at the base using a pair of loppers or a small pruning saw.
By taking out roughly a third of these old stems each year, you open up space and encourage the plant to send up fresh new shoots from the bottom. These new shoots will grow, mature, and then start producing flowers in a continuous cycle, keeping your hydrangeas looking spectacular for years to come.
Pruning Hydrangeas That Flower on New Wood
If your garden is home to the ever-reliable Panicle (Hydrangea paniculata) or Smooth (Hydrangea arborescens) varieties, you can breathe a sigh of relief. Pruning these is a much more straightforward affair. Unlike their old-wood cousins, these fantastic shrubs produce flowers on the growth they make in the current season, which makes them incredibly forgiving.
This means you can approach them with confidence and a bit more gusto in late winter or early spring. A good, hard prune doesn't just keep them in check; it’s the secret to encouraging the strong, vigorous new stems needed to support those huge, impressive flower heads they're famous for. Forget the anxiety of snipping off next year's blooms—with these, your cuts are setting the stage for a spectacular summer show.
The Best Time for a Bold Prune
For both Panicle and Smooth hydrangeas, the ideal pruning window in the UK is from late winter to early spring, typically from February through to early April. The goal is to get the job done before the plant pushes out any significant new growth.
At this stage, the plant is still dormant, and you can clearly see its structure without a mass of leaves getting in the way. Pruning now directs all the plant's upcoming spring energy into producing a framework of powerful new stems – the very growth that will carry this season's flowers.
Shaping Panicle Hydrangeas for Maximum Impact
Panicle hydrangeas, like the popular 'Limelight' or 'Vanille Fraise', are wonderfully versatile. You can prune them to achieve different effects, depending on what you’re going for in the garden. The key is to establish a low framework of woody stems, about 1 to 2 feet from the ground, from which new growth will emerge each year.
From there, your pruning strategy can create two distinct looks:
- For Fewer, Gigantic Blooms: Cut back all of last year’s stems hard, leaving just two or three pairs of buds on each main branch of your framework. This channels the plant's energy into a smaller number of stems, resulting in truly enormous, show-stopping flower panicles.
- For More, Slightly Smaller Flowers: If you prefer a fuller, softer look with a greater number of blooms, simply prune less severely. Cutting last year’s stems back by about a third of their length will encourage more branching and a higher quantity of flowers.
It really is that simple. This choice allows you to tailor the plant's appearance to perfectly suit your garden design.
"A hard prune is an act of faith, but with new-wood hydrangeas, it’s faith that is always rewarded. By cutting back hard, you're not just tidying up; you're actively telling the plant to produce the strong, upright stems needed for the biggest and best flowers."
Taming Smooth Hydrangeas Like 'Annabelle'
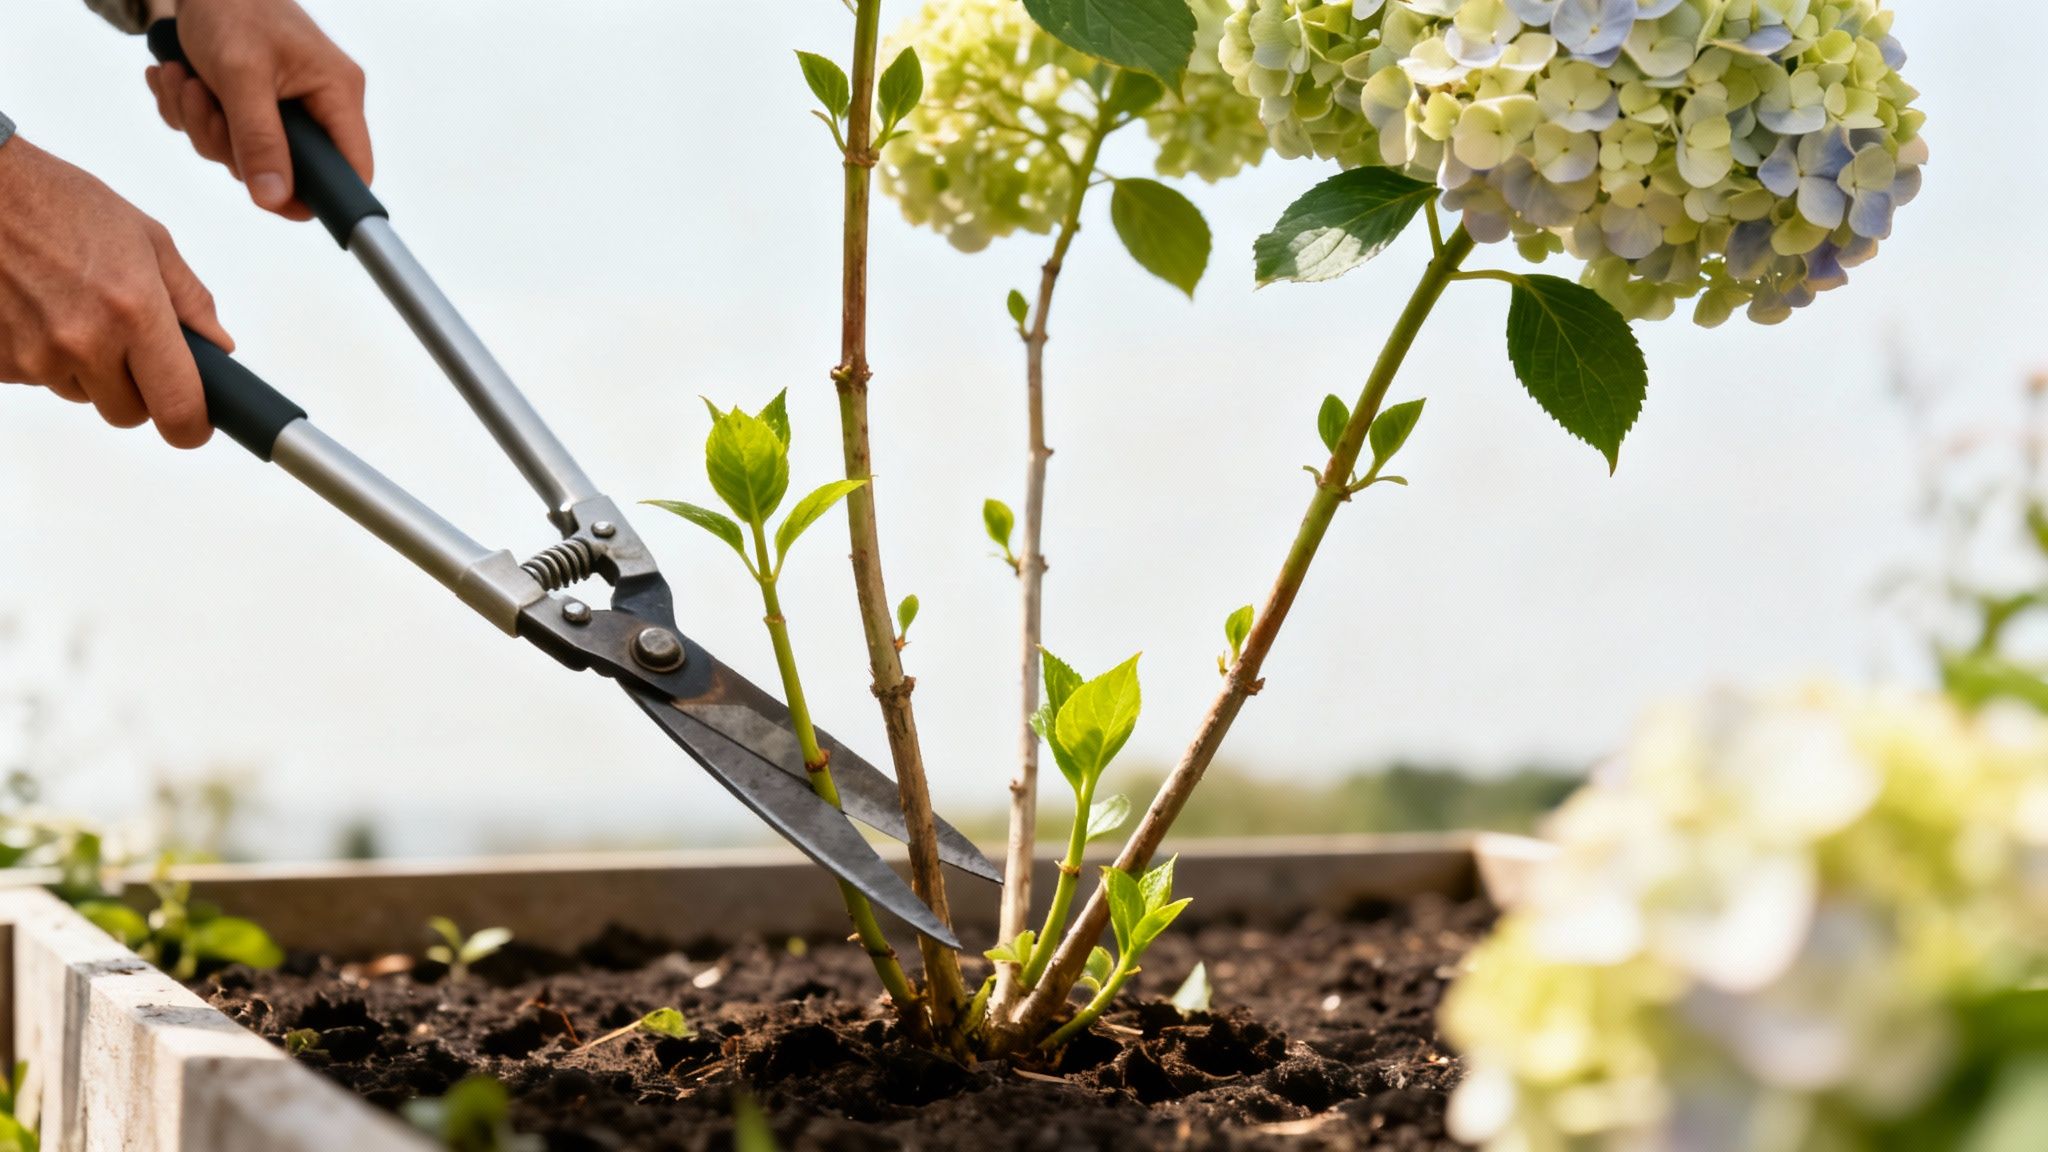
Smooth hydrangeas, most famously represented by the 'Annabelle' variety with its huge, globe-like white flowers, respond brilliantly to a hard prune. In fact, many gardeners cut them back very close to the ground each year.
Because they are so vigorous, you can cut all stems back to about 4-6 inches from the ground in early spring. This severe cut, sometimes called 'stooling', prevents the plant from becoming woody and leggy. It also encourages sturdy new stems strong enough to hold up those massive flower heads without flopping over after a summer rain shower.
In UK gardens, experts often suggest cutting stems back to just 30cm from the ground between mid-March and early April. This hard pruning promotes a beautiful, open, vase-shaped structure which improves air circulation and can slash the risk of fungal issues like powdery mildew by up to 45%. You can discover more insights about pruning for plant health on borderinabox.com.
A Quick Word on Climbing Hydrangeas
Climbing hydrangeas (Hydrangea anomala subsp. petiolaris) fall into a slightly different category. While they also flower on new wood, they require a much lighter touch. Heavy pruning isn't necessary unless you need to control their size or renovate a very old, overgrown plant.
The best approach is a light trim immediately after they have finished flowering in the summer. Simply cut back any shoots that are growing away from their support structure—like a wall or fence—to keep the plant looking tidy and well-managed. You can also snip out any dead or damaged stems at this time. This minimal intervention is all that’s needed to keep a climbing hydrangea healthy and flowering beautifully.
Common Hydrangea Pruning Mistakes to Avoid
We’ve all been there. Every gardener has a story about a pruning mishap that still makes them cringe. While a bit of trial and error is part of the fun, some mistakes with hydrangeas can cost you an entire summer of flowers. And nobody wants that sinking feeling come July.
Getting to grips with the common pitfalls is the quickest way to prune with confidence. The most frequent error? Treating all hydrangeas the same. A hard prune that works wonders on a cone-flowered Hydrangea paniculata will completely wipe out the flower buds on a mophead that blooms on last year’s growth. It’s a bit like giving everyone the same haircut, regardless of their hair type.
Pruning at the Wrong Time of Year
In the garden, timing is everything. This is especially true for hydrangeas. The single biggest mistake is getting scissor-happy with an old-wood variety like Hydrangea macrophylla in late spring, just as its new leaves are unfurling. By that point, the invisible flower buds are already formed, meaning you’re literally snipping off that summer’s display.
On the other hand, waiting too long to prune a new-wood bloomer like ‘Annabelle’ can mean a later, weaker show. You want to get to these types while they’re still dormant in late winter or early spring, before they waste energy growing stems you’re about to chop off anyway.
Here's a simple rule of thumb that can save a lot of heartache: if you're not sure what type of hydrangea you have, it’s far safer to do nothing at all than to give it a hard prune. A gentle deadhead is always a safe bet, but a drastic cut is a gamble you don't need to take.
Being Too Aggressive with Old Wood Bloomers
It’s tempting, isn’t it? When a mophead or lacecap gets a bit too big for its boots, the urge to hack it back into submission can be strong. But this aggressive approach is almost always a mistake. These plants set their flower buds on the woody stems grown the year before. Cutting those stems right back to the ground might result in a tidier, leafier plant, but you’ll be rewarded with a completely flower-free year for your efforts.
If your plant is truly out of hand, the best route to recovery is the gradual ‘one-third renewal’ technique we touched on earlier.
- Year One: Take out one-third of the oldest, thickest stems right at the base.
- Year Two: Cut back another third of the remaining old stems.
- Year Three: Finish the job by removing the last of the original old stems.
This approach gives the shrub a complete refresh over three years without ever sacrificing a whole season of beautiful blooms.
Misidentifying Flower Buds and Leaf Buds
When you’re just getting started, telling one bud from another can feel like a bit of a guessing game. On an old-wood variety, the flower buds are usually fatter, rounder, and more promising-looking than the leaf buds, which tend to be smaller and more pointed.
When you’re deadheading, always aim to make your cut just above a pair of these plump flower buds. This ensures you’re not accidentally removing the main event. And if you do make a mistake? Don’t panic. The plant will recover. Just be patient, give it a bit of extra love with water and feed, and it will bounce back the following year.
Post-Pruning Care for Healthier Hydrangeas
A good prune sets the stage, but the right aftercare is what guarantees a truly stunning performance. Think of it as a minor operation for your plant; afterwards, it needs the right conditions to heal, recover, and channel its energy into producing strong new growth and beautiful flowers. This simple routine is your secret to achieving the healthiest, most productive hydrangeas on the block.
This follow-up care doesn't take much time, but its impact is enormous. By providing a bit of food and protection, you’re giving your hydrangea everything it needs to bounce back with vigour.
Feeding for Future Flowers
Pruning kick-starts new growth, and that growth requires energy. The best way to provide this is with a well-timed feed in the spring, just as the new leaves begin to unfurl. This gives your plant a crucial boost to support new stems and set plenty of flower buds for the coming season.
A balanced, slow-release fertiliser is your best bet here. Look for something formulated for roses or flowering shrubs, as these contain the right blend of nutrients. Unlike liquid feeds that provide a quick, temporary hit, granular fertilisers break down over time, feeding your plant steadily for several weeks.
Just sprinkle the recommended amount around the base of the plant (avoiding the stems) and gently work it into the top inch of soil with a hand fork. Then, simply water it in well.
This simple spring feed is particularly brilliant for reblooming varieties. As you deadhead spent flowers throughout the summer, the extra nutrients help the plant keep pushing out new blooms right into late season.
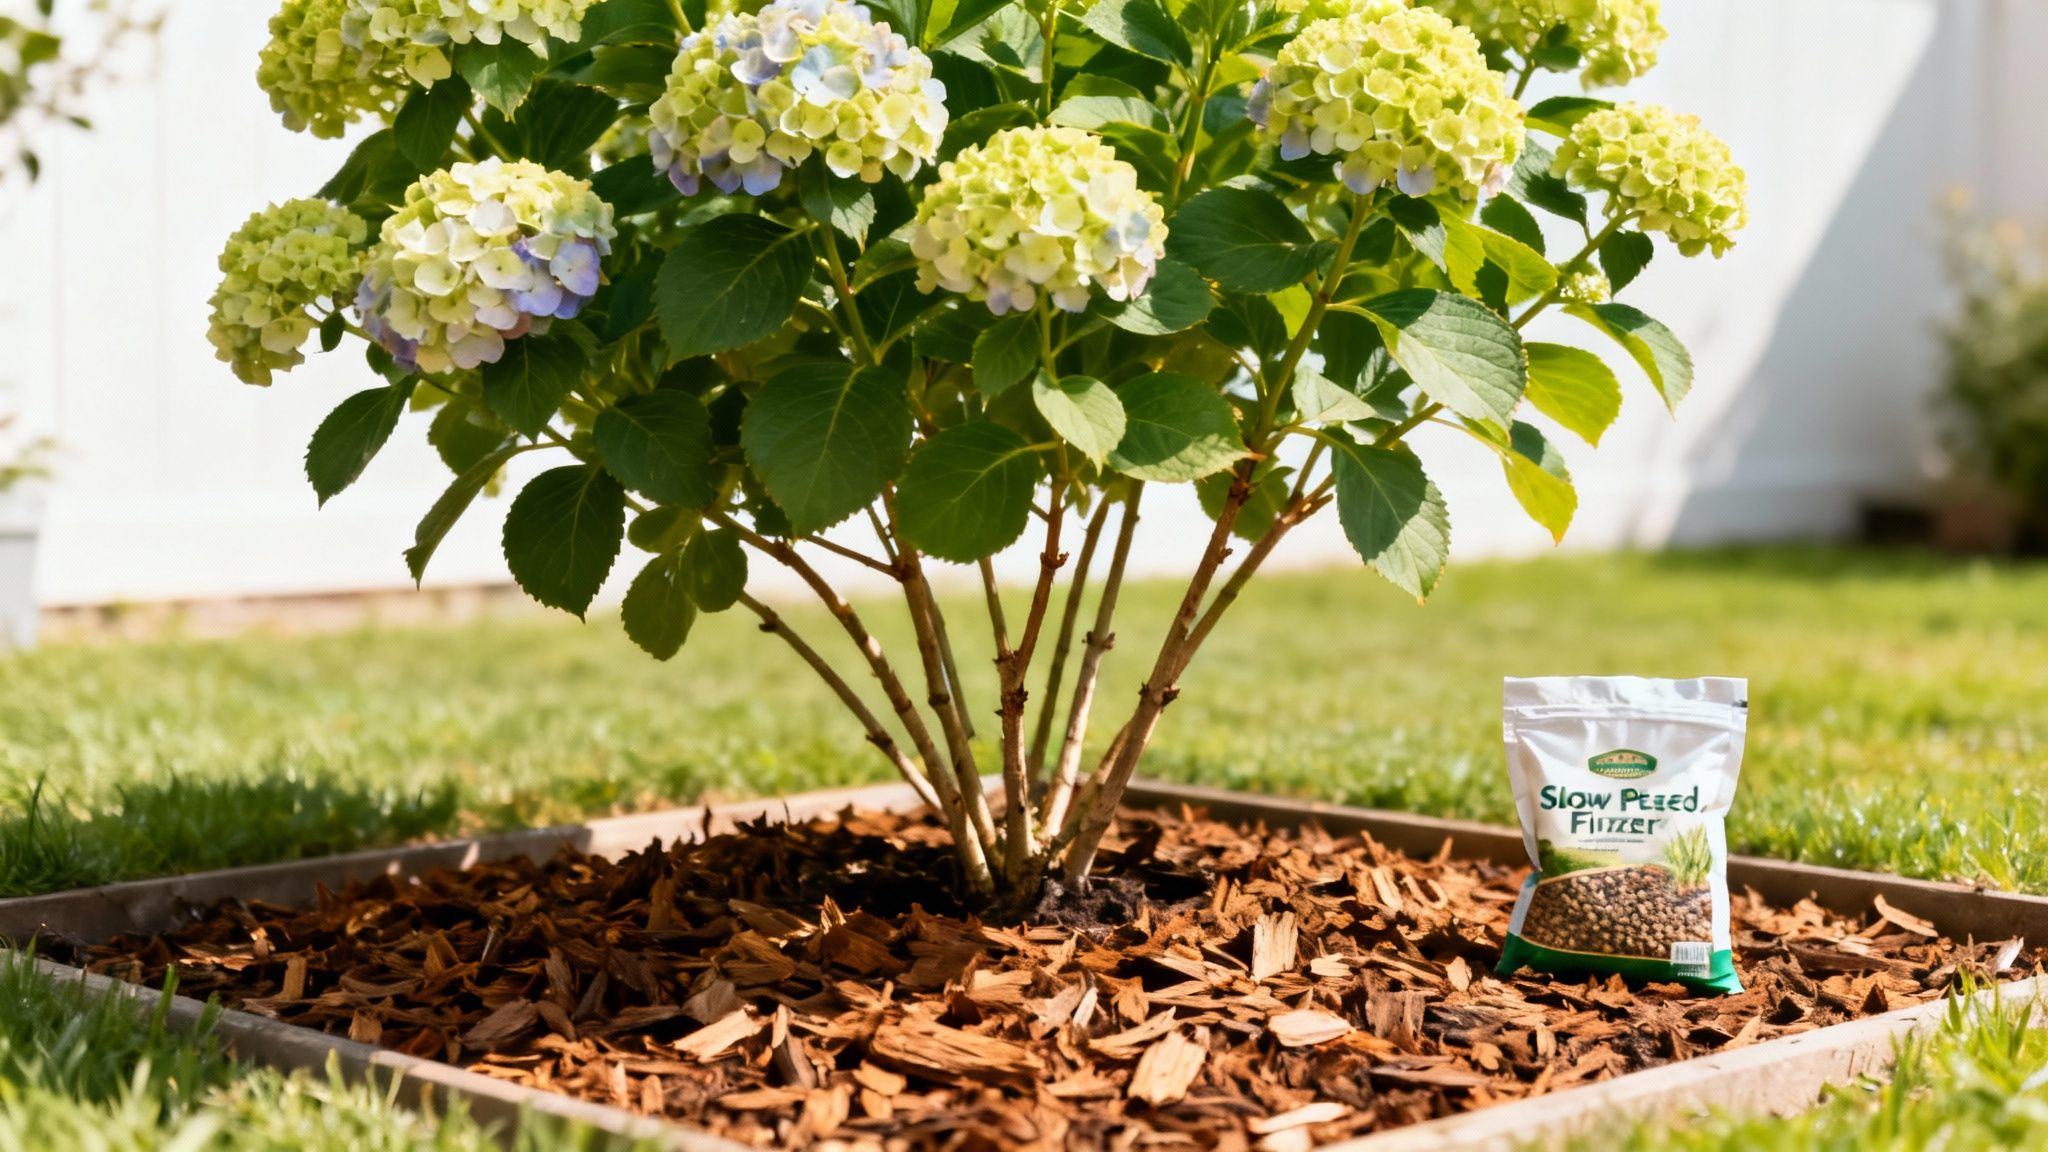
The Benefits of a Good Mulch
After feeding, applying a generous layer of mulch is arguably the most beneficial thing you can do for your hydrangea. A good 5-7cm layer of organic matter like garden compost, well-rotted manure, or bark chippings makes a world of difference.
This one simple step delivers on several fronts:
- Moisture Retention: Mulch acts like a sponge, helping the soil hold onto moisture and reducing the need for constant watering, especially during dry spells.
- Weed Suppression: It creates a physical barrier that stops most annual weeds from ever seeing the light of day, saving you a lot of work later on.
- Soil Health: As the organic material breaks down, it slowly enriches the soil with vital nutrients and improves its structure over time.
Spread the mulch around the base of the plant, but leave a small gap around the main stems to prevent any risk of rot, creating a sort of doughnut shape. This protective blanket is also fantastic for those growing hydrangeas in pots, where soil can dry out much more quickly.
Frequently Asked Questions About Hydrangea Pruning
Even after you’ve done your homework, a few specific questions always seem to pop up when you're standing there, secateurs in hand. Let’s clear up some of the most common worries gardeners have so you can prune with confidence.
What Happens If I Prune at the Wrong Time?
We've all been there – that moment of panic after a slightly too enthusiastic snip. If you prune a variety that flowers on old wood, like a classic mophead, too late in spring, you’ll most likely chop off that summer's flower buds. The plant will be perfectly healthy, but you might have to settle for a leafy display instead of a floral one.
For the more forgiving new-wood varieties, pruning too late in the season might just mean their flowers show up a little later than usual. It all comes back to knowing your plant type.
Should I Deadhead Hydrangeas in the Autumn?
It’s tempting to tidy everything up before winter, but hold back on the mopheads and lacecaps. For most UK gardens, it's actually better to leave their faded flower heads on over the colder months. Think of them as tiny, natural umbrellas, offering a surprising amount of frost protection for the delicate new buds forming just below. You can then snip them off in late winter or early spring without worry.
Leaving the old flower heads on does more than just protect the plant. They create beautiful structure in the winter garden, especially when they catch a bit of frost. For more tips on prepping your garden for the cold, check out our guide on protecting plants in winter.
If you have hardier panicle or smooth hydrangeas, feel free to deadhead them in autumn – they’ll be absolutely fine.
Why Didn't My Hydrangea Flower Last Year?
This is the million-dollar question for many gardeners. The most common culprit is usually incorrect pruning, especially cutting back an 'old wood' hydrangea too hard at the wrong moment. But if you’re sure your pruning was spot-on, there are a few other possibilities:
- A late frost: An unexpected cold snap can easily zap the tender, emerging flower buds before they even get a chance.
- Not enough sun: Most hydrangeas need at least 4-6 hours of decent sunlight each day to really put on a show. Too much shade can leave you with lots of leaves but very few blooms.
- Poor soil: The plant might just be running low on energy. A lack of nutrients in the soil can stop it from producing flowers.
Take a look at where your plant is living and double-check your pruning technique. Nine times out of ten, you’ll solve the mystery and be rewarded with a spectacular show next season.


