
Before you can even think about cleaning or conditioning your leather sofa, you need to know exactly what you’re dealing with. Getting this first step wrong can be a costly mistake. Think of it like this: you wouldn't use the same products on silk as you would on denim, and the same logic applies here.
Understanding Your Leather: The First Step to Proper Care
A good leather sofa is an investment. It’s the kind of piece that tells stories, gets better with age, and becomes the heart of a room. But its longevity really hinges on one thing: knowing its type. Every cleaning product you choose and every conditioning routine you follow will depend on this.
In the UK, we love our leather furniture for good reason. It's incredibly durable, and with the right care, you can extend its lifespan by up to 300%. A well-loved leather sofa can hold onto 80% of its value even after a decade, which is miles better than the 30% you might get from a standard fabric one. For more stats on the UK furniture market, the Furniture Industry Research Association website is a great resource.
It’s all part of a bigger philosophy about choosing quality over quantity. If that sounds like your cup of tea, you’ll probably enjoy our article on the case for investing in forever homeware.
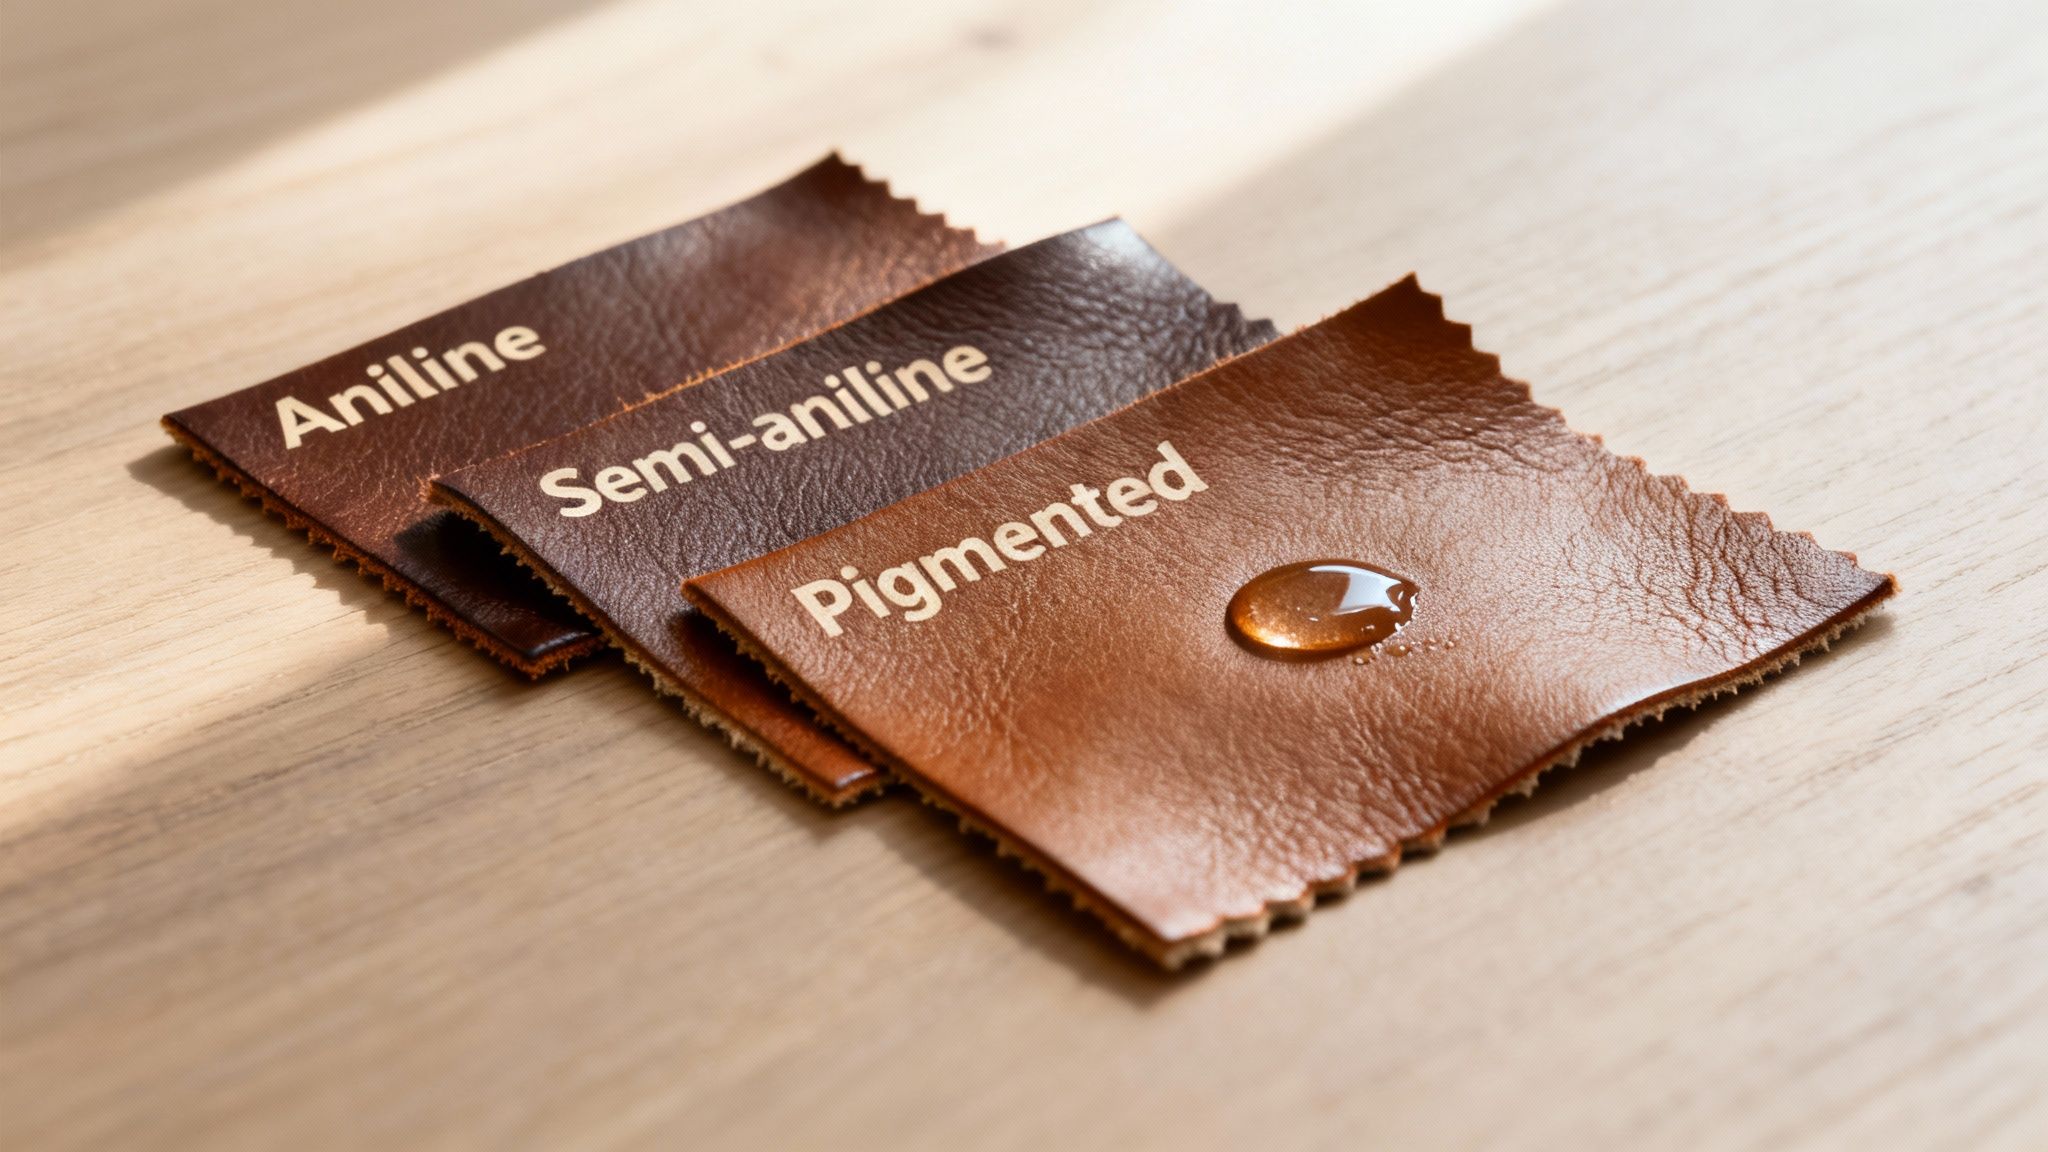
Common Leather Types in UK Homes
Most leather furniture you'll find in UK homes falls into one of three main camps. Figuring out which one you have is simpler than you might think.
- Aniline Leather: This is the most natural, luxurious-feeling leather. You can see the real grain and unique markings of the hide. Because it’s only treated with soluble dyes and has no protective topcoat, it’s buttery soft but also a magnet for stains. It needs a very gentle touch.
- Semi-Aniline Leather: Think of this as the happy medium. It has a very light protective coating with a tiny bit of pigment, which gives it a bit more durability against spills and sun fading. You still get much of that lovely natural feel, but with a little more practicality for a busy home.
- Pigmented (or Protected) Leather: This is the workhorse of the leather world and by far the most common. It has a polymer coating with pigments, making it super tough and resistant to pretty much anything life throws at it – scuffs, spills, you name it. It won’t feel as soft or natural, but it’s brilliant for family life.
Still not sure what you're working with? A quick check can give you all the clues you need. This little table breaks it down.
Quick Guide to Identifying Your Leather Type
This simple knowledge is your foundation for keeping your furniture looking its best for years to come.
The Simple Water Test
If you’re still scratching your head, try this. Find a hidden spot on your furniture—the underside of a cushion or behind a leg is perfect—and place a single drop of water on it. Now, watch what happens.
Quick Tip: If the water sinks in immediately and leaves a dark spot, you’ve got aniline. If it sits on top for a few moments before slowly soaking in, it's likely semi-aniline. If the drop just beads up and rolls off without a trace, you’re looking at durable pigmented leather.
Knowing this tiny detail is everything. It stops you from accidentally ruining a delicate aniline sofa with a harsh cleaner or, on the flip side, from spending a fortune on specialised products for a pigmented sofa that doesn’t need them. You’re now ready to clean with confidence.
Nailing Your Regular Cleaning Routine
The secret to great-looking leather isn't a once-a-year deep clean; it’s the small, consistent habits that make all the difference. Think of it less as a chore and more as a simple ritual that stops dirt from building up and wearing down that beautiful finish over time.
The Weekly Dust and Vacuum
Your first line of defence is a quick weekly dust-down. Just grab a soft, dry microfibre cloth and give every surface a gentle wipe. This tiny habit stops abrasive dust from settling into the grain, which is what causes those tiny scratches that can dull the leather's natural glow over the years.
Once you’ve dusted, get the vacuum out. Use a soft brush attachment to get right into the seams and crevices – you’d be amazed what gets lost down there. Honestly, this is probably the single most important thing you can do for your leather furniture.
It might sound like a small thing, but abrasion tests show that letting dust build up can wear away the surface of leather by 15-20% over time. That quick weekly wipe-down suddenly feels a lot more important, doesn't it?
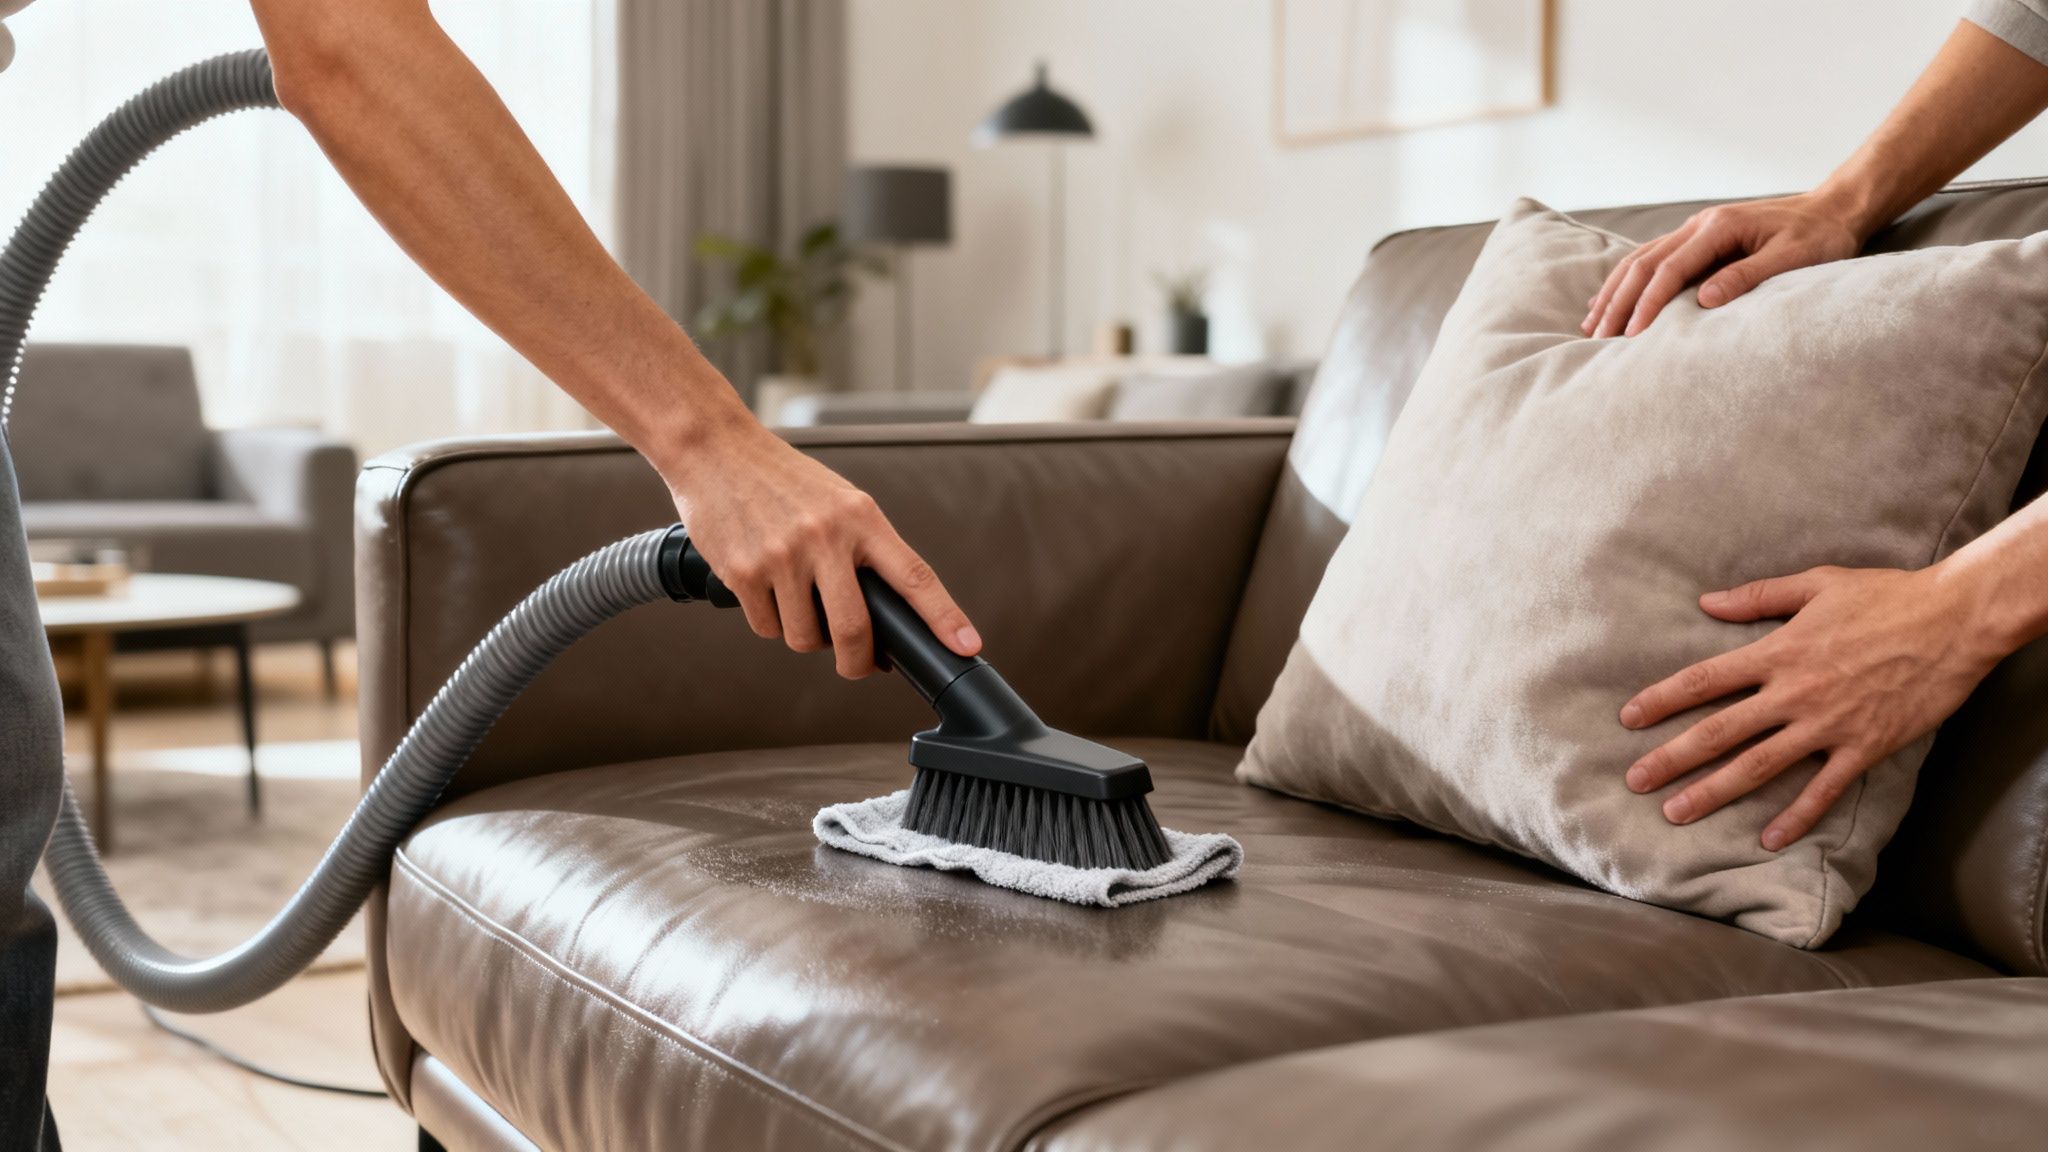
The Monthly Gentle Clean
Every month or so, it’s time for a slightly more thorough clean. This is where people often go wrong. Step away from the washing-up liquid, household sprays, and soaps. They’re nearly always too harsh and will strip the leather of its natural oils, which eventually leads to dryness and cracking.
Instead, you need a proper pH-neutral leather cleaner made for upholstery. A great, safe method is to mix a specialised cleaner with distilled water at a 1:10 ratio. You can find more on industry best practices over at the Furniture Industry Research Association.
Here’s how to apply it:
- Lightly dampen a clean microfibre cloth with your diluted solution. It should feel damp, not sopping wet.
- Wipe the leather gently, working in overlapping sections from top to bottom.
- Grab a second, dry cloth and immediately buff the area to lift off any leftover moisture.
Keeping It in Shape
This is the part everyone forgets. Over time, cushions get squashed and flattened from daily use, which can cause the leather to crease and wear unevenly. It’s an easy fix, though.
Just get into the habit of plumping and rotating your cushions every couple of weeks. It’s a simple two-minute job that redistributes the filling, helps the leather wear evenly, and keeps your sofa looking plump and inviting. We’re big believers in these small actions, a topic we dive into in our journal post about the furniture rituals that make your home feel better.
Deep Conditioning to Keep Leather Soft and Supple
Think of leather conditioning as a moisturiser for your furniture. Just like our skin, leather is a natural material that needs its oils topped up to stay flexible and soft. Over time, things like sunlight, central heating, and just everyday life can dry it out, leading to stiffness and eventually, those dreaded cracks that are almost impossible to fix.

Honestly, this is the single most effective thing you can do to keep your furniture looking its best for years to come. A good conditioning session puts back those essential oils, restoring that supple feel and rich colour while adding a protective layer against future damage.
Setting a Simple Conditioning Schedule
For most homes, a simple twice-a-year schedule is all you need. We recommend doing it at the start of spring and again at the beginning of autumn. This little ritual preps your leather for the big temperature shifts—the dry heat from radiators in winter and the stronger sunlight in summer.
However, if your sofa lives in a sunny conservatory or is positioned right next to a radiator, you might notice it feeling a bit parched more often. In that case, bumping up your routine to three or four times a year is a smart move. You can always do a quick check: run your hand over the surface. If it feels a little rough or less pliable than usual, it’s probably thirsty.
Getting the placement right from the start makes a huge difference, which is something we dive into in our guide on planning your living room layout.
Conditioning is key—apply a leather conditioner biannually, massaging it in circular motions to restore natural oils diminished by the UK's variable humidity levels, which can average 70-90% in winter. This simple step helps prevent drying and cracking, issues reported in a staggering 40% of consumer complaints to UK furniture retailers, as you can read more about in this furniture industry statistical report.
How to Apply Conditioner for the Best Results
The technique here is just as important as the product you choose. You’re aiming for a thin, even coat that the leather can drink up completely, without leaving any sticky or greasy residue behind.
- Start with a clean slate. First things first, give your furniture a gentle but thorough clean using the methods we covered earlier. Applying conditioner over dirt just seals it in, which you definitely don’t want.
- Do a quick spot test. Before you commit, dab a tiny amount of conditioner on a hidden area, like the underside of a cushion or along the back. Let it dry to make sure it doesn’t alter the colour in any unexpected ways.
- Use a soft, clean cloth. A lint-free microfibre cloth is perfect for this. Pop a small, coin-sized amount of conditioner onto the cloth itself, not directly onto the leather.
- Work in gentle circles. Massage the conditioner into the leather using light, overlapping circular motions. It’s best to work in small, manageable sections—tackle one cushion or one armrest at a time to get even coverage.
- Buff it to a perfect finish. Once you’ve covered the entire piece, let the conditioner sit and soak in for about 30-60 minutes. Then, take a second clean, dry cloth and gently buff the whole surface. This little final step removes any excess product and brings back a beautiful, natural sheen.
How to Tackle Common Stains and Spills
We all know that heart-sinking moment. A morning coffee spills, a glass of red wine tips, or a greasy takeaway slip happens. It feels like a disaster, but most everyday accidents don't have to spell the end for your beautiful leather furniture.
The secret? Acting quickly and calmly, with the right trick for the right type of stain.
Before you do anything else, remember the golden rule of leather care: test it on a hidden spot first. The underside of a cushion or a patch on the back of the sofa will do. This quick check makes sure your cleaning method won't cause any unexpected discolouration or damage.
Dealing With Liquid Spills Like Coffee or Wine
When it comes to spills like tea, coffee, or that dreaded drop of red wine, speed is everything. Your goal is to lift the liquid before it gets a chance to soak into the leather’s pores.
Grab a clean, dry microfibre cloth immediately and gently blot the spill. Always work from the outside of the stain inwards to stop it from spreading. It’s absolutely crucial that you blot, not rub. Rubbing just grinds the liquid deeper into the grain, making things much worse.
Once you've soaked up as much as possible, mix a few drops of a pH-neutral leather cleaner with distilled water. Dampen a fresh cloth with your solution, wipe the area gently, and then dry it straight away with another clean cloth.
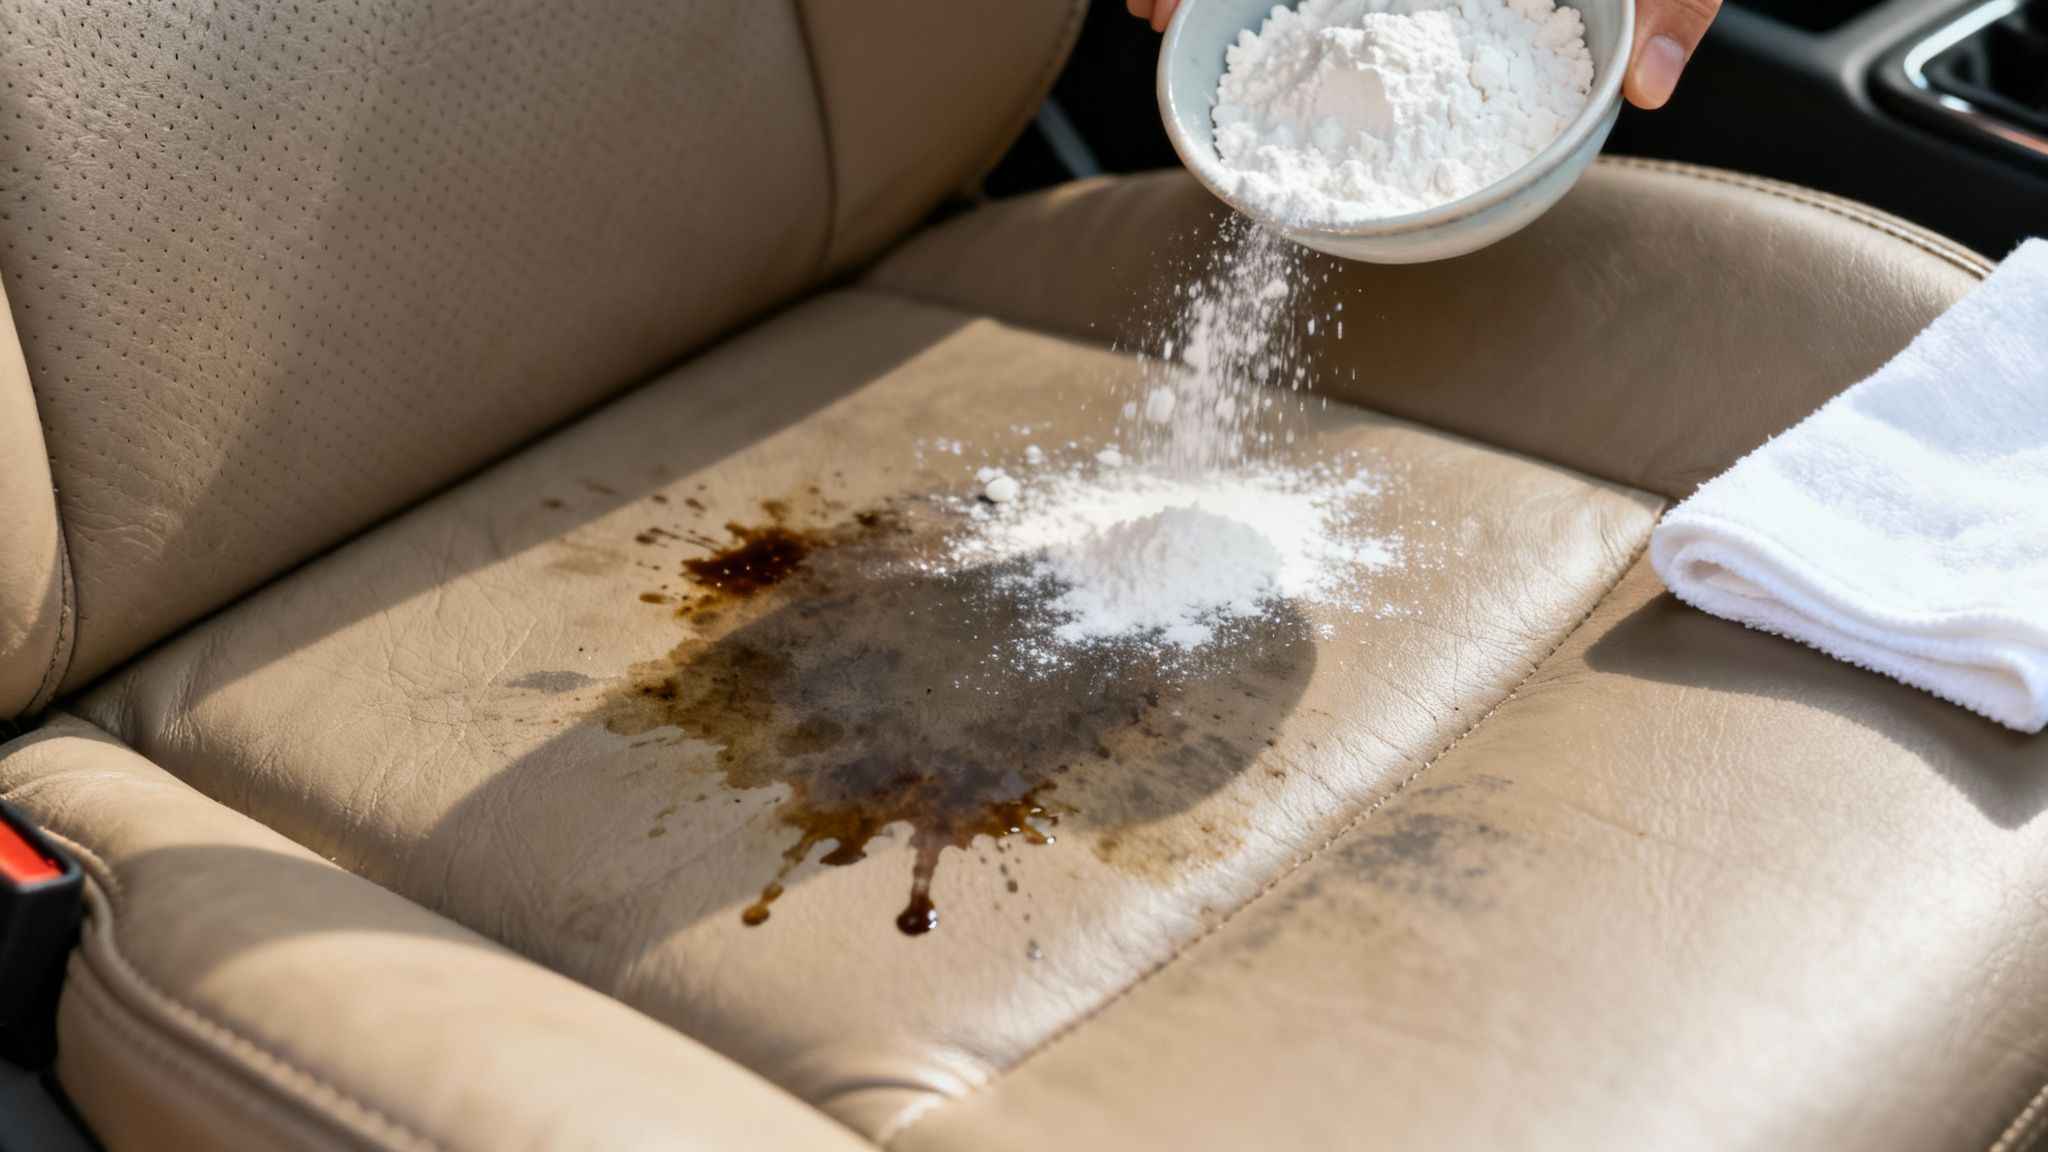
Tackling Grease and Oil Stains
Grease stains from pizza or salad dressing can look particularly nasty, but there’s a surprisingly simple household fix. The trick is to draw the oil out.
As soon as you notice a fresh grease stain, sprinkle a good amount of cornflour or talcum powder directly over it. Let it sit for a few hours—or even overnight. The powder works like a sponge, absorbing the oil right out of the leather.
When the time is up, just gently brush the powder away with a soft-bristled brush. You should see a massive improvement. If a faint mark is still there, you can repeat the process or use a specialised leather degreaser.
One of the biggest mistakes people make is reaching for harsh household cleaners. Anything with ammonia or alcohol will strip the leather's natural oils and protective finish, causing irreversible drying and cracking. Always stick to products made specifically for leather care.
Removing Tougher Marks Like Ink
An accidental swipe of a biro is one of the most stubborn marks you'll encounter. Your usual cleaners won't cut it and can often just smudge the ink, making a bigger mess.
For this job, you need something more specific. A leather ink-remover stick is your best bet. These are specially made to dissolve the ink without harming the finish. Just follow the product instructions, which usually involve rubbing the stick gently over the mark until it lifts.
After treating any kind of stain, it’s always a good idea to apply a light coat of leather conditioner once the area is completely dry. This simple step restores moisture and helps protect the finish.
While these tips are all about leather, if you're battling spills on other materials, you can find great advice in our guide on how to clean upholstered furniture.
Leather Stain Removal Cheat Sheet
For those panic-inducing moments, here’s a quick guide to treating common stains on protected leather (like pigmented or semi-aniline types).
Always remember to finish any spot treatment by conditioning the area once it's fully dry. This keeps your leather looking and feeling its best.
Long-Term Strategies to Protect Your Investment
Beyond the regular cleaning and conditioning, the best way to care for your leather furniture is to play the long game. This is all about thinking ahead – considering where your furniture lives and how you can shield it from the slow, creeping damage that everyday life can inflict.
The two biggest culprits? Sunlight and heat. Constant, direct sun is brutal on leather. It fades the colour and zaps the natural oils, leading to that dry, cracked look nobody wants. The same goes for parking your sofa too close to a radiator or fireplace. As a rule of thumb, always leave at least 50cm between your leather pieces and any direct heat source.
Smart Furniture Placement
Your first line of defence is actually just thoughtful room design. Try to avoid placing your prized leather armchair where it gets baked by the afternoon sun. If your layout is tight, things like blinds, curtains, or even a UV-protective window film can make a massive difference by filtering out the harshest rays.
This isn't just guesswork. Positioning furniture at least 50cm from windows can prevent the kind of UV exposure that fades leather by 30% in just a couple of years. And in a busy UK home, data from the Furniture Industry Research Association shows that an annual application of a leather protectant can cut down stain penetration by a huge 85%.
If you're looking for more ideas on where to position your key pieces, have a look at our guide on how to arrange furniture in your living room.
Creating a Family and Pet-Friendly Zone
Let's be realistic: living with children and pets doesn't mean you have to swaddle your home in plastic. It just calls for a bit of forward planning.
The trick is to create inviting 'safe zones'. A stylish, soft throw blanket draped over the arm where your dog loves to nap not only adds a cosy touch but also protects the leather from claws, dirt, and whatever else they bring in from the garden.
Here are a few other simple but effective habits to get into:
- Keep Pet Nails Trimmed: This one’s a game-changer. Regularly trimming your cat or dog’s nails massively reduces the risk of accidental scratches.
- Use Designated Seating: Gently encourage pets (and kids!) to use specific spots, maybe protected by a washable blanket or a few sturdy cushions.
- Mindful Snacking: A 'no greasy snacks on the sofa' rule is your best friend for preventing those stubborn, hard-to-remove stains.
The Value of a Leather Protector
For an extra layer of security, it's well worth considering a professional-grade leather protector. You apply it after cleaning and conditioning, and it creates an invisible, breathable barrier over the surface.
It won't change how the leather looks or feels. Instead, it works quietly in the background to repel spills, giving you those crucial extra seconds to grab a cloth and blot up liquids before they have a chance to soak in and stain. It’s a simple, proactive step that makes future clean-ups a lot less stressful.
When It’s Time to Call in a Leather Repair Pro
Let’s be honest, while a good care routine handles most of what life throws at your leather furniture, some things are best left to the experts. Knowing when to put down the cleaning cloth and pick up the phone is just as important as your weekly wipe-down. Trying to tackle a serious issue yourself can quickly turn a repairable problem into a permanent regret.
Recognising your limits is key. Think of a professional leather technician as a specialist who can perform the kind of restorative magic that home kits just can’t touch, protecting the value and beauty of your furniture for the long haul.
Red Flags That Need an Expert Eye
If you spot any of the following, it’s a clear sign to step away from the DIY and find a professional. These issues need specialised tools, materials, and a level of skill that only comes with experience.
It’s time to call someone for:
- Deep Cracks and Peeling: While a good conditioner can manage surface dryness, deep cracks or a finish that’s started to peel away signal structural damage. This isn't just cosmetic; it's a sign the leather itself is failing.
- Tears, Rips, or Punctures: Any kind of hole, whether it’s a tiny puncture from a pet’s claw or a bigger tear along a seam, needs more than a bit of glue. A pro can properly patch, fill, and colour-match the repair so it’s virtually invisible.
- Serious Colour Loss: If years of sitting by a window have left your sofa looking faded and patchy, conditioner alone won’t bring back the colour. A technician can re-dye and re-seal the leather to restore its original, rich tone.
- Stubborn Dye Transfer: That faint blue hue from a new pair of jeans or a patch of ink from the weekend papers can seep right into the leather's topcoat. If a gentle clean doesn’t lift it, scrubbing harder will only strip the finish. Professionals have solvents that can lift these stains without causing more damage.
A word of warning: those generic repair kits you find online can often make the damage look worse. A botched DIY job can make it much harder for a professional to fix properly later on, sometimes even doubling the final cost.
Finding a Reputable UK Specialist
Once you’ve decided to get professional help, finding the right person is crucial. You’re looking for someone with a solid reputation who understands the difference between various types of leather.
Start by searching for local leather repair specialists with strong online reviews and, importantly, a gallery of their past work. When you get in touch, don’t be afraid to ask a few questions to suss out their expertise.
Questions to Ask Before You Hire:
- Do you have experience with my type of leather (e.g., aniline, pigmented, etc.)?
- Can you show me before-and-after photos of similar repairs you’ve done?
- Is your work guaranteed?
- Can you give me a clear, itemised quote before you start?
A true professional will be happy to answer these questions and will likely ask you for photos of the damage to give you a decent initial assessment. Making that call ensures your beloved furniture gets the expert care it needs to remain the heart of your home for years to come.


