Garden edging ideas define the line between lush planting beds and tidy lawns, boosting both style and function. With the right edging, you control soil creep, simplify mowing and create a polished look in any garden. This listicle delivers 10 standout approaches so you can transform borders into crisp, eye-catching features.
What you’ll discover in this roundup:
- Material & style mix – from sleek steel strips to rustic timber logs
- Pros and cons – durability, upkeep and environmental impact at a glance
- Cost and effort cues – budget estimates and installation complexity ratings
- Hands-on tips – step-by-step pointers and quick fixes for common pitfalls
- Visual inspiration – image-only examples (no text overlays) to spark fresh ideas
- Member perks – access exclusive Spruce Collective giveaways, discounts and expert advice
Spruce Collective members unlock extra value with referral bonuses, community-driven competitions and weekly draws on premium lifestyle brands. Whether you’re chasing a bargain or looking for pro tips, you’ll find offers tailored to every garden budget and skill level.
Every idea is presented in a consistent format for easy comparison. Short paragraphs and clear headings guide you from one “garden edging idea” to the next without filler content or repetition.
Jump straight into practical solutions that suit formal, cottage or contemporary schemes. Ready to define your flowerbeds with flair? Scroll down to explore each edging style and start planning your perfect borders.
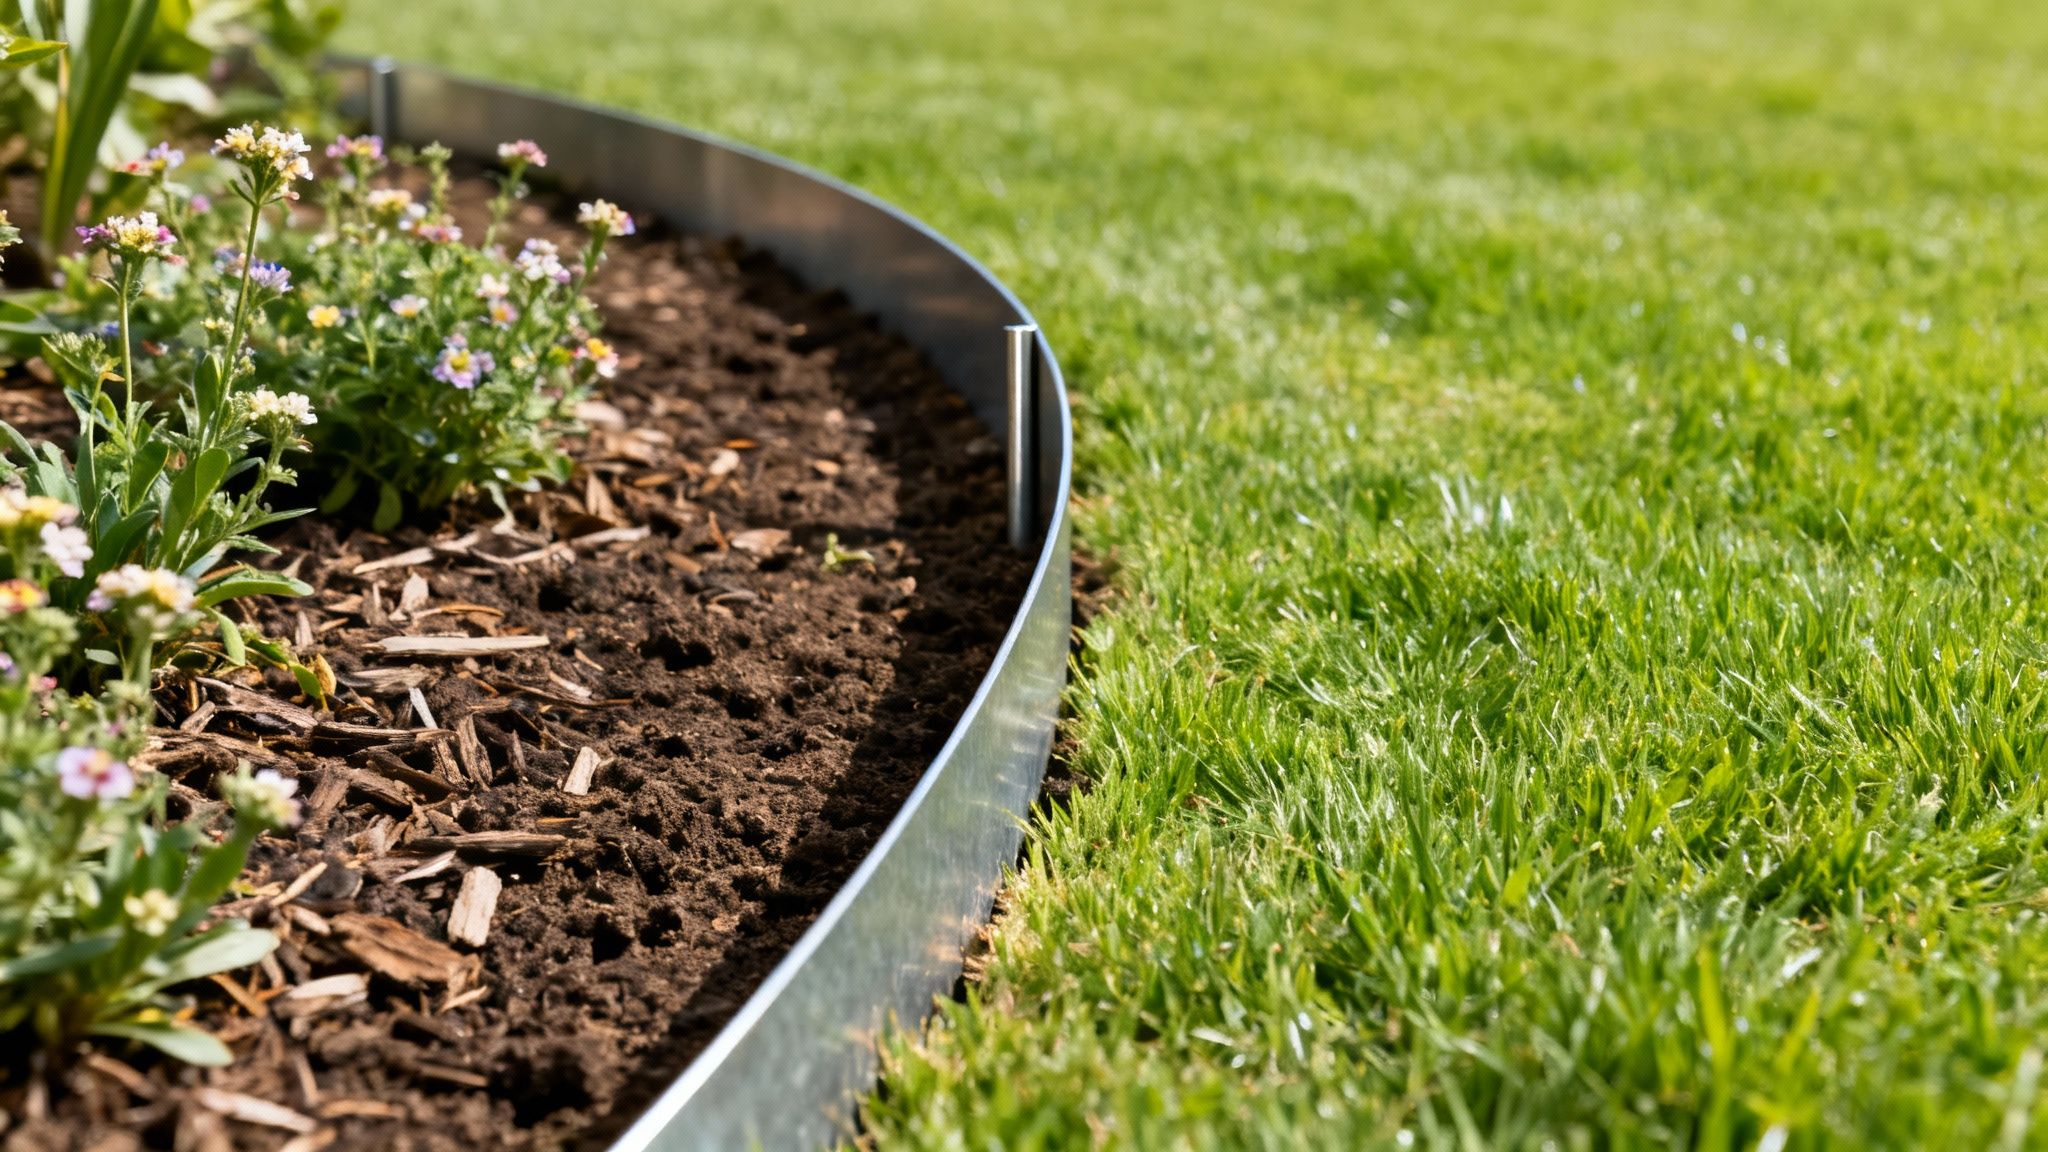
1. Metal Edging (Steel/Aluminum)
Metal edging consists of thin metal strips, usually made from galvanized steel or aluminium, driven vertically into the soil to carve a crisp border between lawn and beds. This modern, minimalist approach withstands weather and delivers a clean line that never fades.
When and Why to Use
Metal edging shines in gardens that value sleek lines and durability. Ideal for the following scenarios:
- Flat or gently sloping ground where clean borders matter
- Contemporary or minimalist garden schemes
- Wet climates where rot-resistant edges are essential
Benefits
- Sharp definition between turf and planting areas
- Durability: resists rot, corrosion and impact
- Low-profile edge allows smooth lawn mowing
- Recyclable material that can be reused or repurposed
Key insight: Metal edging offers a blend of industrial chic and practicality, making it a favourite of modern landscape architects.
Cost and Effort
- Moderate material cost (£10–£15 per metre)
- DIY-friendly with standard tools
- Typical install time 2–4 hours for a 3 m border
Practical Examples
- Contemporary landscape designs in Melbourne and Sydney
- Modern residential gardens in Portland, Oregon
- High-end hotel gardens using Cor-Ten steel edging
Installation Tips
- Prepare a level trench and check for underground services
- Use a rubber mallet to tap strips in gently and maintain consistent height
- Select galvanized steel or aluminium for wetter climates
- File any sharp edges before backfilling and finishing with soil
Why Choose Metal Edging?
Metal edging suits busy homeowners seeking a sleek, low-maintenance boundary. Its longevity means you rarely need to replace or repair once installed.
This method has been popularised by Scandinavian design firms for its effortless look and longevity. Learn more about Metal Edging (Steel/Aluminum) on sprucecollective.co.uk
2. Brick and Stone Edging
Brick and stone edging consists of bricks, pavers or natural stone arranged along borders to carve a classic boundary between turf and beds. Its timeless aesthetic and flexibility in patterning make it a mainstay of traditional and formal garden designs.
When and Why to Use
- Formal or traditional gardens where a refined border is essential
- Sloping sites needing robust, stable edging
- Projects seeking authentic local stone to echo regional character
Benefits
- Versatile layouts: arrange in herringbone, stretcher or random patterns
- Durability: stands up to weather, mowing and foot traffic
- Custom finishes: select brick hues or natural stone textures to suit planting
Key insight: Brick and stone edging combines heritage charm with rock-solid performance, anchoring a garden’s structure for decades.
Cost and Effort
- Material cost £8–£20 per metre depending on brick or stone choice
- Medium DIY skill level; basic masonry tools required
- Installation time 4–6 hours for a 5 m run
Practical Examples
- English country gardens lined with reclaimed red brick
- French formal estates framed by cut limestone blocks
- European cottage plots mixing cobbles and pavers for rustic flair
Installation Tips
- Excavate a 10 cm trench and lay a compacted sand or concrete base
- Use a spirit level frequently to maintain a consistent top line
- Leave 5 mm gaps between units for drainage and expansion
- Choose dry-lay for flexibility or mortar for permanent edges
- Source local stone to reinforce your garden’s sense of place
- Stagger joints in alternating courses for greater stability
Why Choose Brick and Stone Edging?
Brick and stone edging delivers a timeless finish that complements both formal layouts and relaxed country schemes. Its adaptability and long life make it a top pick among garden edging ideas.
Learn more about Brick and Stone Edging at Spruce Collective
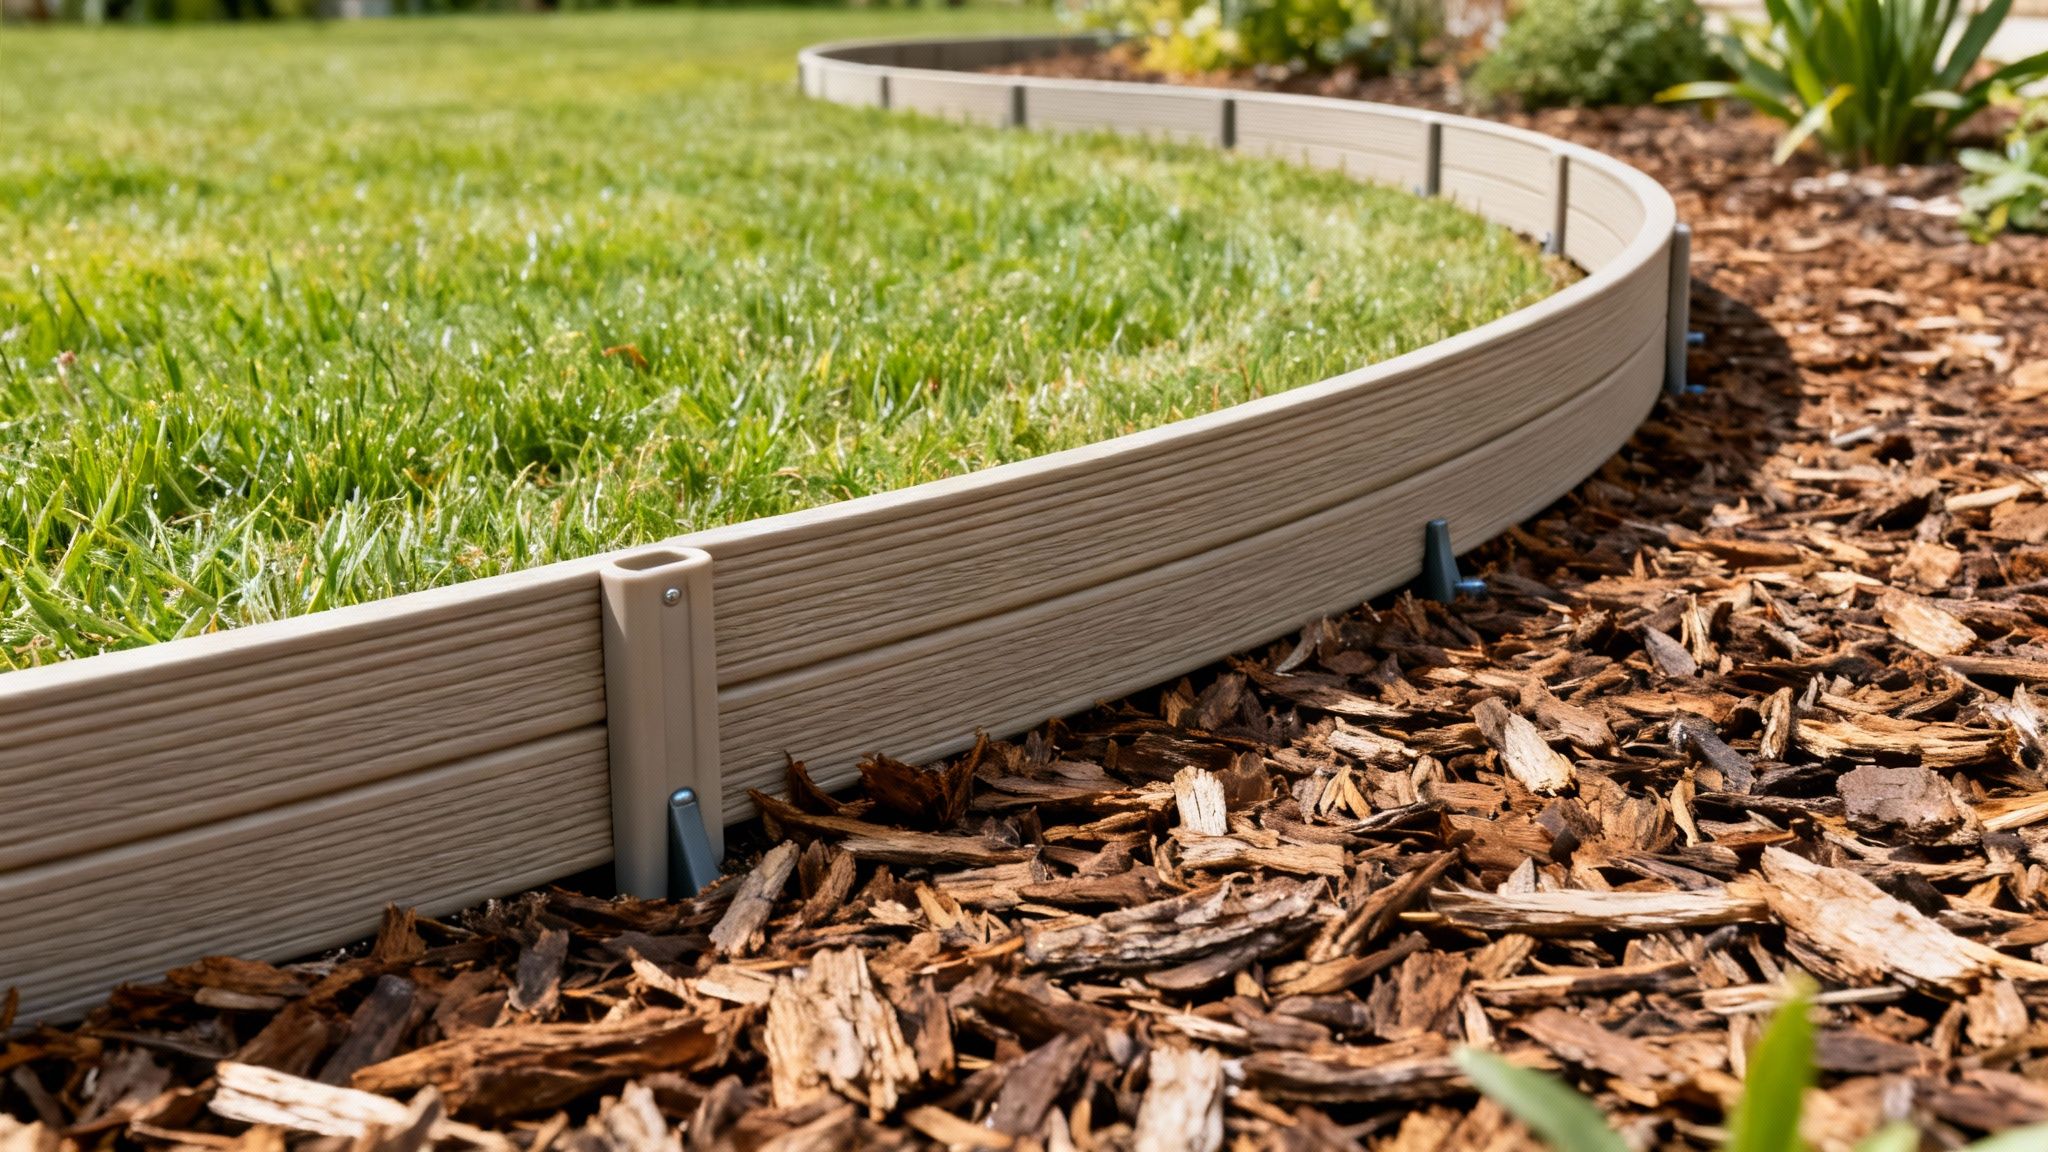
3. Plastic or Composite Edging
Plastic or composite edging consists of manufactured border strips made from recycled plastic, composite materials or vinyl. These lightweight strips press into the soil to define clean lines between lawn and planting beds, offering an affordable, versatile solution for any garden style.
When and Why to Use
- Budget-friendly gardens where cost is a top priority
- Temporary installations such as community or school plots
- Level or gently sloping ground that needs fast, simple borders
Benefits
- Affordability: often under £5 per metre
- Lightweight material makes transport and handling easy
- Variety of styles, colours and heights to match any scheme
- Eco-friendly options available in recycled plastic
Key insight: Plastic edging delivers a fast, low-cost boundary that suits ever-changing planting schemes.
Cost and Effort
- Low material cost (£3–£7 per metre)
- Simple DIY install with basic tools
- Typical install time 1–2 hours for a 5 m border
Practical Examples
- Budget-friendly community gardens in Manchester
- Suburban front gardens in Bristol with coloured edging
- Pop-up festival flower beds and event displays
Installation Tips
- Mark your line with a garden hose or string for accuracy
- Dig a shallow, level trench about 5 cm deep
- Position edging strips and secure every 60–90 cm with stakes
- Backfill soil and tamp down for a neat finish
Why Choose Plastic or Composite Edging?
Plastic or composite edging deserves a spot on your list of garden edging ideas because it balances cost, ease and colour customisation. It’s ideal for DIY gardeners who want a quick install and the flexibility to update their borders season by season. Learn more about Plastic or Composite Edging on sprucecollective.co.uk
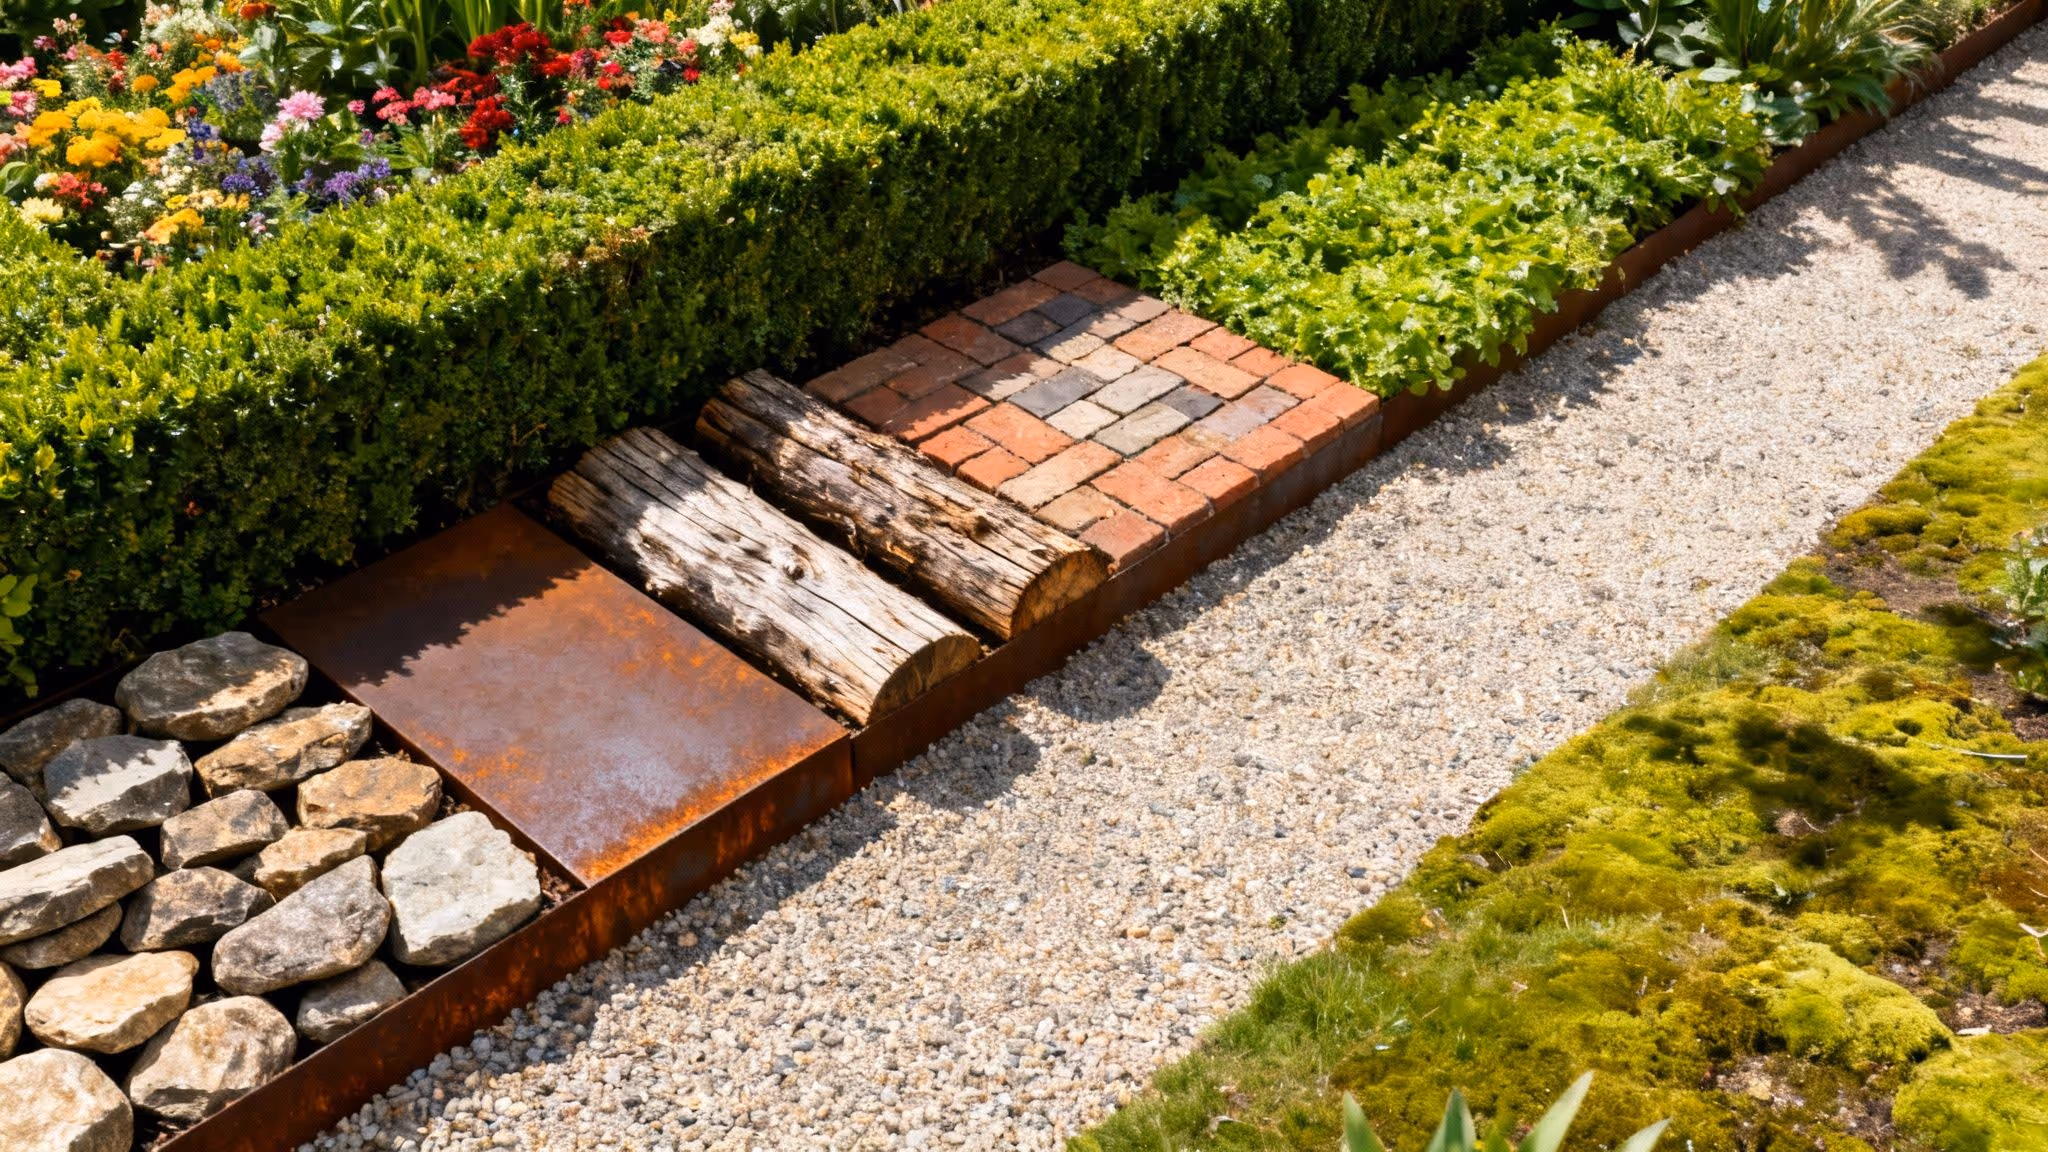
4. Wood Edging (Timber/Logs)
Natural wood borders use logs, dimensional lumber or reclaimed timber driven into the ground to frame beds and paths. This approach delivers a warm, organic aesthetic that blends seamlessly with planting schemes. Custom lengths and finishes let you tailor each border to cottage, rustic or Japanese-inspired gardens.
When and Why to Use
Wood edging works best when you want a natural look that ages gracefully. Ideal scenarios include:
- Rustic cottage gardens throughout the UK and North America
- Sustainable landscaping schemes using reclaimed wood
- Japanese-inspired layouts where organic materials prevail
Benefits
- Warmtone finish that softens garden lines
- Customisable heights and profiles for unique borders
- Eco-friendly options using reclaimed or FSC-certified timber
- Ease of installation with basic joinery
Key insight: Wood edging brings organic charm and versatility, making it a go-to for informal garden styles.
Cost and Effort
- Material cost £8 - £12 per metre for quality cedar or redwood
- DIY-friendly with saw, mallet and stakes
- Install time 2–3 hours for a 5 m border
Practical Examples
- Rustic borders in Cotswold cottage gardens
- Community veg plots using reclaimed pallet timbers
- Zen pathways edged with half-logs in Surrey
Installation Tips
- Select naturally rot-resistant woods such as cedar or redwood
- Lay landscape fabric underneath to slow moisture-driven decay
- Position grain side down to reduce water absorption
- Anchor posts with rebar or heavy stakes every 4–6 feet
- Apply a breathable wood sealant annually for durability
- Consider pressure-treated timber for high-humidity spots (be aware of chemical leaching)
Why Choose Wood Edging?
Wood edging offers a budget-friendly, visually warm boundary that complements plantings and evolves with the seasons. Its adaptability and ease of DIY installation make it a favourite among cottage-style and sustainable landscape enthusiasts. Learn more about Wood Edging (Timber/Logs) on sprucecollective.co.uk
5. Rock and Boulder Edging
Natural stone borders use larger boulders, rocks or stacked stone slabs to craft rustic, informal edges. This approach excels in xeriscaping and naturalistic gardens by offering excellent drainage and a timeless aesthetic.
When and Why to Use
- Gardens in arid or drought-prone regions where xeriscaping is desired
- Naturalistic or rustic landscape schemes
- Areas requiring excellent drainage and low-maintenance edges
Benefits
- Enhanced drainage: gravel and gaps prevent water logging
- Natural appearance: blends seamlessly into surrounding planting
- Durability: stones resist weathering and wear over decades
- Low maintenance: minimal repair or replacement once set
Key insight: Natural rock edges reduce water usage and mirror native landscapes, making them perfect for sustainable garden designs.
Cost and Effort
- Material cost variable based on stone size and source (£8–£25 per metre)
- Effort intensive for heavy lifting and precise placement
- Installation time 4–6 hours for a 3 m border
Practical Examples
- Xeriscape gardens in Phoenix and Tucson, Arizona
- Alpine rockeries in the Lake District, UK
- Japanese style rock gardens in Kyoto-inspired patios
Installation Tips
- Source local stone for cost savings and regional authenticity
- Bury the base of each rock one quarter deep for stability
- Use landscape fabric and gravel to control weeds and aid drainage
- Arrange stones of varying sizes in a staggered pattern for natural flow
Why Choose Rock and Boulder Edging?
Rock and boulder edging brings a timeless, organic boundary that weathers gracefully and requires minimal upkeep. It suits gardeners focused on sustainability and water conservation, offering both aesthetic charm and practical performance. Learn more about Rock and Boulder Edging on sprucecollective.co.uk.
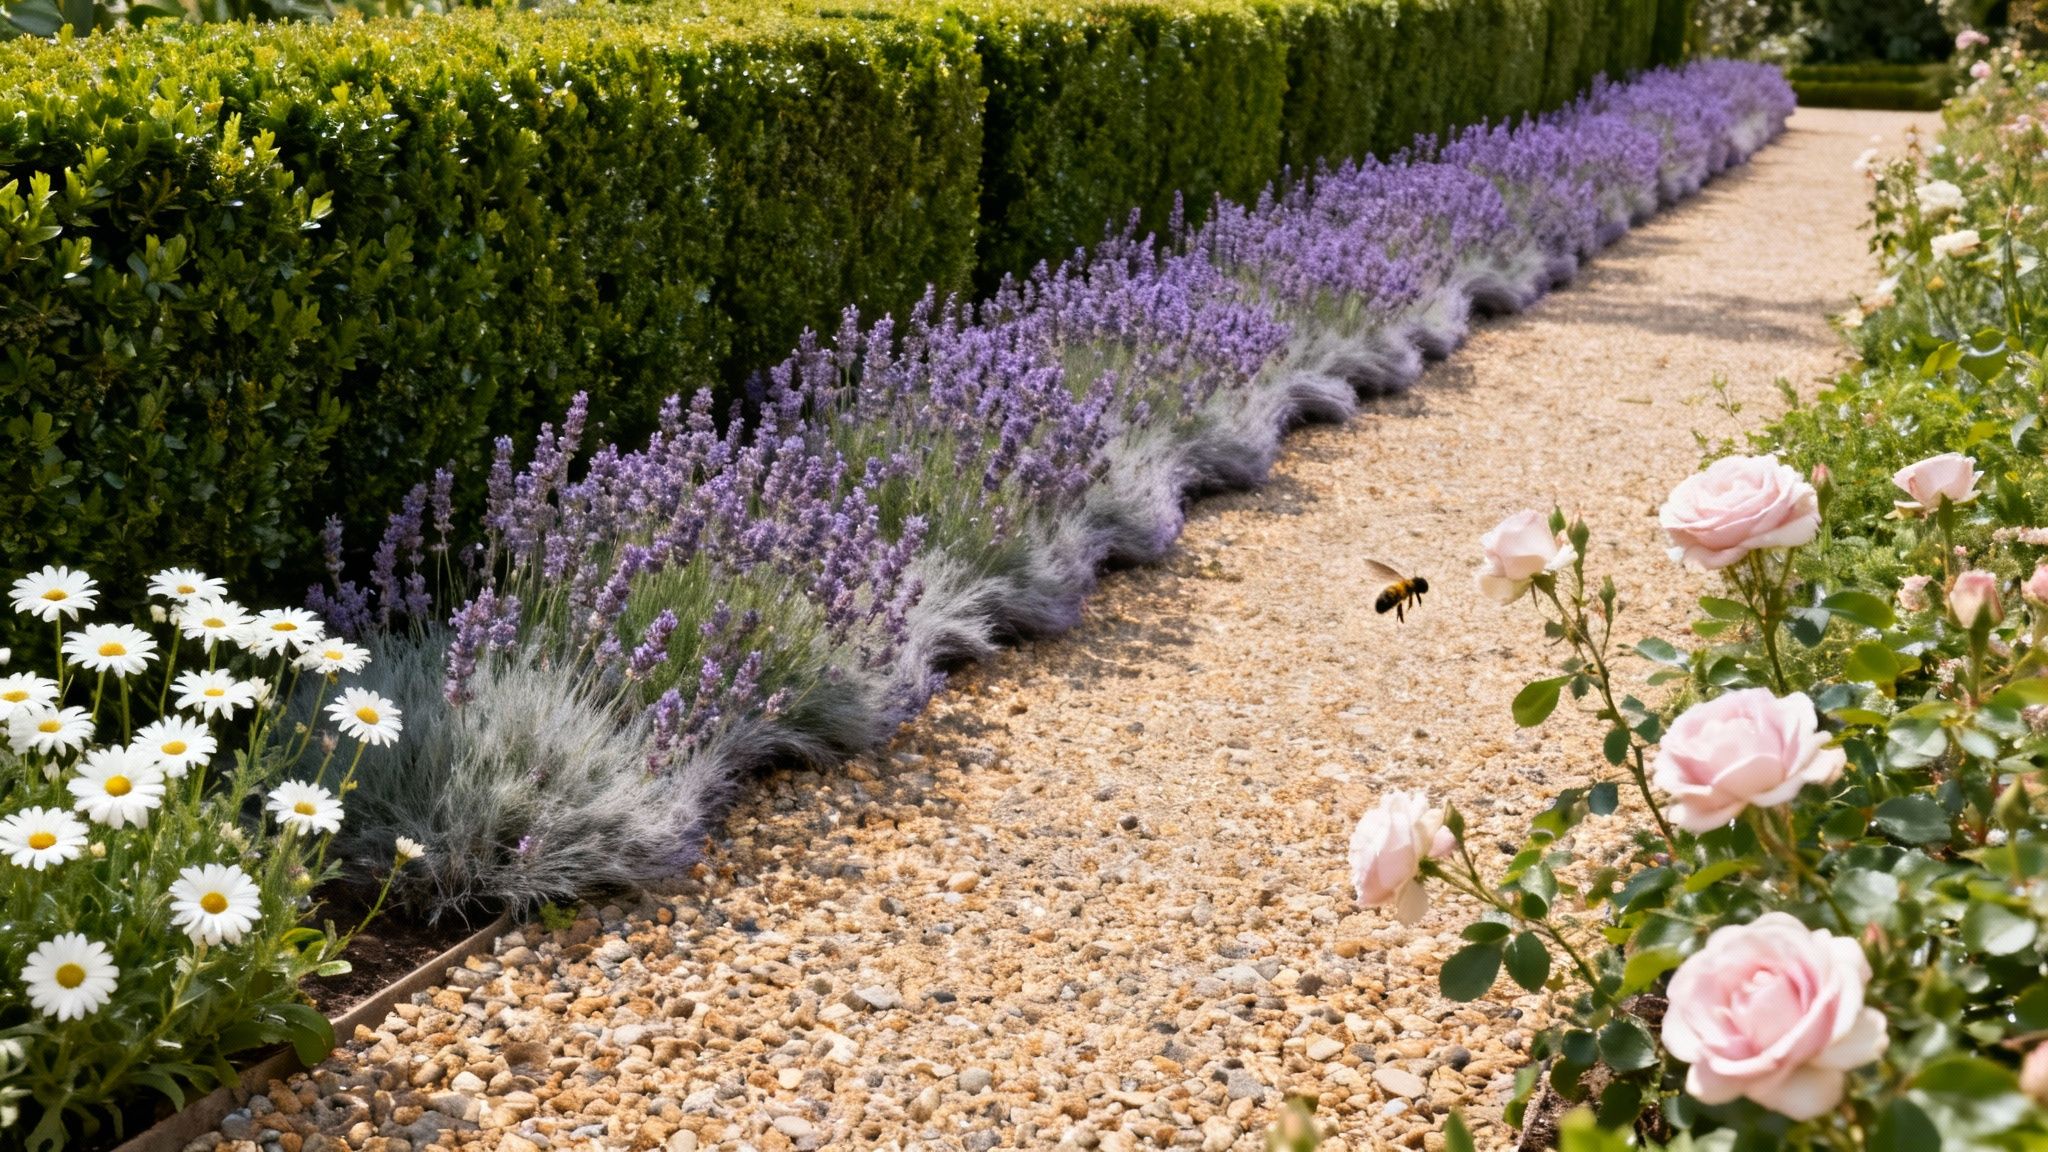
6. Perennial and Hedge Plant Edging
Perennial and hedge plant edging is one of the most versatile garden edging ideas. Living borders created by planting low-growing perennials, flowering plants or clipped hedges along beds provide a soft natural aesthetic while offering ecological benefits.
When and Why to Use
- English cottage schemes craving lavender or herb borders
- Formal gardens requiring clipped boxwood for structure
- Modern sustainable landscapes seeking wildlife habitat
- Curved paths needing a flexible, low-maintenance edge
Benefits
- Softens hardscapes with a living, seasonal display
- Attracts pollinators and beneficial insects to beds
- Roots help stabilise soil and reduce erosion
- Can be tailored to bloom throughout spring to autumn
Key insight: A living edge blends form and function by defining borders and supporting biodiversity.
Cost and Effort
- Low to moderate plant cost (£8–£20 per metre)
- Medium effort: planting, staking and initial weeding
- Establishment phase: 4–12 weeks until full cover
Practical Examples
- Lavender edging in an English cottage garden near Bath
- Clipped boxwood parterres at a stately home in Kent
- Ornamental grass borders in a contemporary Brighton yard
Installation Tips
- Choose species suited to local soil and light conditions
- Space plants by mature width to avoid overcrowding
- Lay landscape fabric beneath to suppress weeds early
- Apply a 5 cm layer of mulch and water regularly
- Prune annually for a neat, compact appearance
Why Choose Perennial and Hedge Plant Edging?
This method suits gardeners seeking a year-round living boundary that evolves with the seasons. Its adaptability works in both naturalistic and formal layouts while delivering habitat value. Embrace this approach for a sustainable, low-impact edge that grows more charming over time.
Learn more about Perennial and Hedge Plant Edging on sprucecollective.co.uk
7. Concrete Edging (Cast and Molded)
Concrete edging consists of fabricated borders, either professionally cast with decorative motifs or simple moulded strips, driven into a shallow trench to create a uniform frame for lawns and planting beds. This method delivers a clean, contemporary line with excellent durability and endless customisation options.
When and Why to Use
Concrete edging excels in schemes where consistency and longevity matter. Ideal for:
- Municipal park and public garden installations requiring low maintenance
- Modern residential developments seeking minimalist, hardwearing borders
- Accessible garden designs with smooth, level edges for mobility aids
Benefits
- Uniform appearance suits formal and contemporary styles
- Exceptional durability resists frost, rot and ground settlement
- Customisable with pigments, patterns or textured finishes
- Low maintenance requires minimal upkeep once installed
Key insight: Cast or moulded concrete edging combines precision with resilience, making it a go-to solution in many high-traffic outdoor spaces.
Cost and Effort
- Material cost: £8–£12 per metre for basic strips, £15–£25 for decorative cast sections
- DIY-friendly if using simple moulded lengths, professional installation recommended for patterned units
- Typical install time: 3–5 hours for a 5 m border
Practical Examples
- City council plazas in Manchester and Glasgow
- Contemporary housing developments in Bristol
- Community gardens with wheelchair-friendly layouts
Installation Tips
- Excavate a level trench at least 10 cm deep and compact the base
- Set edging slightly tilted away from planting beds for surface water drainage
- Use a high-quality concrete mix with added colour pigment if desired
- Allow 7–10 days curing before backfilling and lawn reinstatement
- Seal the surface annually in freeze-thaw climates for extra protection
Why Choose Concrete Edging?
Concrete edging boasts unmatched strength and a sleek, uniform look that endures decades. Its flexibility in shape, colour and finish makes it a standout entry among garden edging ideas for both public and private landscapes. Learn more at Concrete Edging Guide UK.
8. Sunken Bed Method (No Physical Edging)
Sunken beds are formed by lowering the planting area below the surrounding lawn level, creating a natural border without the need for bricks or metal. This technique relies on subtle elevation changes to define planting zones, blending seamlessly into the garden. Over time, turf and mulch reinforce the edge, giving a soft yet clear division.
When and Why to Use
- Minimalist gardens where discreet borders complement the aesthetic
- Gentle slopes that benefit from terraced or recessed planting areas
- Wet climates where drainage and raised perimeters prevent waterlogging
- Eco-conscious designs seeking to reduce material use and maintenance
Benefits
- Seamless integration of lawn and borders for a cohesive look
- Low maintenance – no edging to repair, paint or replace
- Naturalistic appeal that follows your garden’s contours
- Enhanced microclimate as recessed beds hold moisture and shelter roots
Key insight: The sunken bed method turns your garden’s topography into a design feature, removing hard edges in favour of organic flow.
Cost and Effort
- Material cost: Very low, no edging supplies required
- DIY effort: Moderate, focused on excavation and grading
- Install time: Typically 1–2 days for a 10 m² area, depending on soil type
Practical Examples
- Xeriscape gardens in California that conserve water with sunken profiles
- Japanese-inspired plots in London suburbs showcasing minimalist planting
- Modernist backyard makeovers in Bristol and Bath using natural contours
Installation Tips
- Mark out the bed perimeter with string and stakes
- Excavate to 15–20 cm depth and smooth side slopes at 30–45°
- Lay a shallow gravel layer or a perforated pipe for extra drainage
- Finish with mulch to highlight the sunken edge and suppress weeds
Why Choose Sunken Bed Method?
Sunken beds are perfect for gardeners who favour an understated, maintenance-light approach to garden edging ideas. They deliver elegant, flowing borders that evolve naturally over time. For more inspiration visit gardenersworld.com/sunken-beds.
9. Corten Steel and Weathering Steel Edging
Corten steel edging uses weathering steel that forms a protective rust patina over time, creating a sophisticated industrial boundary that blends beautifully with greenery. This robust edging evolves with age, adding character to modern and contemporary landscapes while serving as a durable garden edging idea.
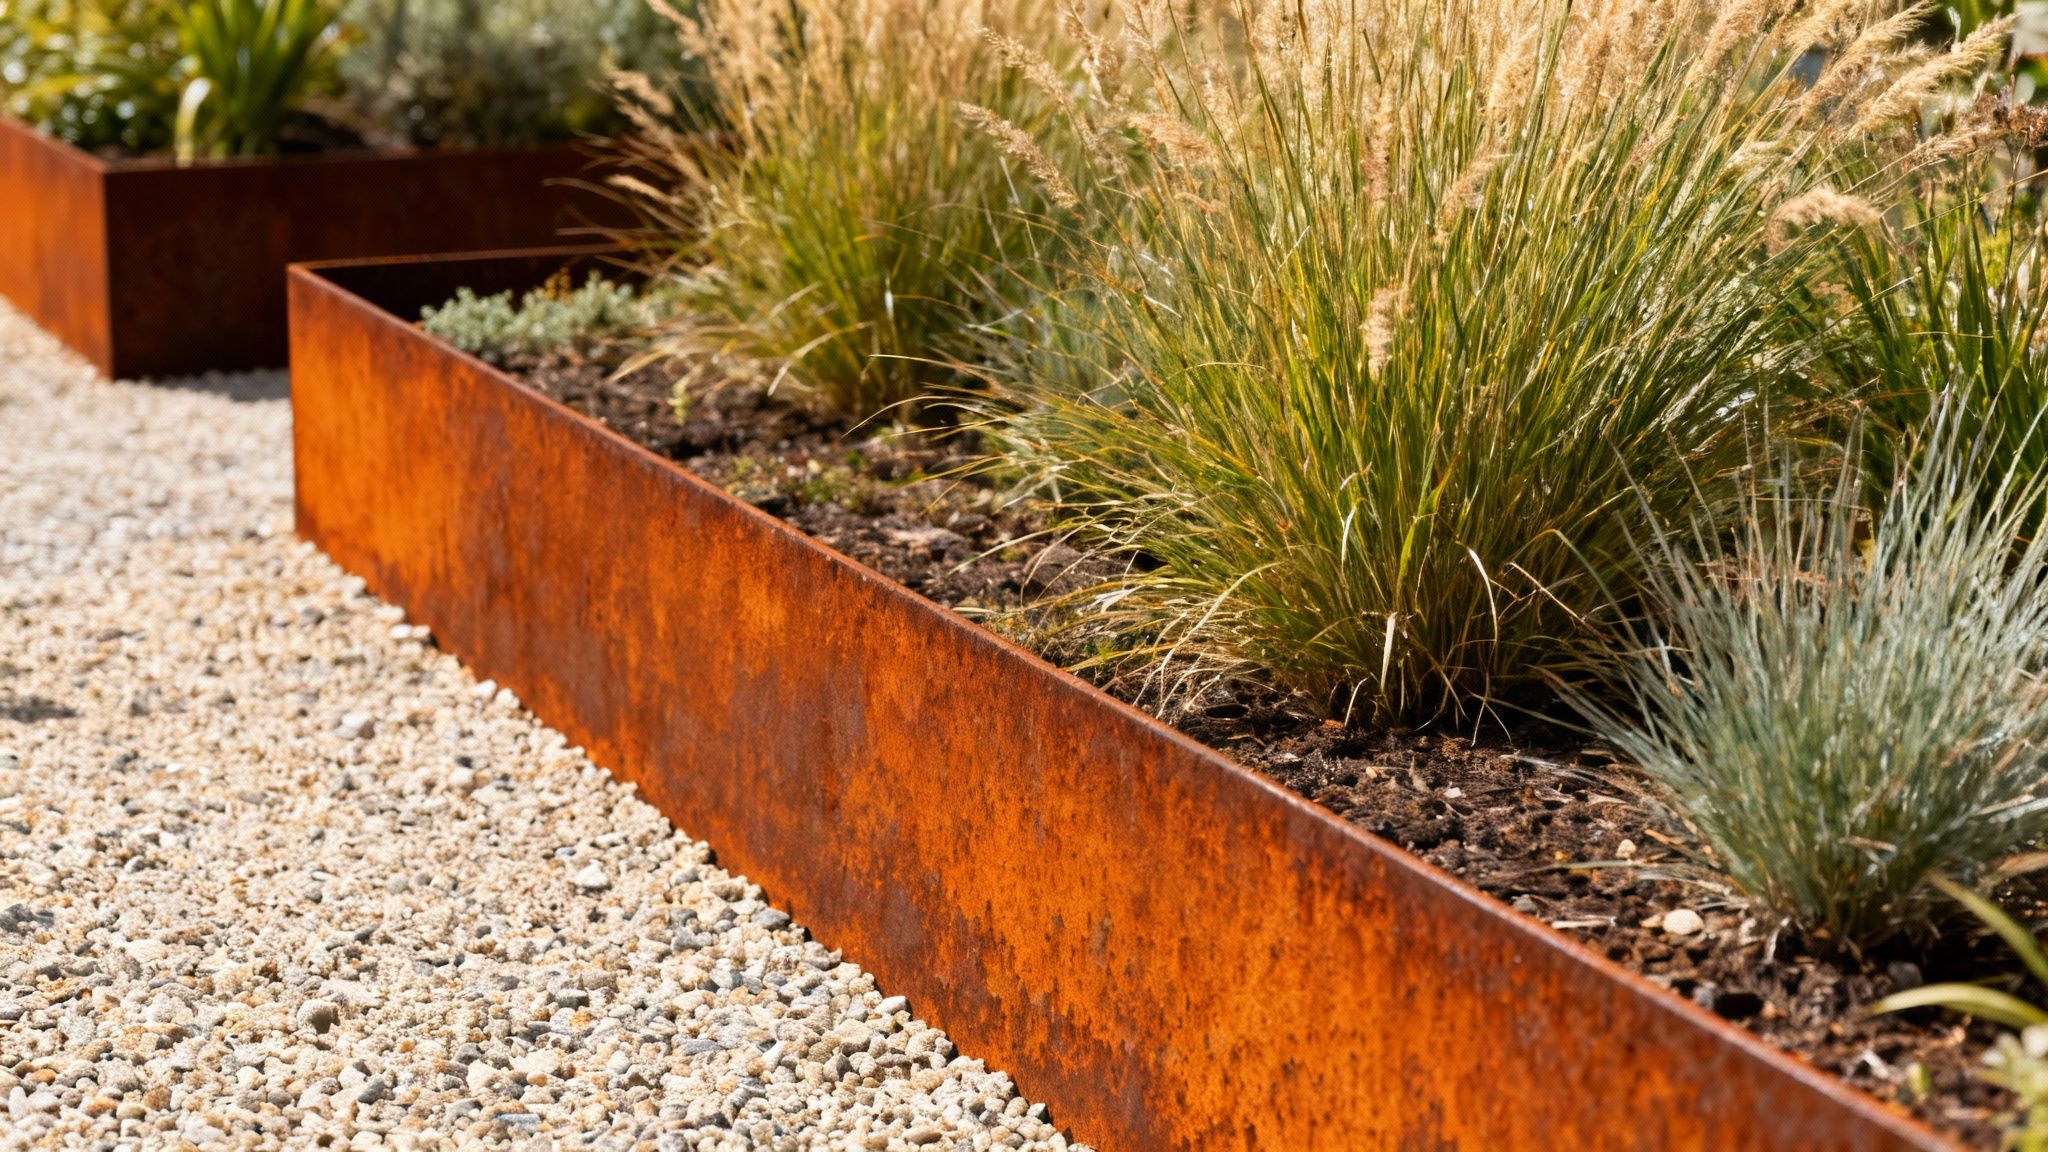
When and Why to Use
Corten steel is perfect when you want a standout border that matures into ever richer tones. Consider this approach for:
- Minimalist or industrial-inspired gardens
- Urban courtyards and rooftop terraces
- Boundaries near perennial beds or ornamental grasses
Benefits
- Evolving patina adds depth and warmth over time
- High durability resists corrosion even in harsh weather
- Low maintenance once the protective layer is formed
- Striking contrast between rusted steel and lush planting
Key insight: A living patina gives Corten edging both form and function, turning a simple border into a focal point.
Cost and Effort
- Premium material cost (£20–£30 per metre)
- Labour-intensive installation recommended for lasting results
- Allow 6–12 months for full patina development
Practical Examples
- Award-winning contemporary gardens in London and Manchester
- Luxury residential projects in Portland and Seattle
- High-end hotel courtyards in major metropolitan areas
Installation Tips
- Plan for runoff staining by using a gravel trench or barrier fabric
- Position edges away from light-coloured paving initially
- Clean surrounding surfaces during the first year of weathering
- Engage experienced fabricators for custom bends and profiles
Why Choose Corten Steel Edging?
Corten steel stands out among garden edging ideas for its blend of industrial chic and natural ageing. Its evolving patina ensures your borders remain dynamic and eye-catching for decades.
10. Terracotta and Clay Edging Tiles
Terracotta and clay edging tiles use decorative fired-clay pavers to create warm, rustic borders. Available in rich reds, oranges and muted earth tones, they bring Mediterranean, cottage or formal flair to any garden setting.
When and Why to Use
Use terracotta or clay tiles when you want:
- A Mediterranean or rustic vibe in sunny or sheltered spots
- A cottage garden edge that complements flowering beds
- A formal border in stone or gravel schemes for colour contrast
- Durable edging in regions with mild winters
Benefits
- Artistic appeal: hand-crafted patterns elevate simple borders
- Variety of colours: from terracotta red to glazed pastels
- Durable once sealed, resisting moisture and wear
- Versatile to mix tile sizes, shapes or patterns
- Low maintenance: occasional resealing keeps tiles bright
Key insight: Terracotta edging fuses functional boundary definition with timeless, artisanal style.
Cost and Effort
- Material cost: £8–£12 per tile (depending on size and glaze)
- Labour: moderate DIY skill; cutting tiles may require a wet saw
- Typical install time: 3–6 hours for a 5 m border
Practical Examples
- Mediterranean gardens in Southern Spain and Italy
- Formal courtyards in Mexico and Central America
- Upscale cottage plots in England and France
Installation Tips
- Prepare a compacted sand or concrete base for stability
- Choose frost-resistant clay in colder UK zones
- Use exterior-grade mortar for a permanent bond
- Leave 2–3 mm gaps between tiles for expansion
- Seal tiles before winter to prevent water ingress
- Hand-pick tiles for consistent colour or mix for contrast
Why Choose Terracotta and Clay Edging Tiles?
Terracotta and clay edging tiles deserve a spot in your garden for their blend of durability, colour and craftsmanship. They suit both relaxed cottage schemes and elegant formal layouts. Learn more about Terracotta and Clay Edging Tiles on sprucecollective.co.uk: Learn more about Terracotta and Clay Edging Tiles
Garden Edging: 10-Option Comparison
Ready to Revamp Your Borders?
You’ve explored ten distinct garden edging ideas, from sleek metals to living hedges, each offering unique textures, styles and installation tips. Whether you gravitate towards the industrial charm of corten steel or the timeless warmth of timber logs, these solutions cater to every design vision and budget. Below we distil the most important takeaways and outline clear next steps to help you transform your outdoor space with confidence.
Key Takeaways
Versatility of Materials
- Metal, brick, wood, concrete and living edges each bring a signature look
- Match materials to your garden’s existing features for seamless integration
Cost and Effort Indicators
- Sunken beds and plastic edging are quick, affordable options
- Custom-cast concrete or natural stone require higher investment but deliver lasting impact
Installation Insights
- Simple DIY methods include setting timber planks on a gravel bed
- More complex builds, like corten steel panels or moulded terracotta tiles, may call for specialist tools or pro help
Maintenance Considerations
- Weathering steel and plastic composites demand minimal upkeep
- Living hedges and timber require periodic trimming or sealing
“Well-defined borders elevate any garden from functional to magazine-worthy with minimal fuss and maximum flair.”
Next Steps
Review Your Garden Layout
- Sketch borders or use a garden app to visualise each edging style
- Note sunlight patterns and soil conditions for living edges
Set a Realistic Budget
- Allocate funds based on material longevity and installation complexity
- Factor in tool rental or contractor fees for intricate options
Source Materials and Discounts
- Join Spruce Collective for member-only discounts, weekly giveaways and referral bonuses
- Compare garden centres and online suppliers for reclaimed bricks or offcuts
Test a Small Section
- Trial a short border run with your chosen material to gauge look and effort
- Adjust depth, alignment and finish before committing to the entire garden
Share Your Progress
- Post before-and-after snaps in our community forum for expert feedback
- Enter monthly competitions to win free edging kits
- Direct foot traffic to protect delicate plantings
- Create visual rhythm and flow across different garden zones
- Define functional areas, such as seating corners or vegetable patches
- Boost curb appeal and elevate your home’s value
Why Mastering Garden Edging Ideas Matters
Well-executed borders do more than contain flower beds. They:
By choosing the right edging style, you achieve a cohesive look that balances form and function while reflecting your personal taste.
Final Thought
Embarking on these garden edging ideas is more than a weekend DIY project. It’s an opportunity to redefine your outdoor living space, add architectural interest and foster lasting connections with fellow enthusiasts. With the right plan and a dash of creativity, you’ll enjoy a garden that’s as rewarding to maintain as it is beautiful to behold.
Ready to get started? Grab your tools, claim your member perks at Spruce Collective and watch your borders transform from simple outlines into stunning design statements. Happy edging!


