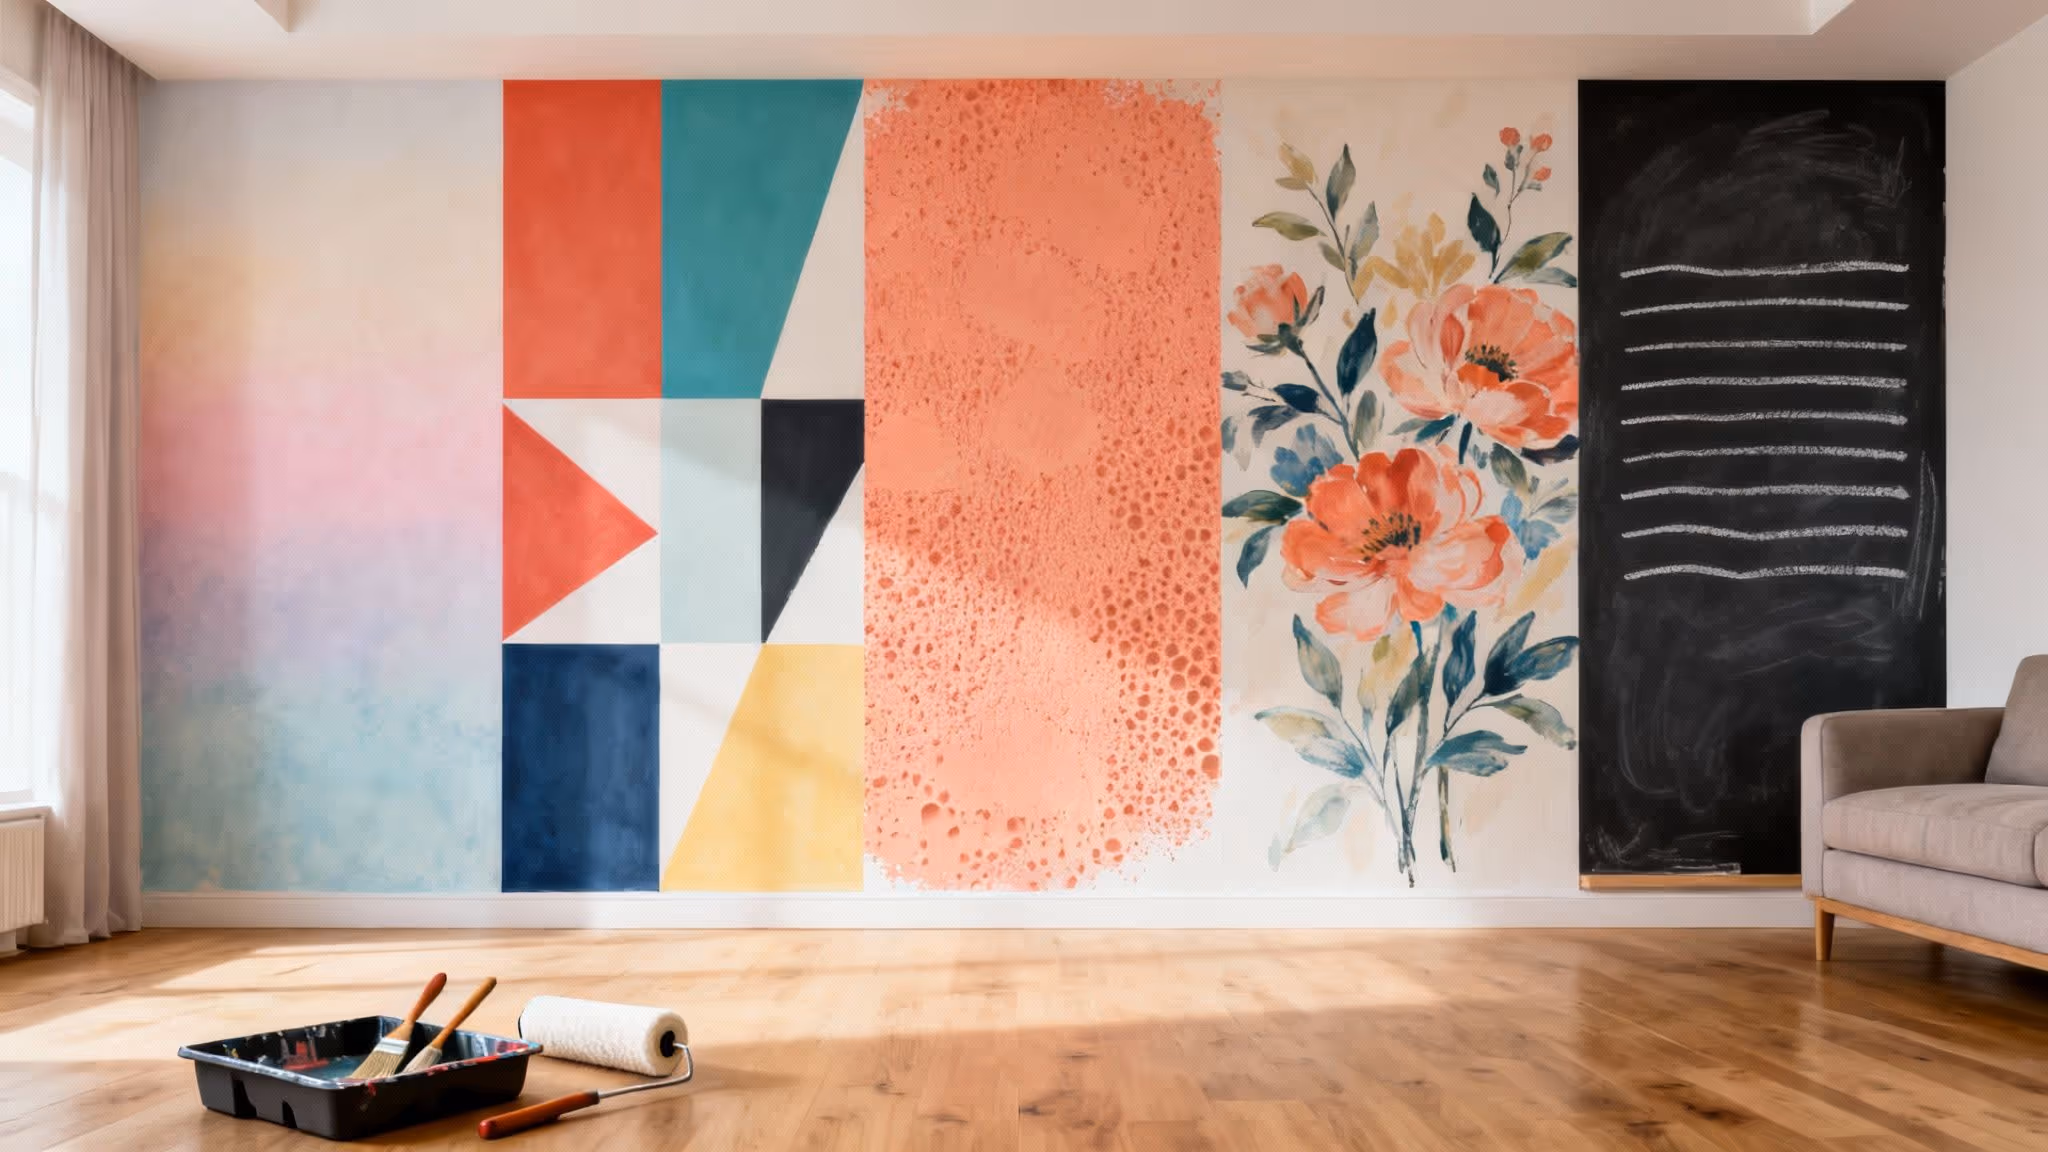
Moving beyond a simple coat of magnolia is one of the most transformative updates you can make to your living space. The right wall painting technique can redefine a room's atmosphere, create a stunning focal point, and express your unique personality without the need for a complete renovation. Whether you're a seasoned DIY enthusiast or a first-time decorator, exploring creative painting walls ideas opens up a world of possibilities that go far beyond a single, flat colour.
This guide is designed to move beyond the basics, offering a curated collection of distinct and actionable approaches to turn your walls into works of art. We will explore everything from the subtle gradients of an ombré finish to the bold impact of geometric patterns, providing the practical steps and expert tips needed to achieve a professional-looking result. Prepare to be inspired and equipped with the knowledge to refresh your home with vibrant colour, captivating texture, and sophisticated style. Consider this your definitive resource for turning a blank canvas into a statement piece that truly reflects your taste.
1. The Subtle Art of Ombré Wall Painting
The ombré wall is a sophisticated painting technique that involves blending colours seamlessly into one another, creating a beautiful gradient effect. This approach moves beyond a single flat colour, introducing depth and a sense of movement to a room. It's one of the most artistic painting walls ideas, perfect for creating a feature wall that feels both modern and ethereal.
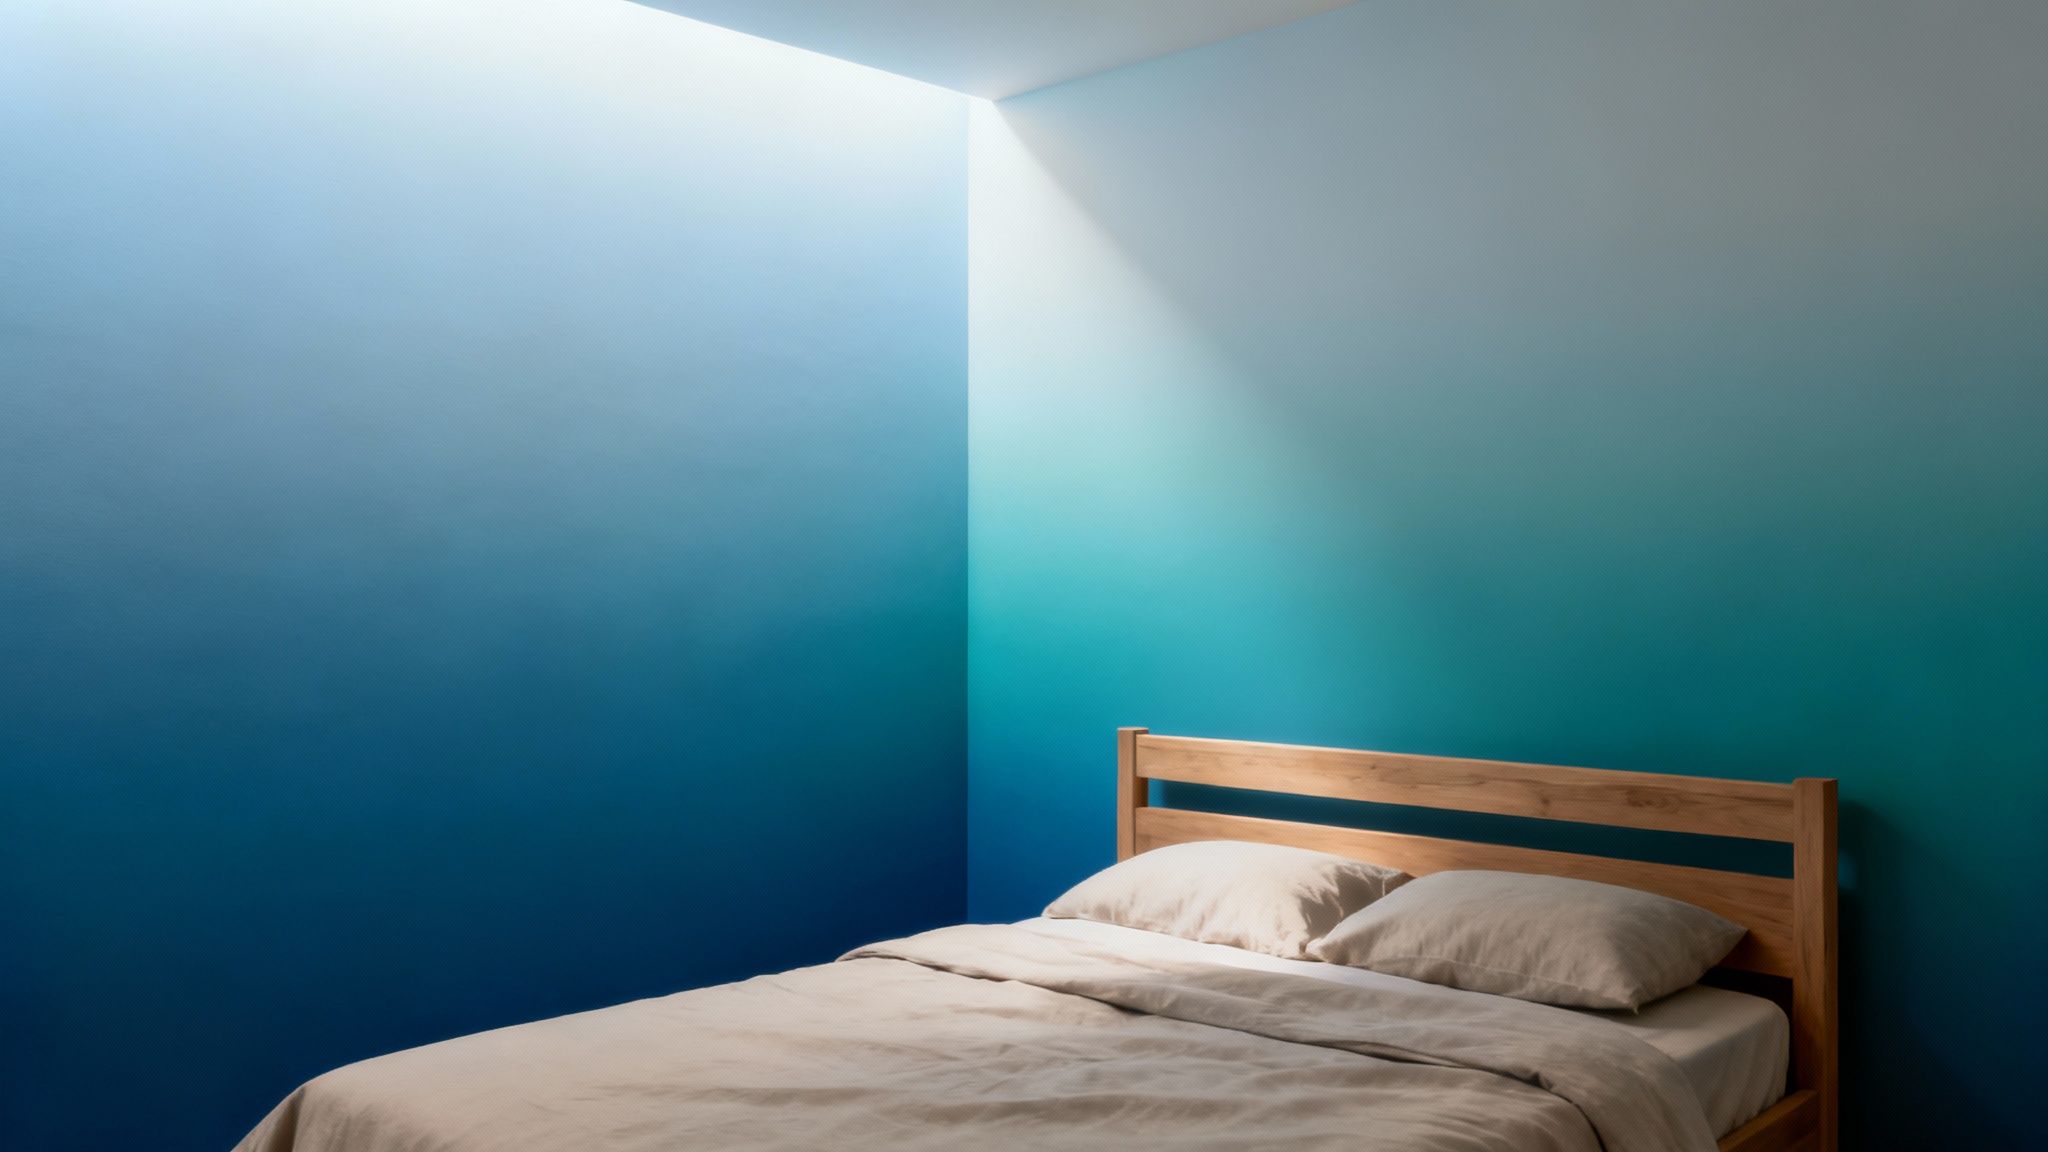
Unlike a solid accent wall, an ombré finish can make a space feel larger and more dynamic. A popular choice is a "sunset" effect, blending soft pinks into warm oranges, or a "seascape" that transitions from deep navy to a pale, misty blue. This technique works exceptionally well in bedrooms to create a calming atmosphere or in living rooms as a stunning visual centrepiece.
How to Achieve the Look
To create a successful ombré wall, careful planning is essential. Here are the key steps:
- Choose Your Colours: Select three to four shades from the same colour family, ranging from light to dark. A paint chart is your best friend here. For a subtle effect, pick adjacent shades; for more drama, choose colours with higher contrast.
- Divide and Conquer: Use a pencil and a level to lightly mark horizontal sections on your wall for each colour. Paint the darkest shade at the bottom, the lightest at the top, and the medium shades in between, leaving a small gap between each section.
- Blend While Wet: While the paint is still wet, use a clean, wide paintbrush or a small roller to blend the edges of the colours together. Use criss-cross or "X" motions to blur the lines and create a soft, gradual transition. It’s a process that requires patience, but the final result is a bespoke work of art.
2. Accent Wall Design
The accent wall is a classic and impactful design technique where one wall is painted in a contrasting or vibrant colour, while the others remain neutral. This focal point approach is one of the most versatile painting walls ideas, allowing you to introduce a pop of colour and personality into a room without overwhelming the entire space. It’s an effective way to draw the eye, highlight architectural features, or create a specific mood.
Unlike painting an entire room, an accent wall offers a lower commitment with maximum impact. It can anchor a furniture grouping, such as a dark feature wall behind a sofa in the living room, or add a touch of drama with a deep jewel tone behind a headboard in the bedroom. For home offices, a carefully chosen productive colour can enhance focus. You can find more inspiration for how this works in different spaces, including kitchens, and learn more about feature wall ideas on sprucecollective.co.uk.
How to Achieve the Look
Creating the perfect accent wall requires more than just picking a bold colour. Thoughtful execution is key to a cohesive design.
- Strategic Placement: Choose the wall you want to be the natural focal point. This is often the wall behind your main piece of furniture, like your bed or television unit, or the first wall you see upon entering the room.
- Colour Selection: Select a colour that complements your existing decor. A good rule of thumb is to choose a shade two to three times darker or more intense than your other walls. Using high-quality paint will ensure better coverage and richer colour depth.
- Consider Lighting: Ensure the accent wall receives adequate light, both natural and artificial. Good lighting prevents a dark colour from making the room feel smaller and brings out the true hue of the paint.
3. Geometric Pattern Painting
Geometric pattern painting is a highly structured and impactful technique that uses clean lines and shapes to add a modern, dynamic feel to any room. By using painter's tape to create crisp, defined patterns like triangles, hexagons, or chevrons, you can transform a plain wall into a striking piece of custom art. This is one of the most versatile painting walls ideas, allowing for endless creativity.
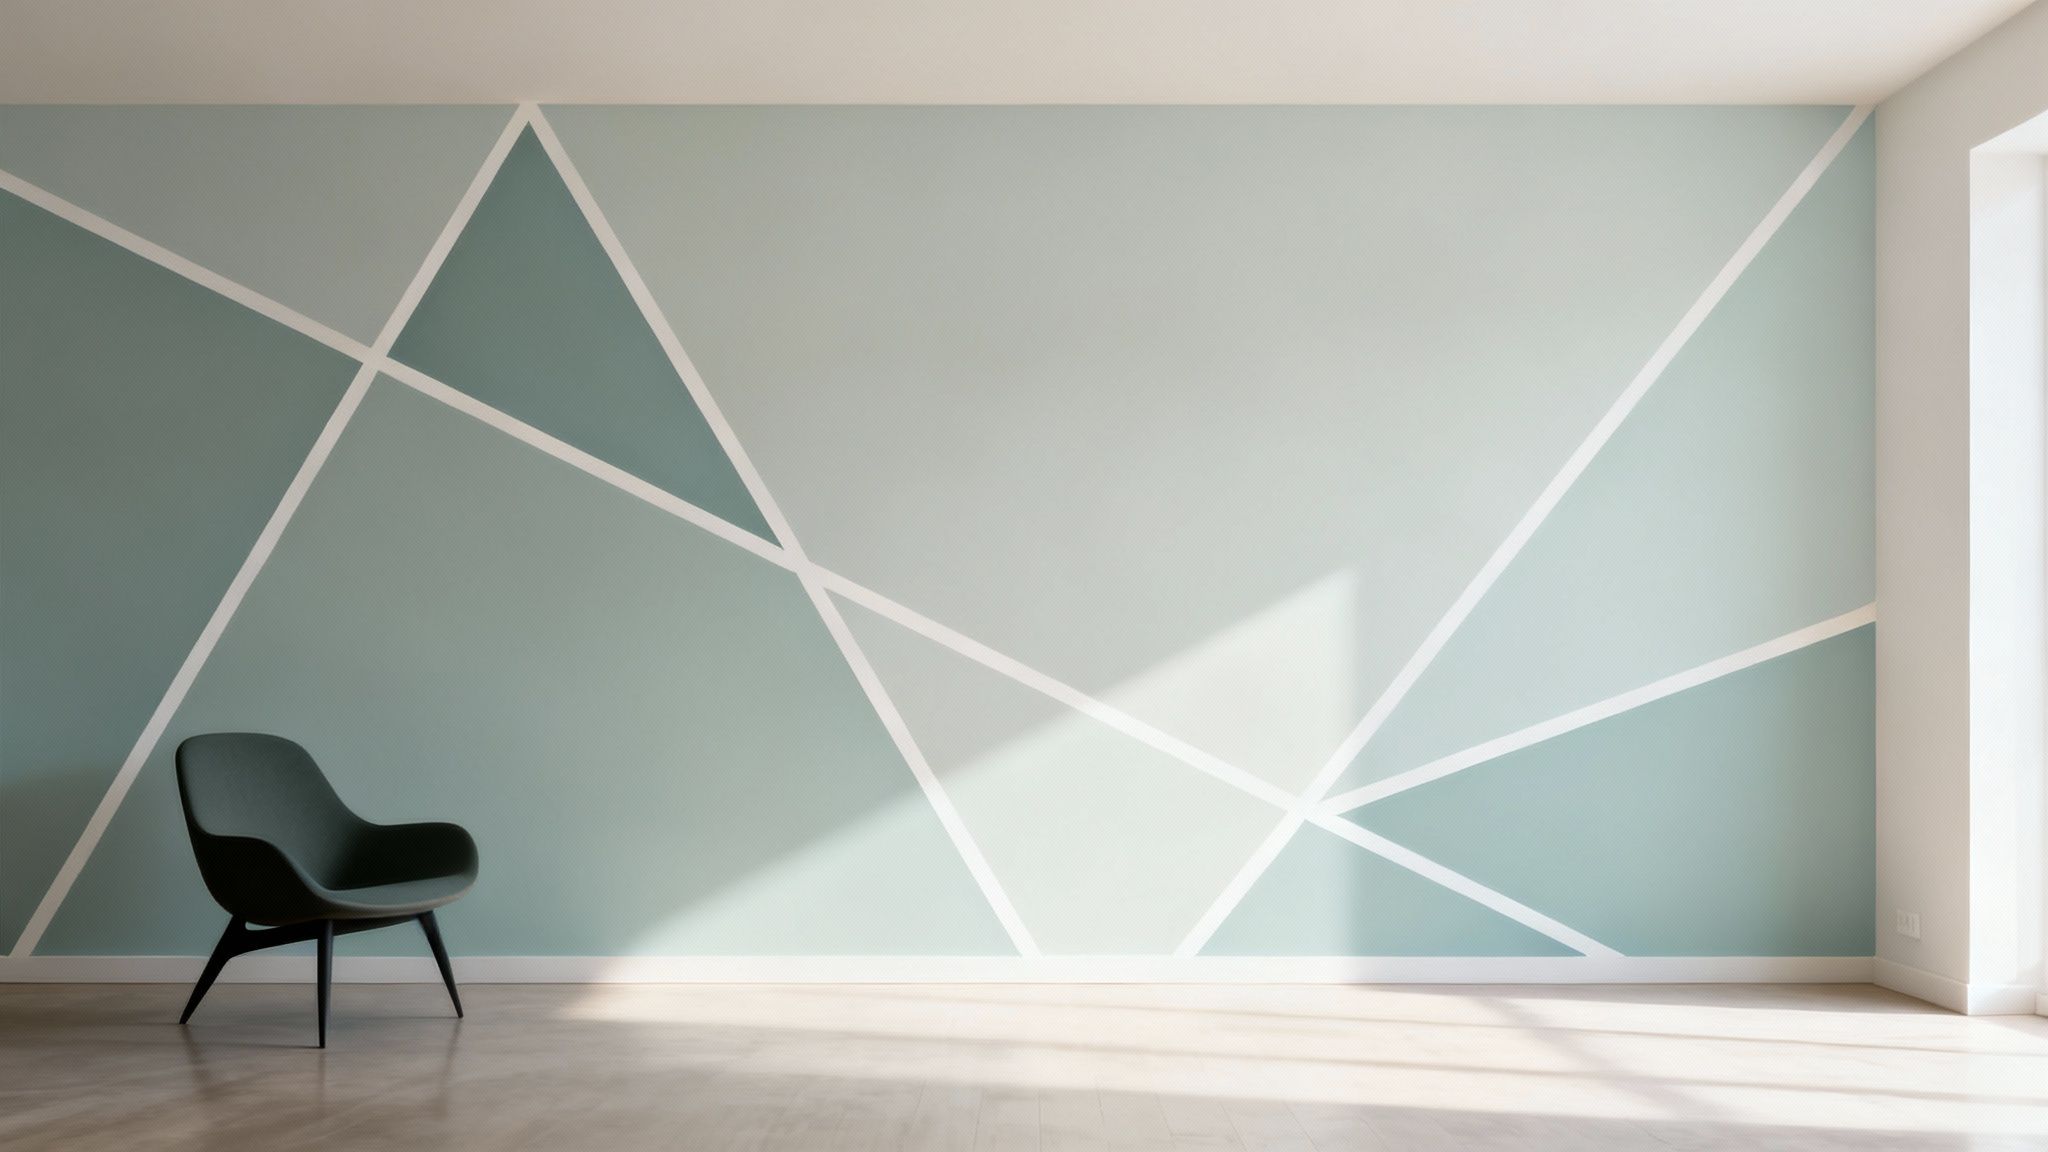
This method is perfect for creating a feature wall that demands attention without overwhelming the space. Imagine a nursery with soft, pastel-coloured triangular mountains, a home office energised by a bold honeycomb pattern, or a living room with a sophisticated Scandinavian-inspired design. The precision of geometric patterns offers a clean, organised aesthetic that complements contemporary and minimalist decor beautifully.
How to Achieve the Look
Precision is the key to a professional-looking geometric wall. Following a clear process will ensure sharp lines and a flawless finish.
- Plan Your Design: Start by sketching your pattern on paper. Use a measuring tape, pencil, and a spirit level to lightly transfer the design onto your clean, dry wall. Meticulous planning at this stage prevents mistakes later on.
- Tape with Care: Apply low-tack painter's tape firmly along your pencil lines. Press down the edges with a credit card or a putty knife to prevent paint from bleeding underneath, which is crucial for achieving those razor-sharp edges.
- Paint and Peel: Paint within the taped-off sections. For the best results, carefully peel the tape off while the paint is still slightly tacky. Pulling it off when the paint is fully dry can cause it to crack and peel away with the tape.
4. Textured Wall Painting
Textured wall painting moves beyond colour alone, introducing a tactile dimension that adds depth and character to any room. This technique uses specialised paints or application methods like sponging, rag-rolling, or stippling to create a surface with physical texture. It's an excellent choice among painting walls ideas for adding visual weight and can cleverly conceal minor imperfections like cracks or uneven surfaces.
This approach is incredibly versatile, capable of evoking different styles, from the rustic charm of a Mediterranean stucco finish to the sophisticated, raw-silk look found in luxury interiors. A textured accent wall can become a focal point, adding a layer of warmth and sophistication that a flat paint simply cannot achieve. It engages both sight and touch, creating a more immersive and interesting living space.
How to Achieve the Look
Creating a beautiful textured finish requires the right tools and a methodical approach. Here’s how to get started:
- Select Your Method: Decide on the texture you want. You can use pre-mixed textured paint for a consistent finish or create your own effect using standard paint with tools like a natural sea sponge, a crumpled rag, or a stippling brush.
- Practise First: Before committing to the wall, practise your chosen technique on a spare piece of drywall or a large sheet of cardboard. This allows you to perfect the pressure and motion needed to achieve your desired look.
- Work in Small Sections: To maintain a consistent pattern and avoid visible seams, work in small, manageable sections (e.g., one square metre at a time). Complete one area before moving to the next, blending the edges as you go for a seamless appearance.
5. Color Blocking
Colour blocking is a bold and graphic painting technique that uses large, solid blocks of contrasting or complementary colours to create a visually striking effect. This modern approach transforms walls into canvases, treating them as integral components of the room's overall design. It's one of the most dynamic painting walls ideas for anyone looking to make a confident, artistic statement.
Unlike a simple feature wall, colour blocking can define spaces within an open-plan room, highlight architectural details, or simply inject a dose of personality. It's often seen in contemporary art galleries and fashion-forward boutiques but works just as well in a modern living room, a creative home office, or a playful children's bedroom. The key is to use clean lines and well-chosen palettes to create a balanced yet impactful composition.
How to Achieve the Look
Precision and a good eye for colour are crucial for successful colour blocking. Here are the steps to get it right:
- Select Your Palette: Start with two or three colours. Use a colour wheel to find harmonious combinations, such as complementary (opposite) or analogous (adjacent) colours. Creating a mood board can help you visualise the final look and ensure the colours work together. For guidance, explore how to choose paint colours on sprucecollective.co.uk.
- Plan Your Design: Sketch your design on paper first. Decide where the blocks of colour will go and how they will interact with furniture and room features. Use a pencil, a level, and a tape measure to transfer your design onto the wall.
- Execute with Precision: Use high-quality painter's tape to create sharp, clean edges for each block. Paint one colour at a time, allowing it to dry completely before taping over it to paint the next section. Remove the tape while the final coat is still slightly wet for the crispest lines.
6. Mural Painting
Mural painting is an ambitious and highly artistic technique that transforms an entire wall into a bespoke piece of art. This approach goes far beyond simple paint colours, turning a surface into a large-scale canvas for everything from photorealistic scenes to abstract compositions. As one of the most impactful painting walls ideas, a mural becomes an immediate and powerful focal point, telling a story and infusing a room with unique character.
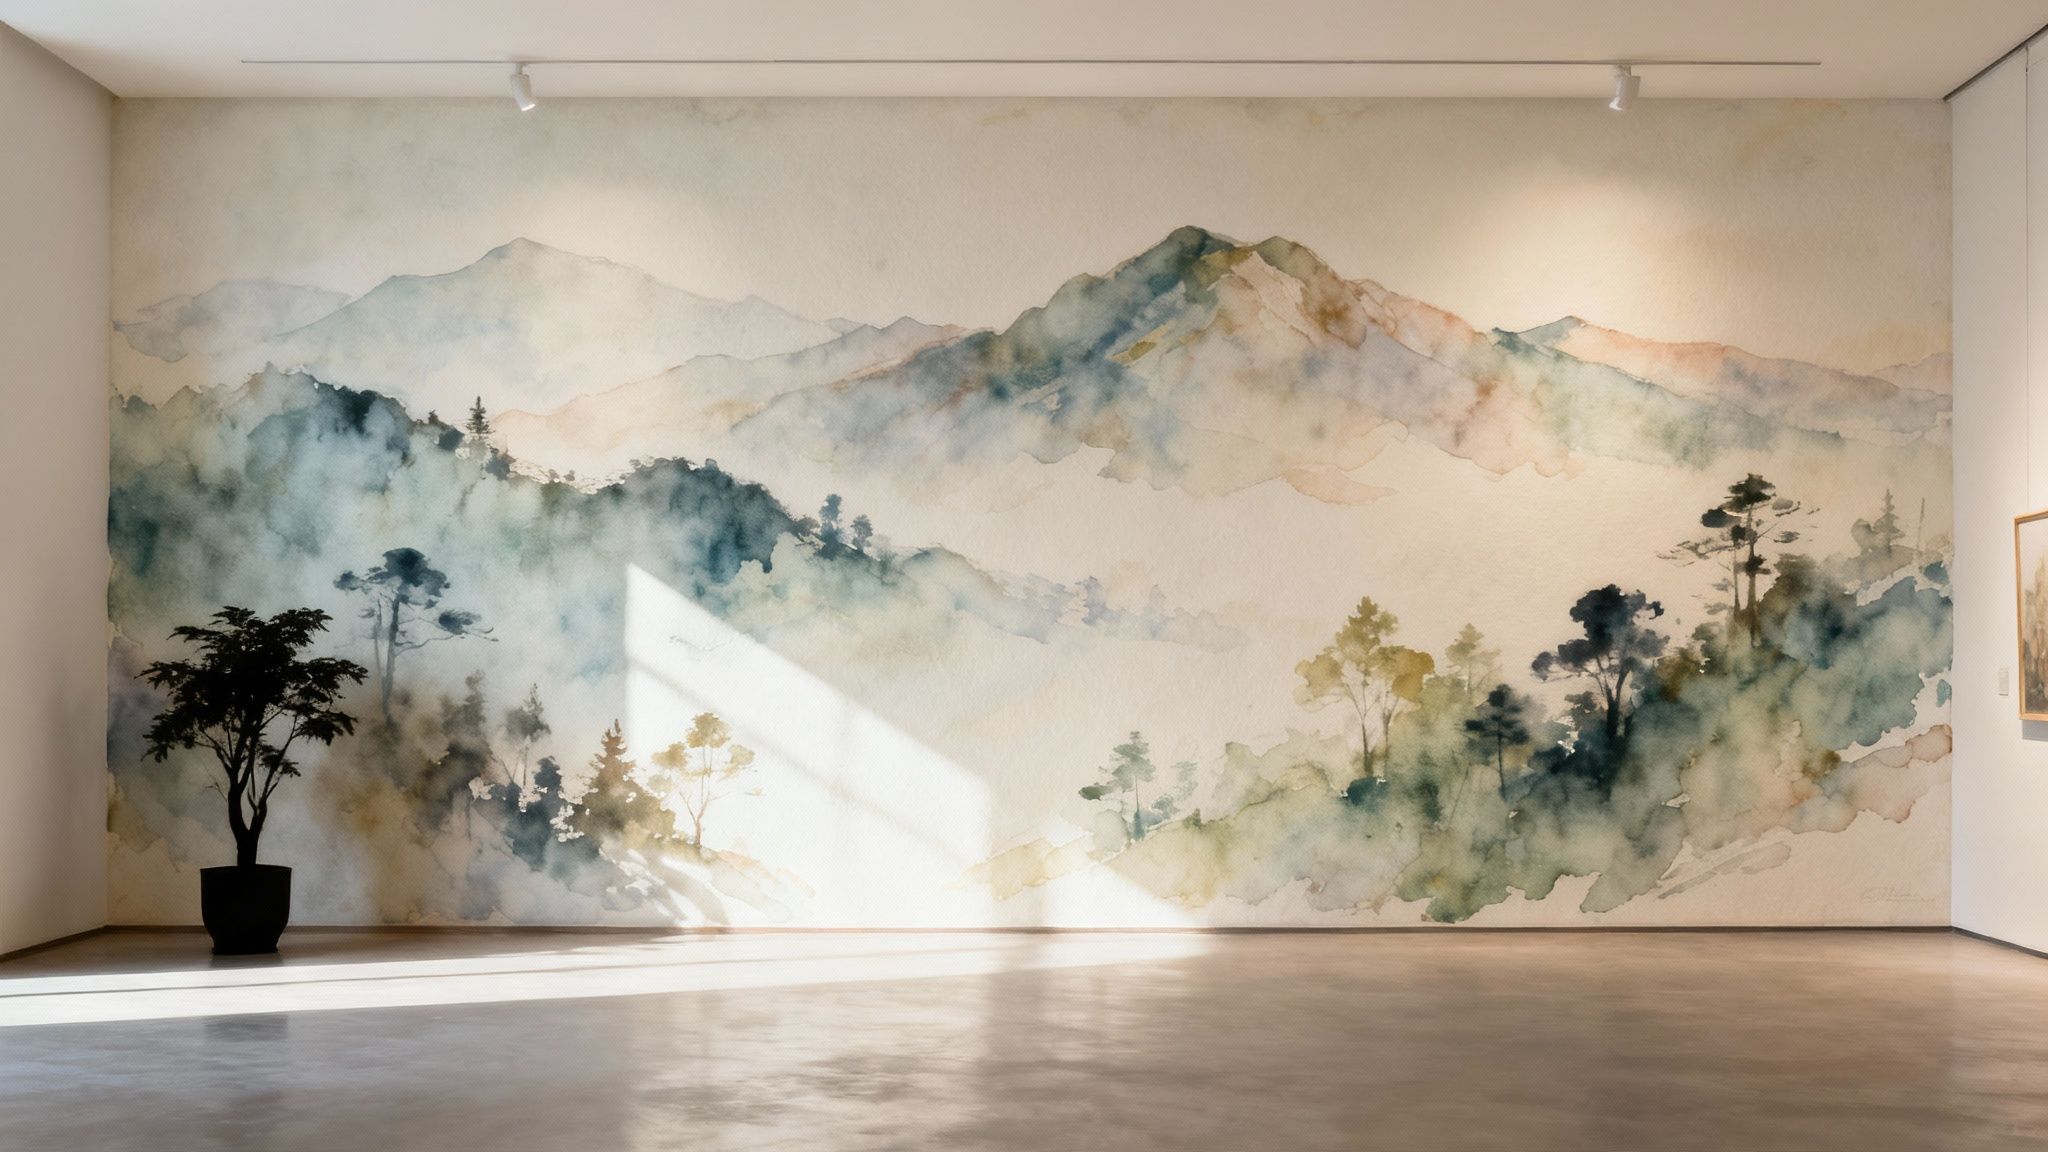
From a tranquil, nature-inspired landscape in a bedroom to a vibrant, graphic design in a commercial space, murals offer limitless creative potential. They are particularly effective in children's rooms, where fantasy landscapes can spark imagination, or in dining rooms to create an immersive atmosphere. This technique essentially integrates fine art directly into your home's architecture, making a bold and unforgettable statement.
How to Achieve the Look
Creating a mural is a significant undertaking that requires careful artistic planning and execution. Here’s how to approach it:
- Design and Plan: Start with a detailed sketch or a digital mock-up. This is crucial for finalising the composition, colour palette, and scale before any paint touches the wall. Consider the room’s lighting and existing décor to ensure the design feels integrated.
- Prepare the Canvas: Your wall must be perfectly smooth and primed. Any imperfections will be magnified in the final artwork. A high-quality primer creates an ideal surface for the paint to adhere to, ensuring vibrant colours and longevity.
- Execution and Protection: For complex designs, hiring a professional muralist is highly recommended. If you're tackling it yourself, transfer your design using a projector or grid method. Once complete and fully dry, apply a clear matte or gloss sealant to protect the artwork from scuffs and fading.
7. Metallic and Specialty Paint Finishes
For a touch of glamour and opulence, metallic and specialty paint finishes offer a luminous quality that standard paints cannot replicate. This sophisticated technique uses paints infused with metal pigments, such as mica, to create a surface that catches and reflects light, adding depth and a subtle shimmer to your walls. It’s an exceptional choice among painting walls ideas for creating a high-impact accent wall that feels luxurious and modern.
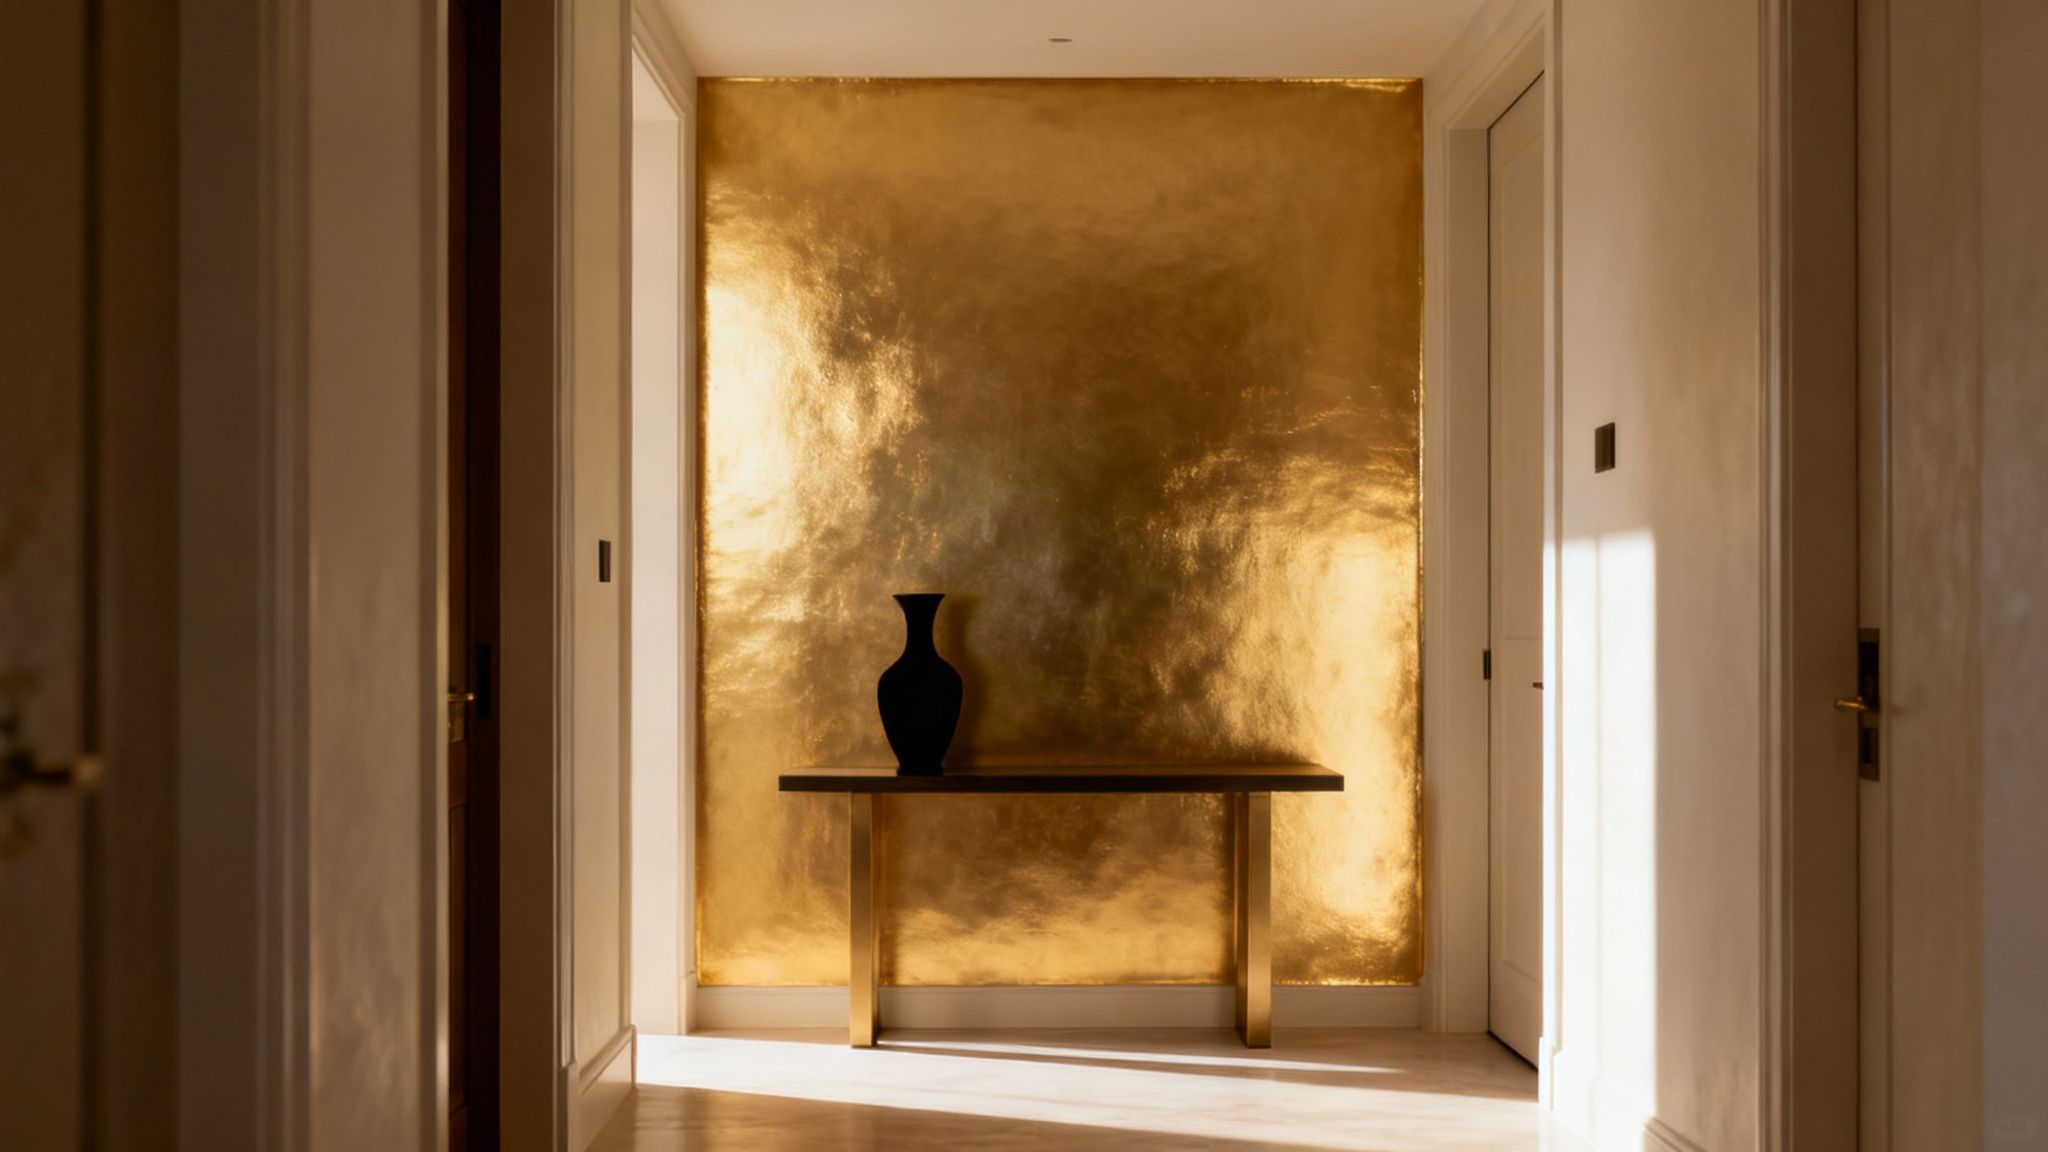
Often seen in high-end hotels and executive offices, metallic finishes in gold, silver, copper, or bronze can transform a space from ordinary to extraordinary. A pearlescent finish, for example, can bring a soft, ethereal glow to a bedroom, while a bold copper accent wall can add warmth and drama to a dining room. The reflective nature of these paints can also make smaller or darker rooms feel brighter and more expansive.
How to Achieve the Look
Achieving a flawless metallic finish requires precision and proper surface preparation. Here are the key steps for a professional-looking result:
- Prepare the Surface: Metallic paints will highlight any imperfections. Ensure your wall is perfectly smooth by filling any holes or cracks and sanding it down. A pristine surface is non-negotiable for a high-quality finish.
- Prime Correctly: Apply a high-quality primer tinted to a similar shade as your metallic paint. This creates a uniform base, ensuring the metallic effect is consistent and vibrant across the entire wall.
- Apply with Care: Use a high-quality roller or brush to apply the paint in thin, even coats. Work in one direction to avoid streaks and maintain the integrity of the metallic flecks. The sheen level is also crucial; you can explore the differences between sheens like eggshell and satin to select the perfect lustre for your project.
- Test the Lighting: Before committing, test a small patch and observe how it looks in different lighting conditions throughout the day. The reflective quality of metallic paint means its appearance can change dramatically with the light.
8. The Rich Texture of Colourwashing
The colourwash technique, also known as glazing, is a layered painting approach that imparts a sense of age, depth, and subtle texture to walls. It involves applying thin, translucent layers of glaze over a solid base colour, creating a soft, mottled effect reminiscent of historical European interiors. This is one of the more timeless painting walls ideas, perfect for adding character and a sophisticated, weathered charm to a space.
Unlike a flat paint finish, colourwashing creates a complex, dimensional surface that beautifully catches the light. It's an excellent choice for evoking the feel of a Tuscan villa, a French country home, or a rustic farmhouse. The technique can make a room feel cosy and established, and lighter colour choices can even help to brighten a space by adding luminosity. For more tips on enhancing a room’s brightness, you can explore ideas for how to brighten a dark room.
How to Achieve the Look
Achieving an authentic colourwash finish requires a delicate touch and patience. The key is in the layering process.
- Prepare Your Glaze: Start with a solid, light-coloured base coat that is completely dry. Mix your darker top colour with a glazing medium; a common ratio is one part paint to four parts glaze. This makes the paint translucent.
- Apply in Sections: Work in small, manageable sections (about one square metre) to prevent the glaze from drying too quickly. Apply the glaze over the base coat using a wide brush in random, criss-crossing strokes.
- Soften and Blend: While the glaze is still wet, use a soft, clean rag, a cheesecloth, or a sea sponge to gently blot and blend the glaze. This creates the signature mottled, cloudy effect. The goal is to achieve an organic, imperfect finish rather than a uniform one. Practice on a sample board first to perfect your technique.
9. Stencil Wall Painting
Stencil wall painting offers a fantastic way to introduce intricate patterns and repeatable designs without needing freehand artistic skill. This technique uses a pre-cut template to apply paint, creating crisp, professional-looking motifs. It's one of the most versatile painting walls ideas, allowing you to achieve anything from a subtle, repeating geometric pattern to a bold, singular mural-like image.
Unlike wallpaper, stencilling gives you complete control over colour and placement, making it a highly customisable and budget-friendly alternative. It’s perfect for creating an elegant damask feature wall in a dining room, a playful pattern of stars in a nursery, or a sophisticated mandala behind a bed. The precision of stencils ensures a polished finish that can mimic high-end wallpaper or custom artwork.
How to Achieve the Look
Achieving clean, sharp lines with a stencil requires a bit of patience and the right technique. Here are the fundamental steps:
- Secure Your Stencil: Firmly attach your stencil to the wall using painter's tape or a light-tack repositionable spray adhesive. This is crucial to prevent the stencil from shifting during painting and causing smudges.
- Use the Right Tools: A stencil brush with a flat top or a high-density foam roller is ideal. Avoid overloading your brush or roller with paint, as excess can easily seep underneath the stencil's edges.
- Apply Paint Carefully: Use a "dry brush" technique. Offload most of the paint from your brush onto a paper towel before dabbing or swirling it over the stencil openings. Build up the colour in thin, even coats rather than applying one thick layer. This prevents bleeding and results in much cleaner lines.
- Plan Your Pattern: For repeating patterns, use the stencil's registration marks to align it perfectly for the next application. A level and pencil can help ensure your design stays straight across the wall.
10. Ombre Wall with Furniture Integration
Taking the ombré concept a step further, this advanced technique involves designing a gradient wall that intentionally complements and integrates with your furniture. Instead of a floor-to-ceiling effect, the colour transition is strategically placed to align with key pieces, creating a cohesive and highly customised look. This is one of the more thoughtful painting walls ideas, turning a feature wall into an element that feels completely unified with the room's decor.
Imagine a gradient in a bedroom that starts just above the headboard, blending upwards into a softer hue that matches the bedding. In a living room, the transition could begin at sofa height, with the darkest shade anchoring the seating area. This approach creates a deliberate visual flow, making the furniture appear as if it's a natural extension of the wall itself. It's particularly effective for adding depth and intention without overwhelming the space.
How to Achieve the Look
Precision planning is the key to successfully integrating an ombré wall with your furniture.
- Plan the Entire Room First: This technique works best when the furniture and decor are already chosen. Your paint colours should be selected to enhance these existing pieces, not compete with them.
- Create a Visual Map: Take photos of your furniture against the wall. Use painter's tape to mark the exact heights where you want the colour transitions to begin and end, such as the top of a console table or the bottom of a floating shelf.
- Test Colours In Situ: Paint large samples of your chosen gradient colours on poster board and place them behind your furniture. Observe how they look in both natural and artificial light at different times of the day before committing to the full wall.
- Blend with Purpose: When blending, focus on creating the smoothest transition at the key furniture-level lines. The goal is to make the point of integration appear seamless and intentional. For more inspiration, you can learn more about selecting the right colours for a living room.
Side-by-Side Comparison: 10 Wall Painting Ideas
From Idea to Implementation: Your Next Creative Project
We've journeyed through a spectrum of transformative painting walls ideas, from the subtle gradient of an ombré finish to the structured boldness of colour blocking and the bespoke artistry of a hand-painted mural. Each technique offers a unique pathway to revitalise your living space, proving that a can of paint and a clear vision are among the most powerful tools in home design. The possibilities are truly as boundless as your imagination.
The central message woven through these concepts is one of empowerment. Whether you're a seasoned DIYer or a novice looking to make your first mark, these ideas are designed to be accessible. You've seen how simple tools like painter's tape can create complex geometric patterns and how basic sponges can produce an elegant, textured colourwash. The barrier to entry for creating a professionally finished, high-impact wall is lower than you might think.
Key Takeaways for a Flawless Finish
Before you begin your project, let’s distil our exploration into a few core principles that will guide you from inspiration to a stunning final result:
- Preparation is Paramount: The success of any paint job lies in the prep work. Meticulous cleaning, sanding, and priming create the perfect canvas. Rushing this stage will almost certainly compromise the longevity and appearance of your finish.
- Embrace Experimentation: Don't be afraid to test your ideas. Use a large piece of cardboard or a discreet section of wall to sample colours and practise your chosen technique. This step builds confidence and ensures the final look aligns with your vision.
- Precision is Your Ally: From establishing a level line for an accent wall to carefully applying stencils, precision makes all the difference. Take your time with measurements and masking to achieve those crisp, clean lines that define a polished project.
Your Action Plan for Transformation
Feeling inspired? The next step is to translate that creative spark into action. Begin by selecting the one or two painting walls ideas that truly resonate with the atmosphere you want to create in a specific room. Consider the room's function, existing furniture, and natural light.
Once you have a concept, break it down into manageable steps. Create a detailed list of supplies, from the specific paint sheens and colours to the right brushes, rollers, and applicators. Dedicate a weekend to the project, allowing ample time for each stage, including the crucial drying periods between coats. Remember, paint is one of the most cost-effective and reversible design choices you can make. If you dare to be bold, you can always paint over it later. This is your opportunity to play, to create, and to craft a home that is a true reflection of your personal style. So, pick up that brush and begin the rewarding journey of turning a blank wall into your next masterpiece.


